How to use Unreal Engine for compositing
We test out whether Unreal’s much-vaunted new motion graphics tooling can match up against After Effects.
Most of us think of motion graphics and After Effects in the same breath. Not only has it been the world’s most popular mograph and compositing tool, its timeline style of animation control is similar to our common video editing tools. Other compositors such as Flame, Nuke and Fusion are node-based and offer more flexibility. But that process takes a certain frame of mind; even node junkies occasionally get too burned out to deal with it.
This year, we’re seeing a minor exodus of creatives from Adobe, and an increase of creatives moving to Linux, leaving many without any access to Adobe or After Effects. Then there’s the buzz about Epic Games’ new motion designer module for Unreal Engine, and how it’s an After Effects killer.
Any After Effects user will tell you two things: first that the two interfaces are similar; and second that Unreal’s 3D tools blow away After Effects’ implementation. That leaves just one question: how well does Unreal replicate After Effects’ 2D compositing?
While Unreal is a powerful and capable program (see our review here), like so much high-end software it can be obtuse for new users. Although there’s a lot of hype about the motion graphics module and how much it resembles After Effects, it’s not a replacement yet. But there’s nothing preventing Epic from cleaning up the issues and making Unreal the After Effects destroyer some claim. If your needs lean towards 3D graphics for TV bumpers, commercials and the like, Unreal’s Motion Design could be an excellent tool for you, especially as it develops.
If you’re keen to get in on the ground early, we’ll take a look at the compositing process within Unreal in this tutorial.
01. Get set up
Unreal Engine is free to download and free to use. It’s even free to develop commercial products with it as long as the annual gross revenue stays under $1 million. The install process is a bit more laborious than with most software, and will need upwards of 150GB of valuable hard drive space by the time it’s done. On your first run, create a new blank project, which will open in the main interface. While it’s titled a blank project, it won’t be empty and will have a number of locked items, but you can ignore these for now.
02. Load the plugins
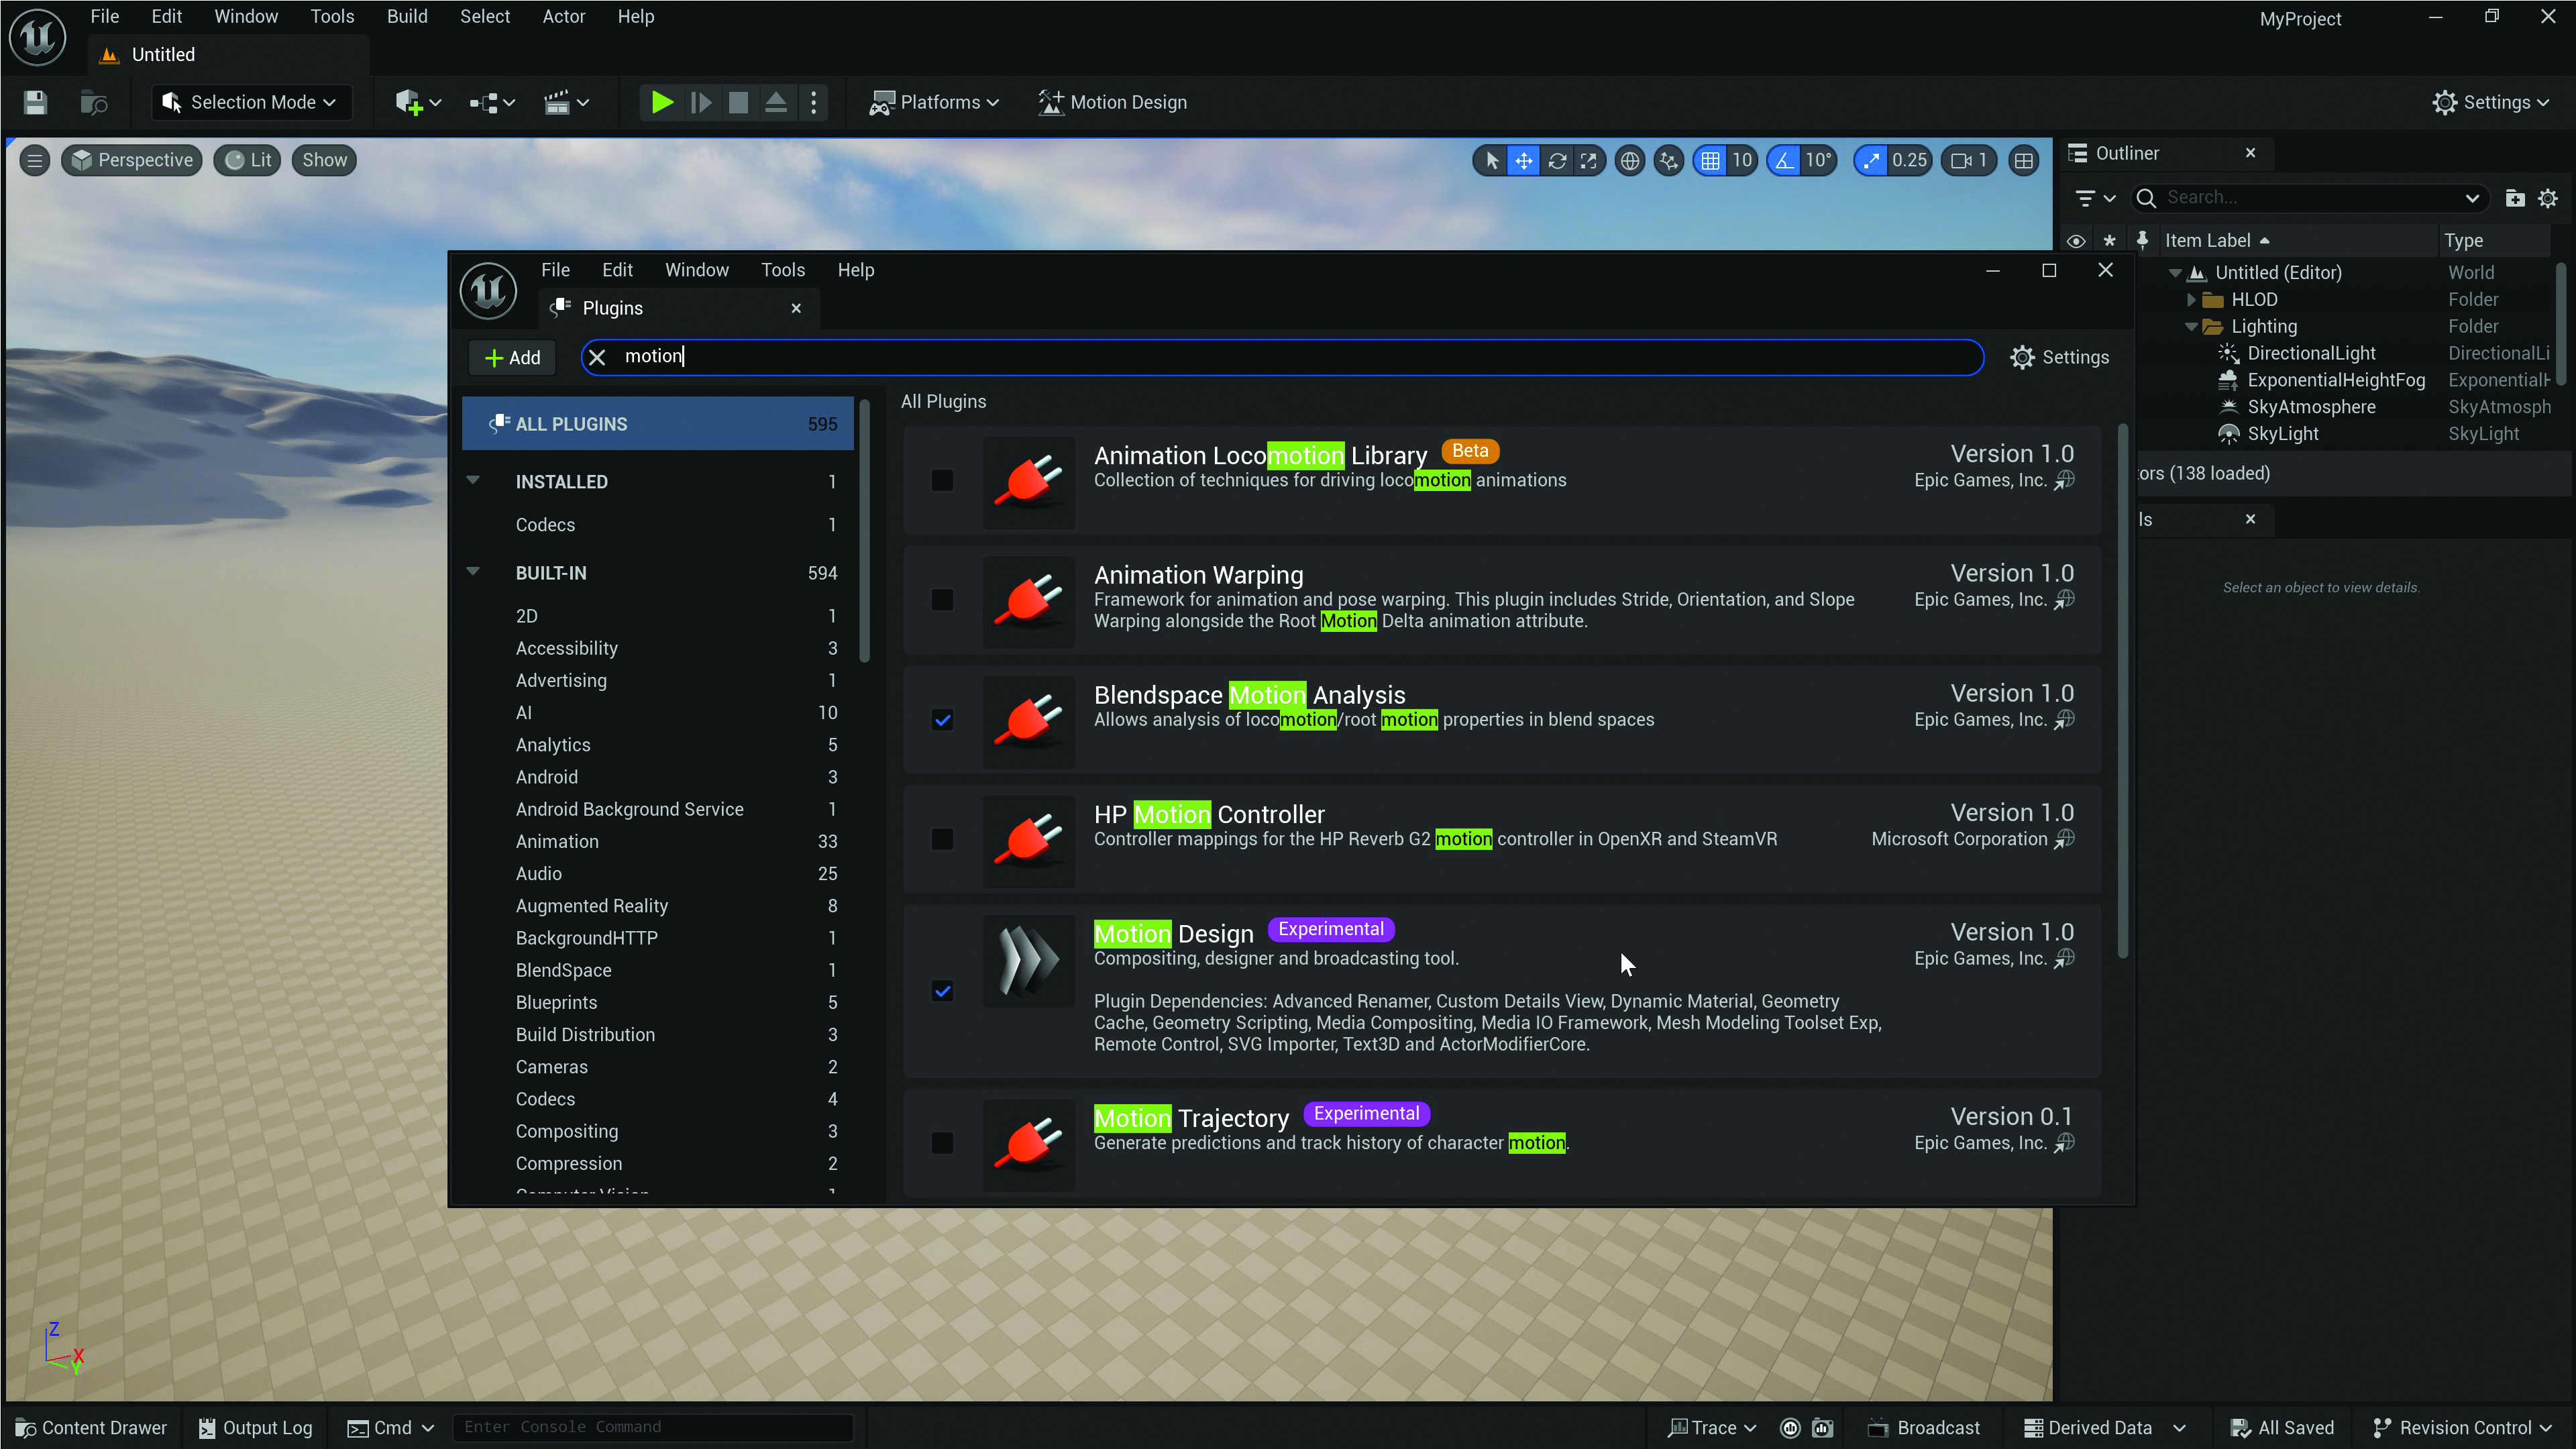
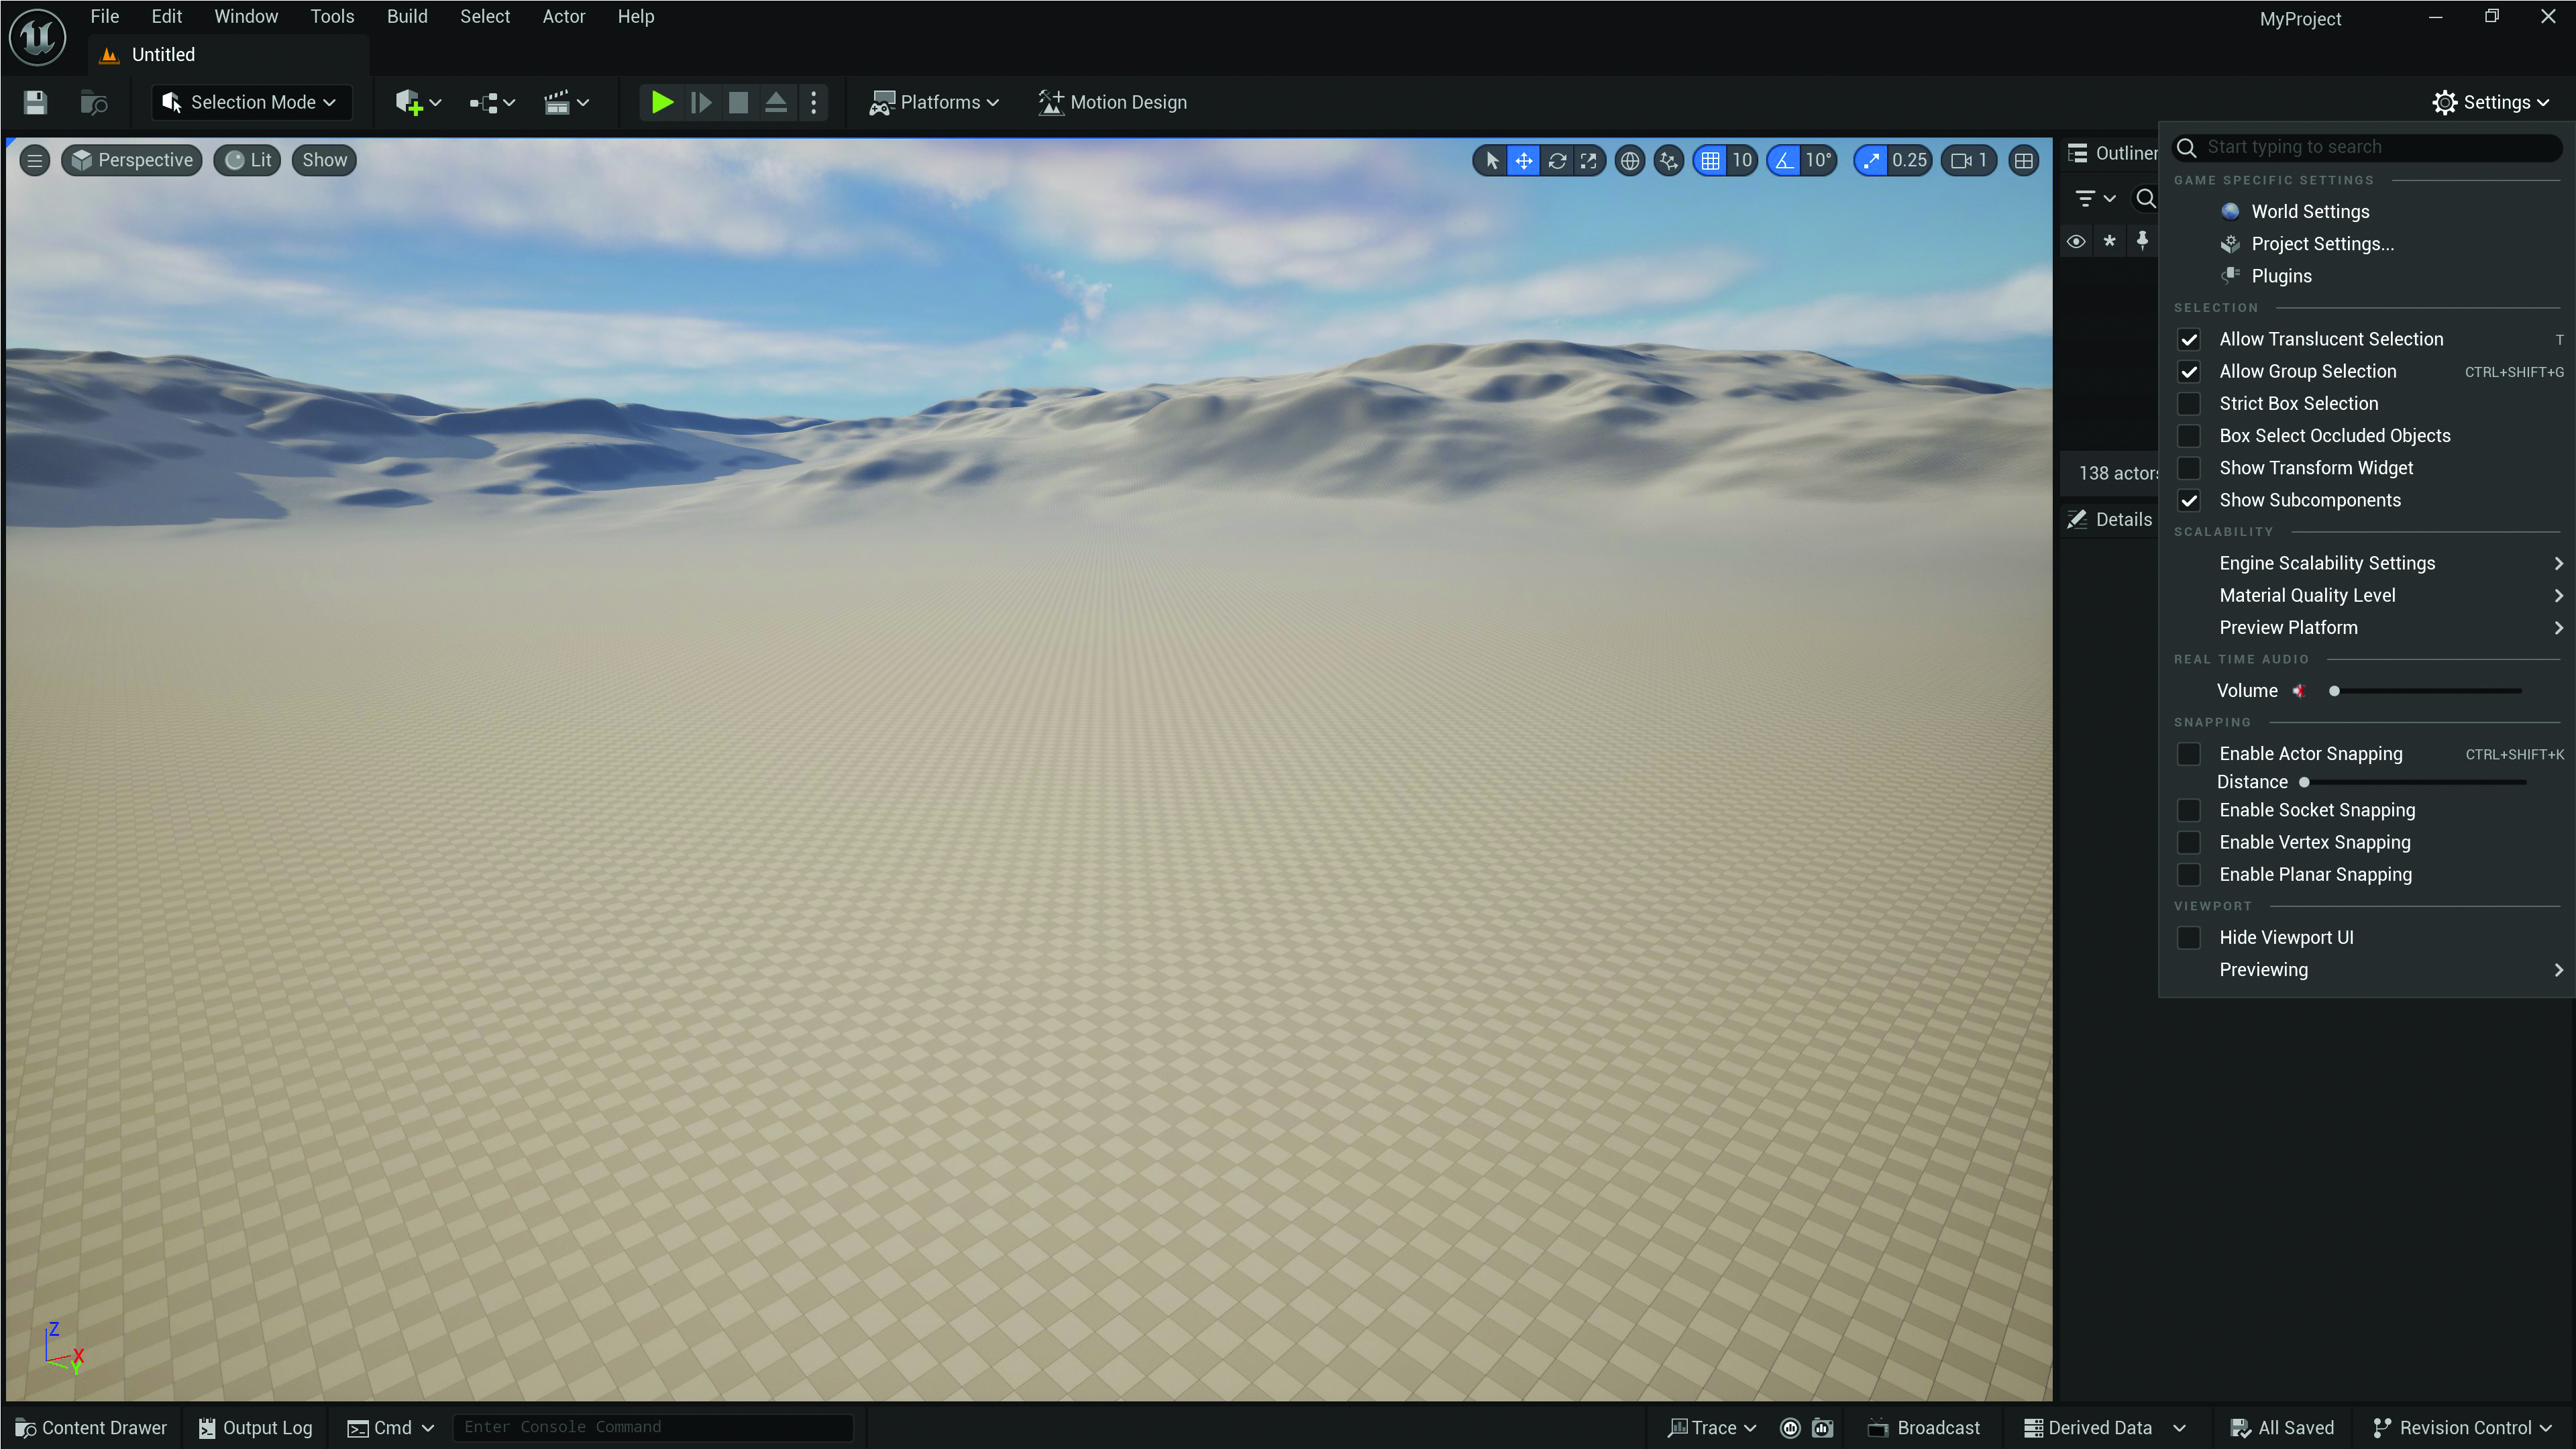
Under the Settings button in the top-right corner of the interface, select the Plugins option. Type “Motion” into the search bar at the top of the plugins window and enable the Motion Design plugin from the list. While we’re here, let’s also turn on the Electra Media Player and Movie Render Queue plugins. Hit the Restart button, and a few moments later you should be relaunched into the main window, but now with some Motion Design options across the top.
03. Enter the motion design mode
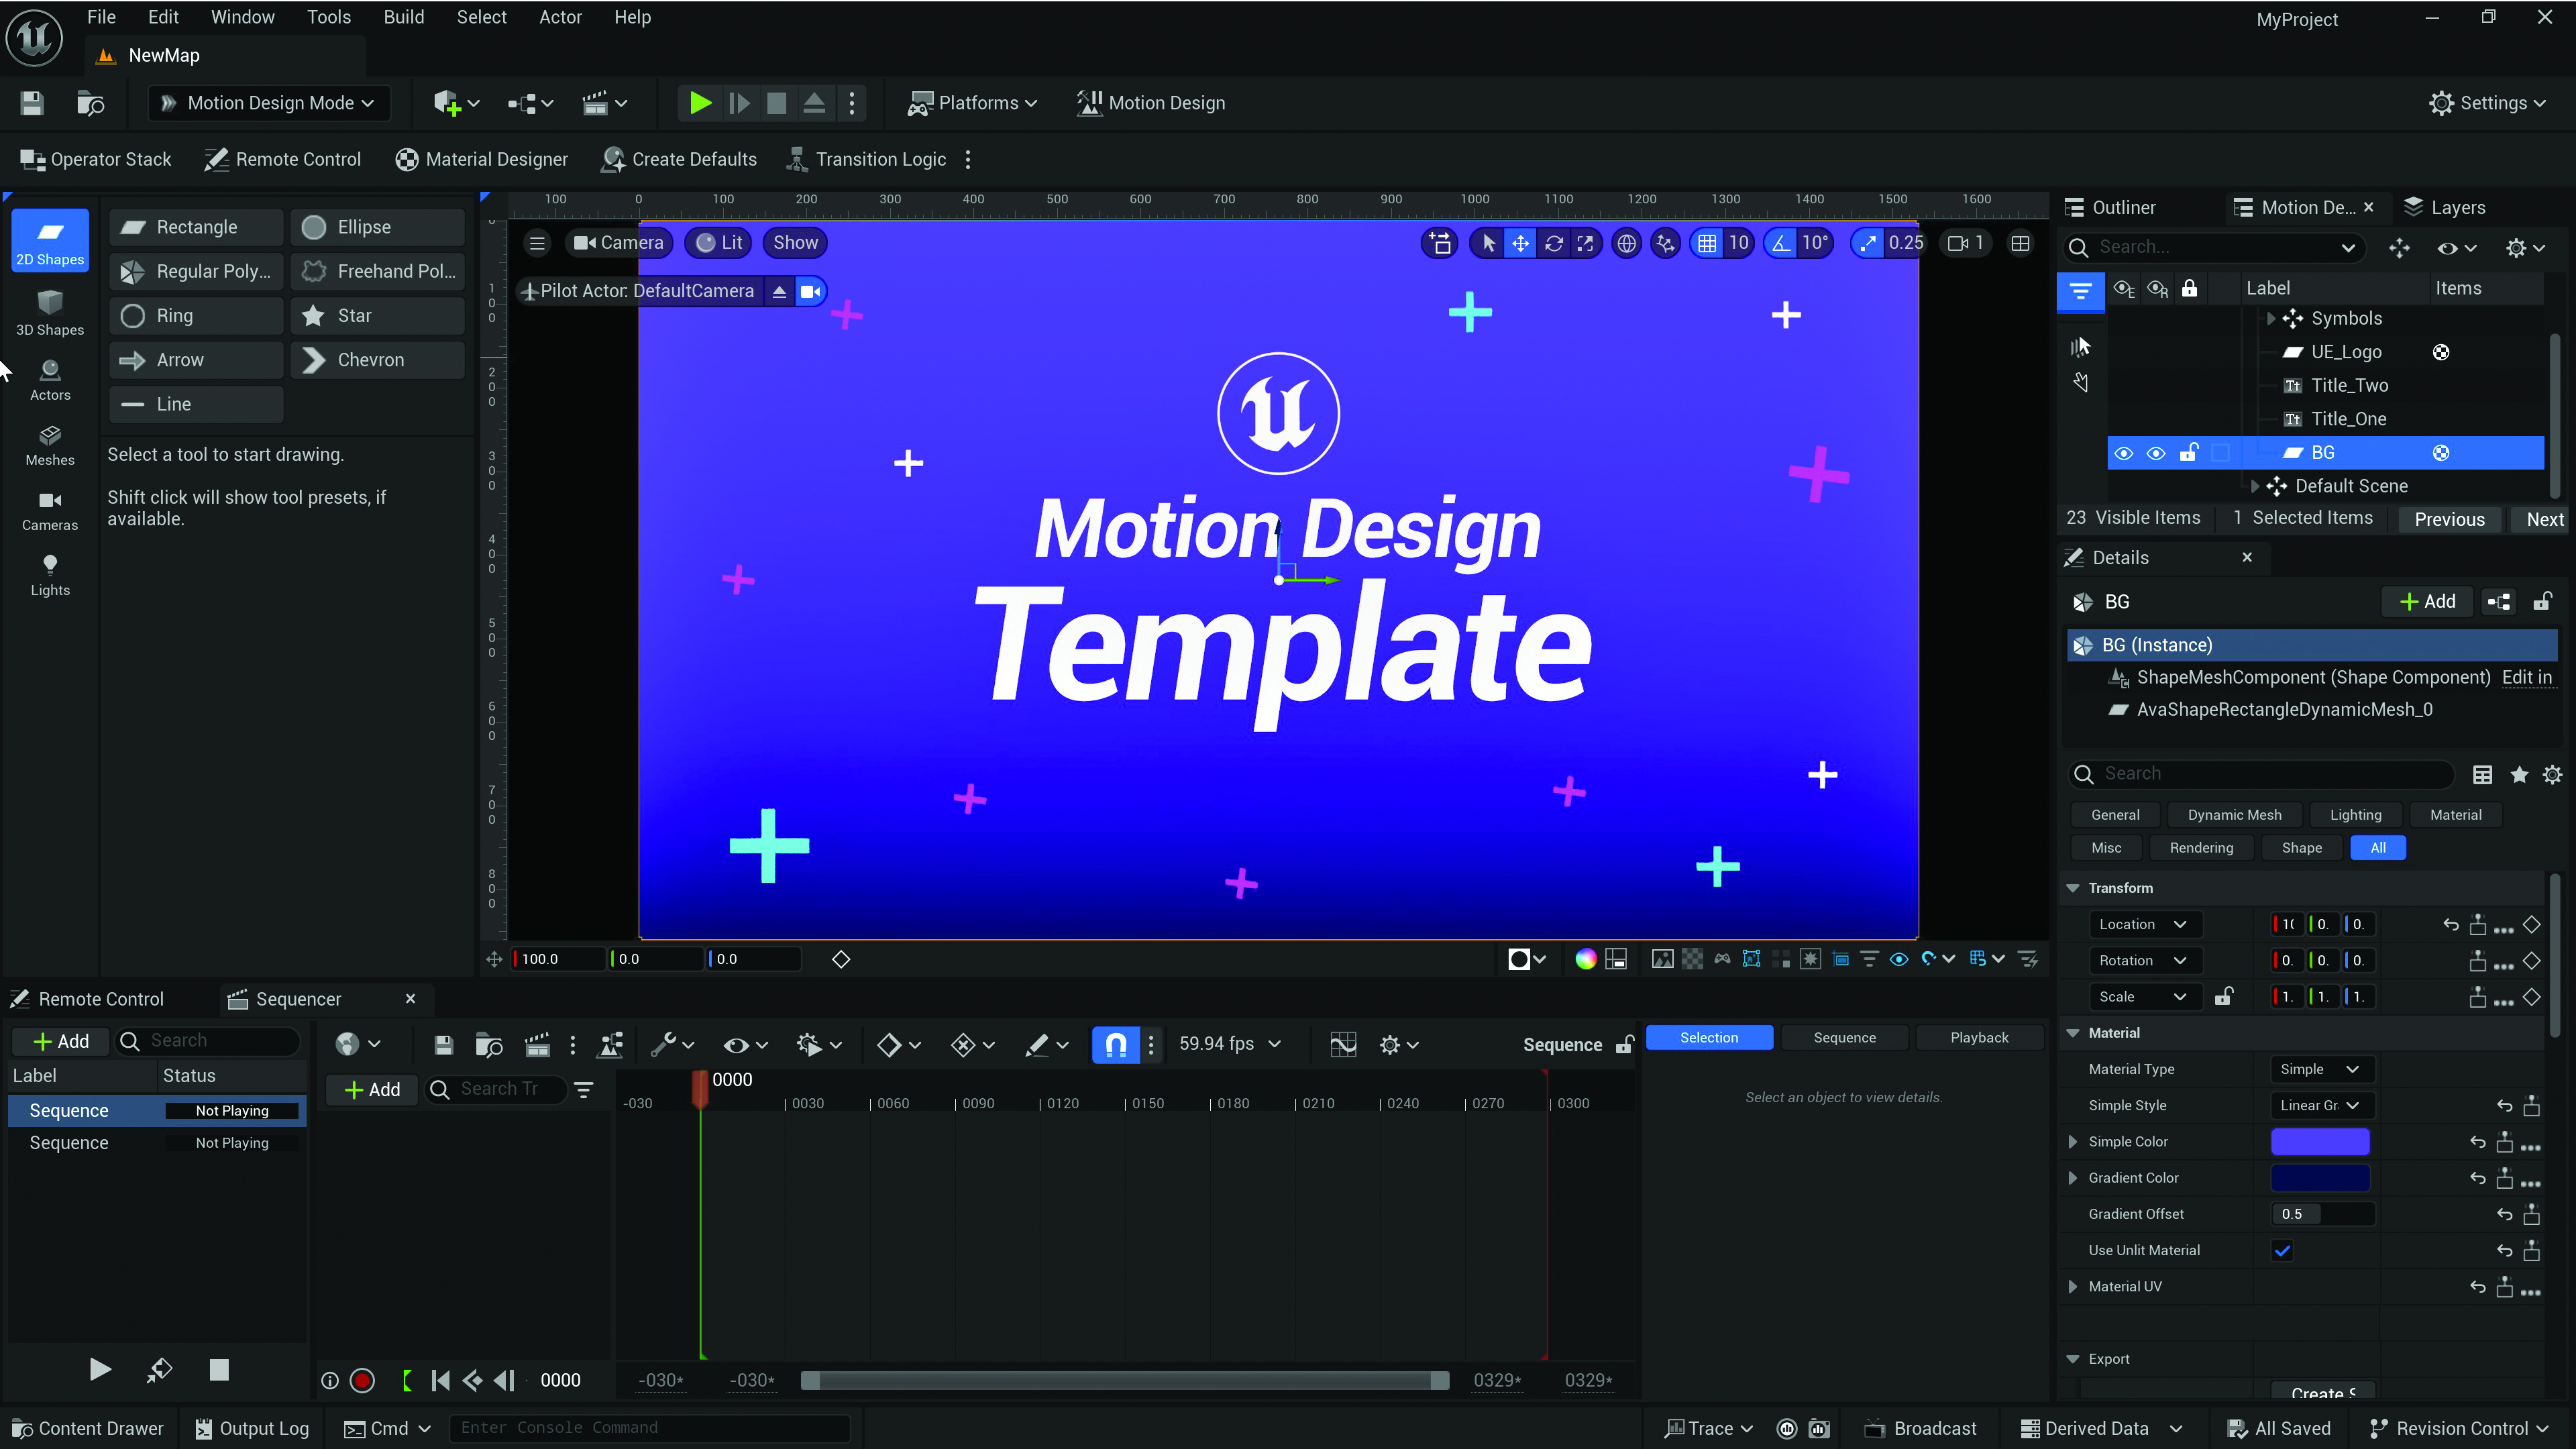
Once the project is loaded, select File>New Level to bring up a new window and choose the Motion Design option. Think of this like a pre-comp in After Effects. Open up the Selection dropdown menu located on the top-left side of the screen, then select Motion Design Mode. To get a blank scene, select all the items in the Motion Design Outliner and delete them. Just above the canvas, click on Create Defaults and then Spawn. This will create your default camera, post-process and two lights.
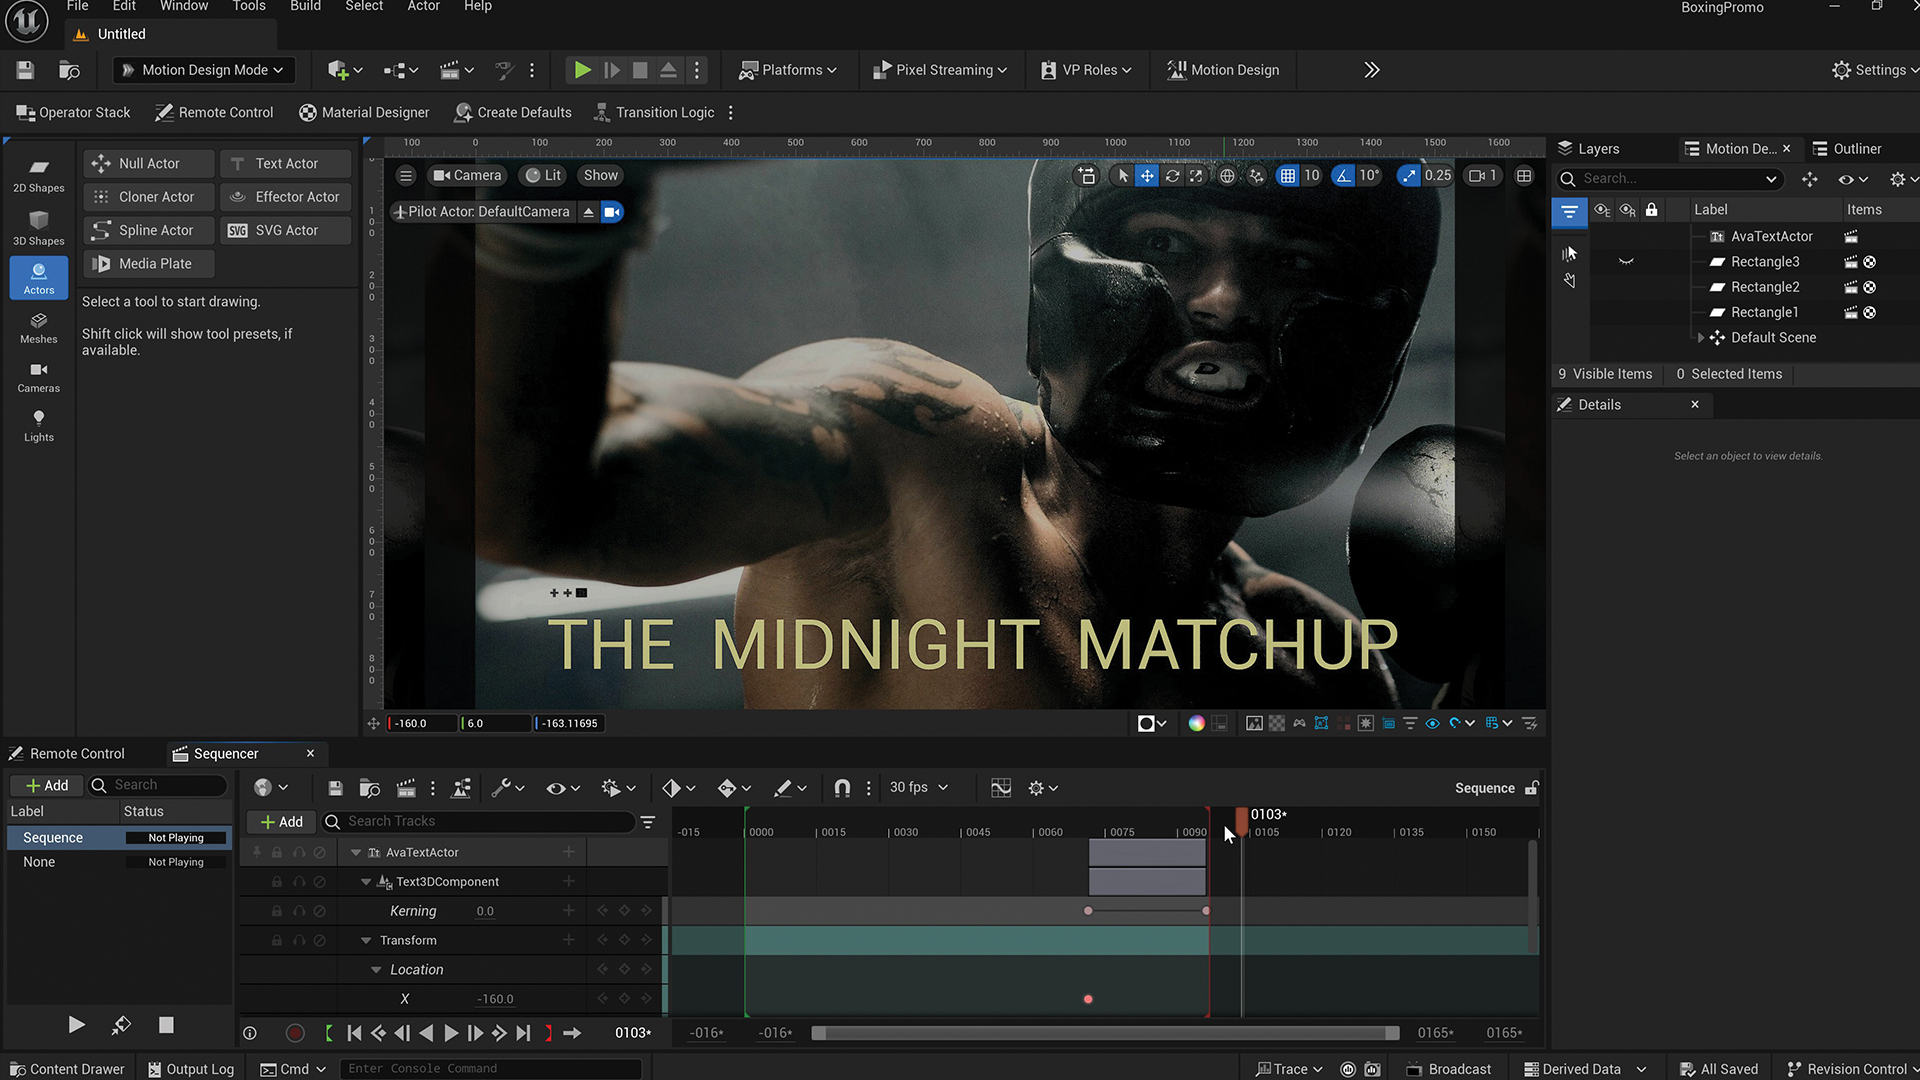
If you’re accustomed to working inside After Effects, you’ll likely notice the Unreal interface is fairly similar. Content creation and importing tools are along the left of the screen, object properties and controls along the right, the working view is both large and centered, and animation is controlled by a timeline at the bottom.
04. Create shapes
Unreal is a 3D application that we’re shoehorning into use as a 2D compositor. This is most obvious when trying to bring in external content like images and video. When we import artwork or videos in After Effects, it resides in the Content Bin and can simply be dragged into a project.
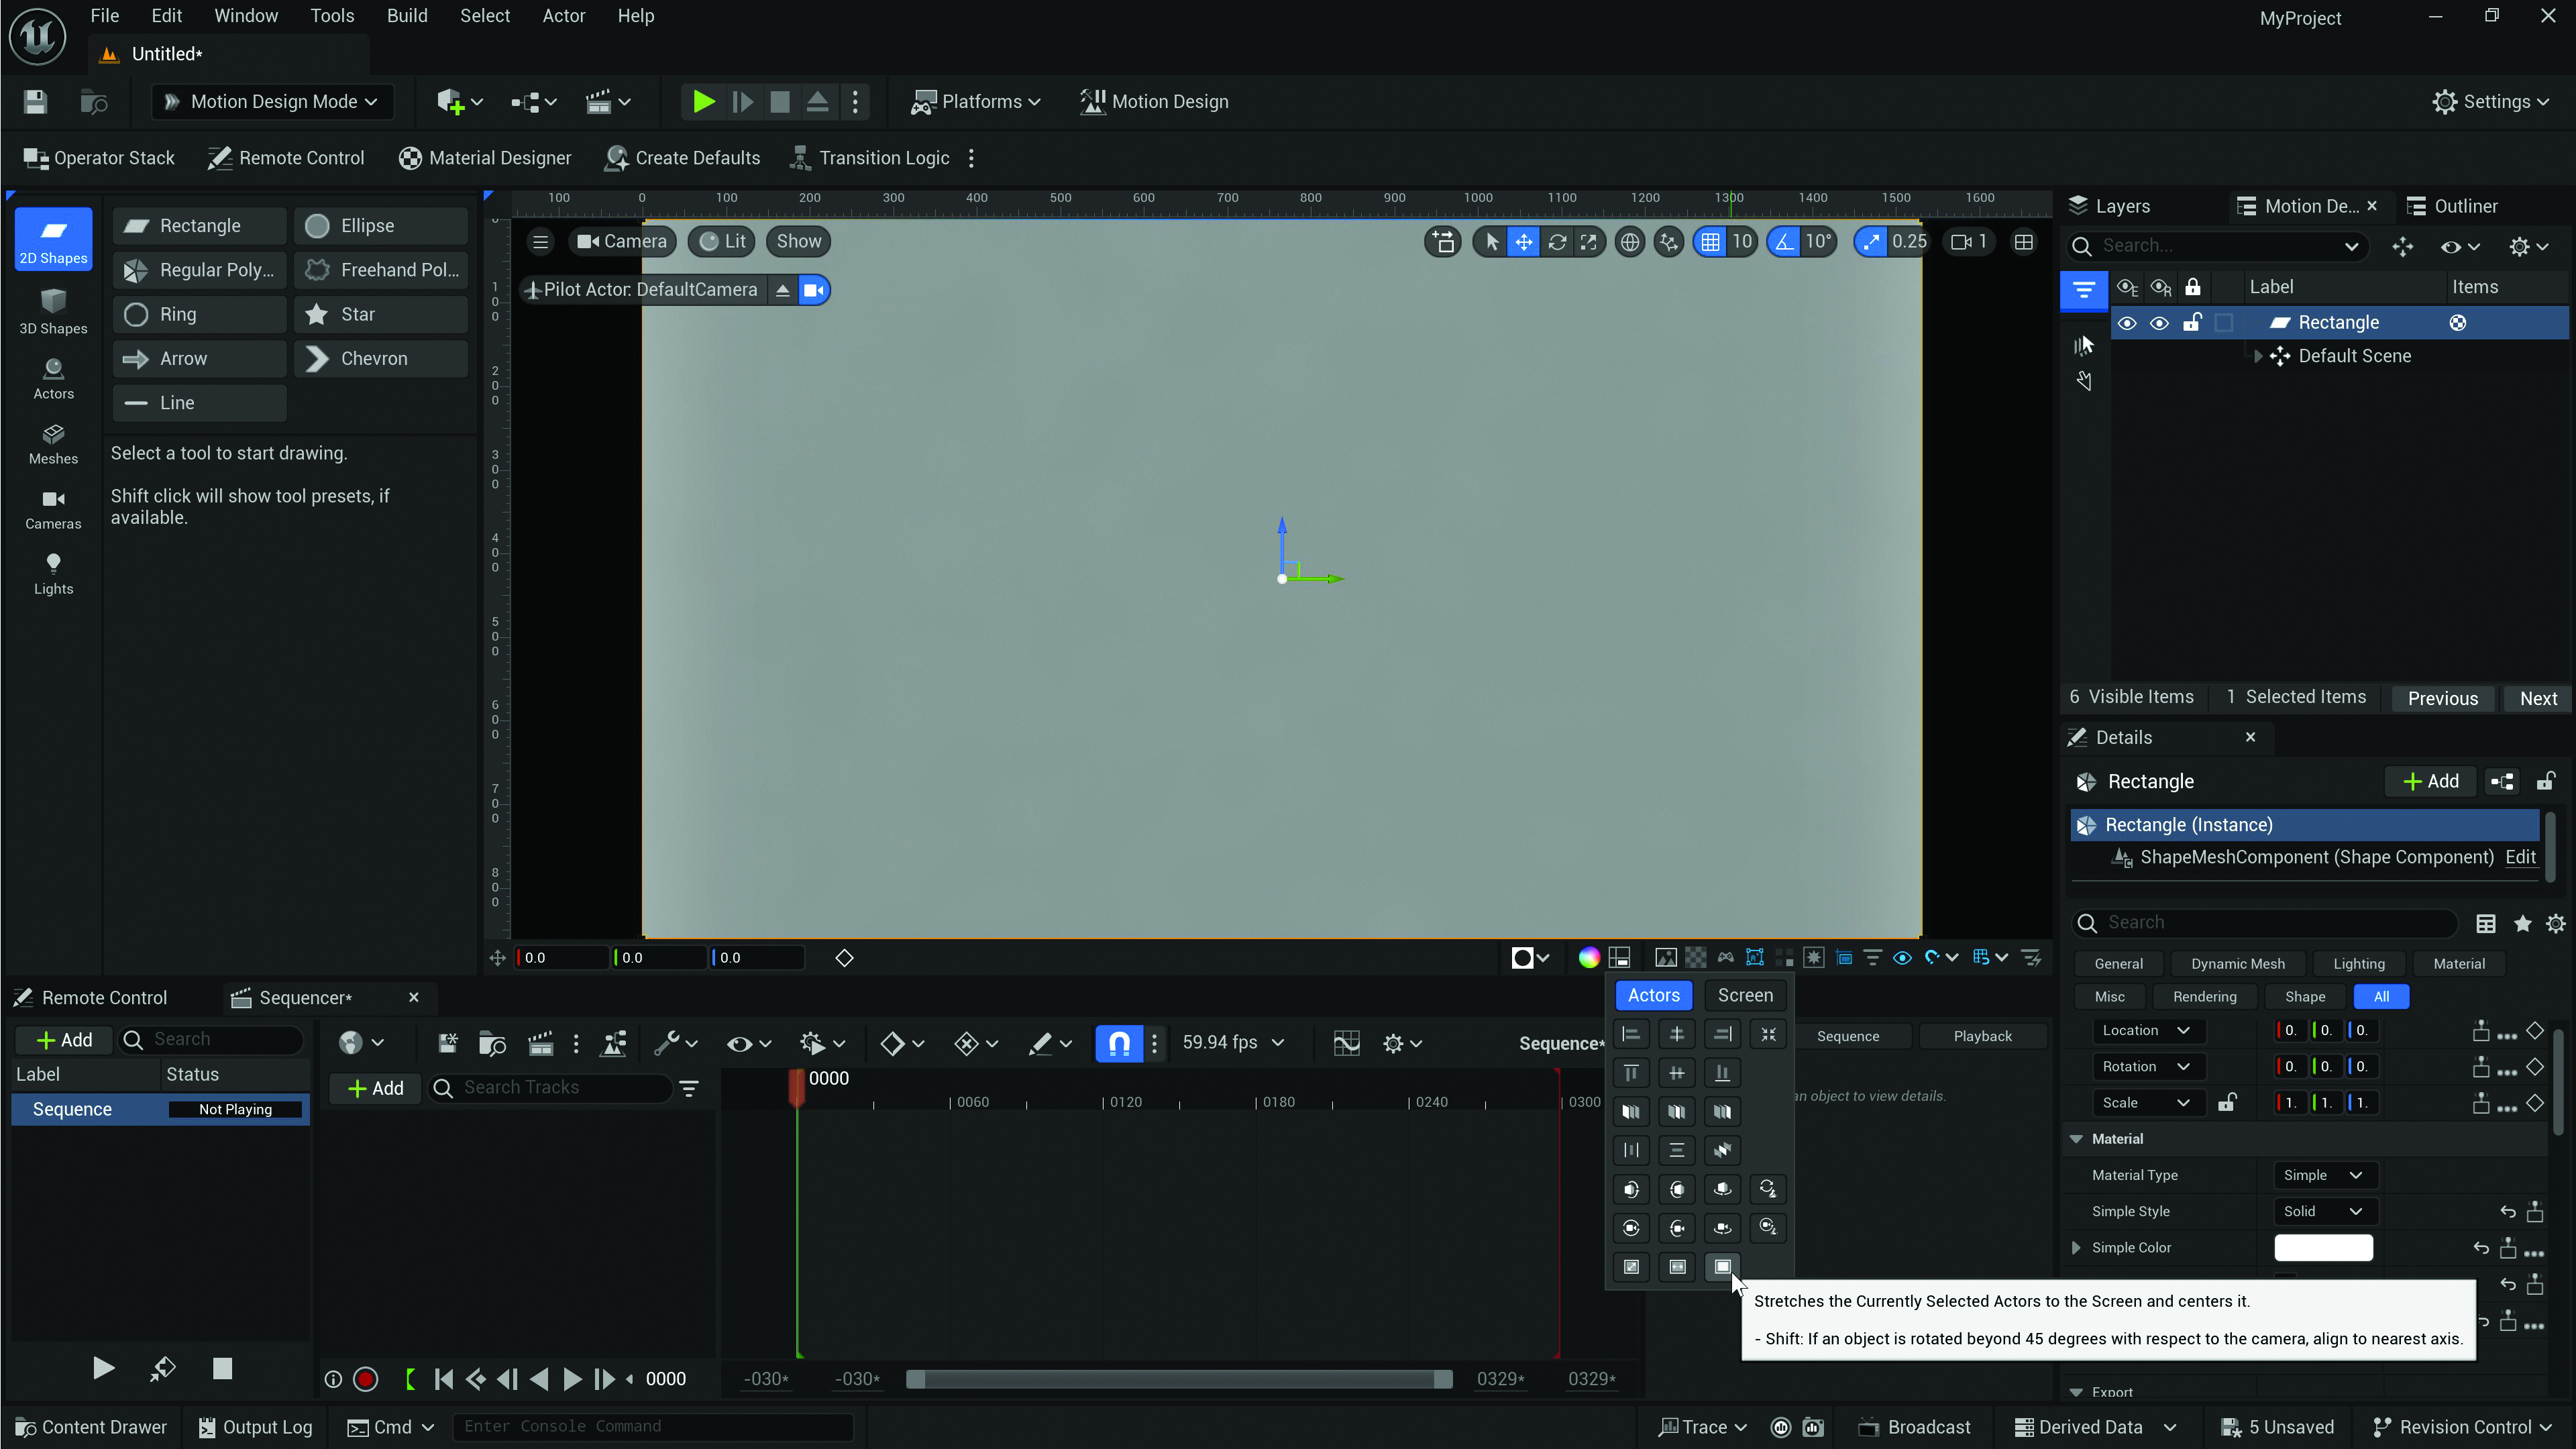
In Unreal, as with most 3D apps, pixel content needs to be applied to geometry. To do this, select 2D Shapes and double-click Rectangle to place new geometry in the scene. If you need it, a single click brings up a reference grid first. Next go down to Align Actors at the bottom of the canvas, and select ‘Stretch Actor to Screen’ at the end of the list. This centres and expands the rectangle to fit a 16:9 camera view.
Duplicate the rectangle three times using Ctrl+D or a right-click command. Under Details> Transform, use the Location setting to offset the three planes a little to avoid polygon strobing; offsets of just 1.0 will work. You can also stagger their vertical placement so each can be seen for texturing.
05. Import textures
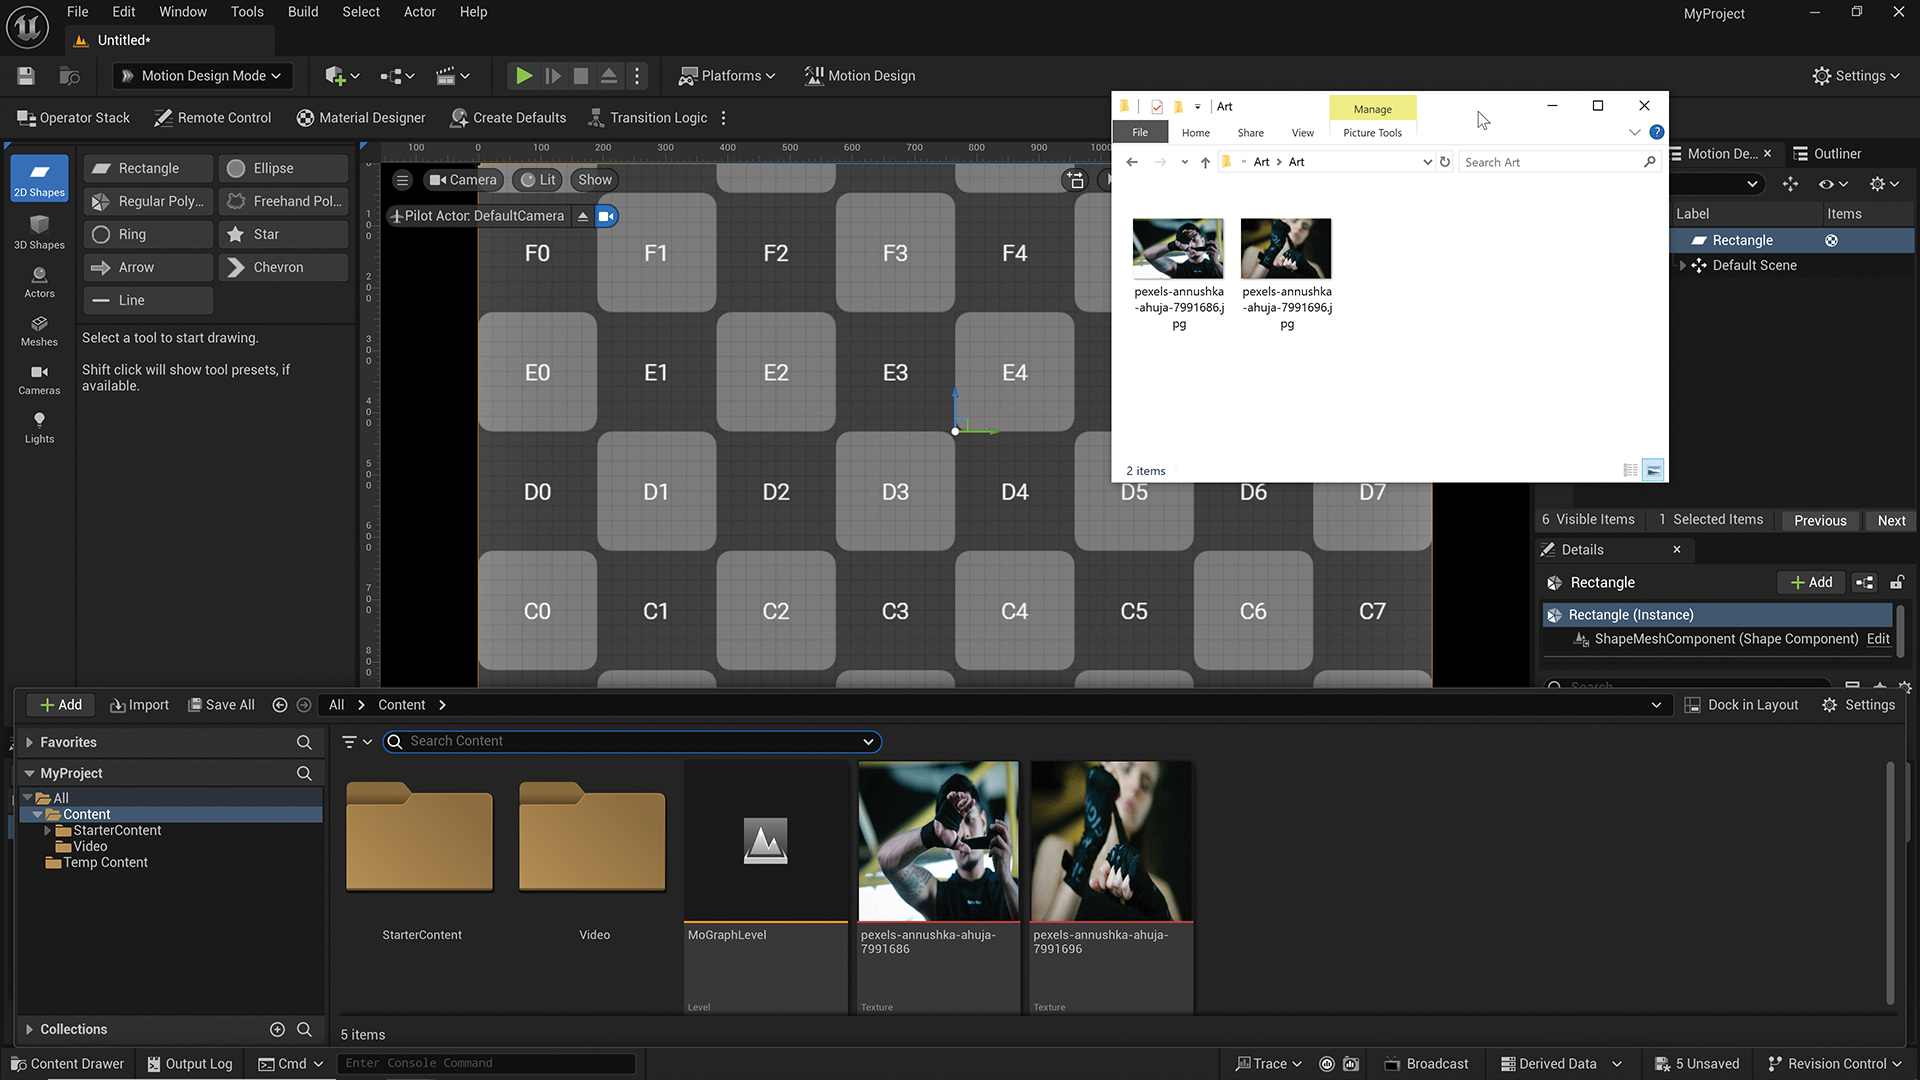
To add images, textures and video to our artboard, we must first add those elements to our project. For this you can simply drag content from a desktop folder into Unreal’s Content Drawer, which is opened by hitting Ctrl+Space Bar on Windows. It’s also a good idea to place your files within the Unreal Engine file hierarchy itself.
06. Select options
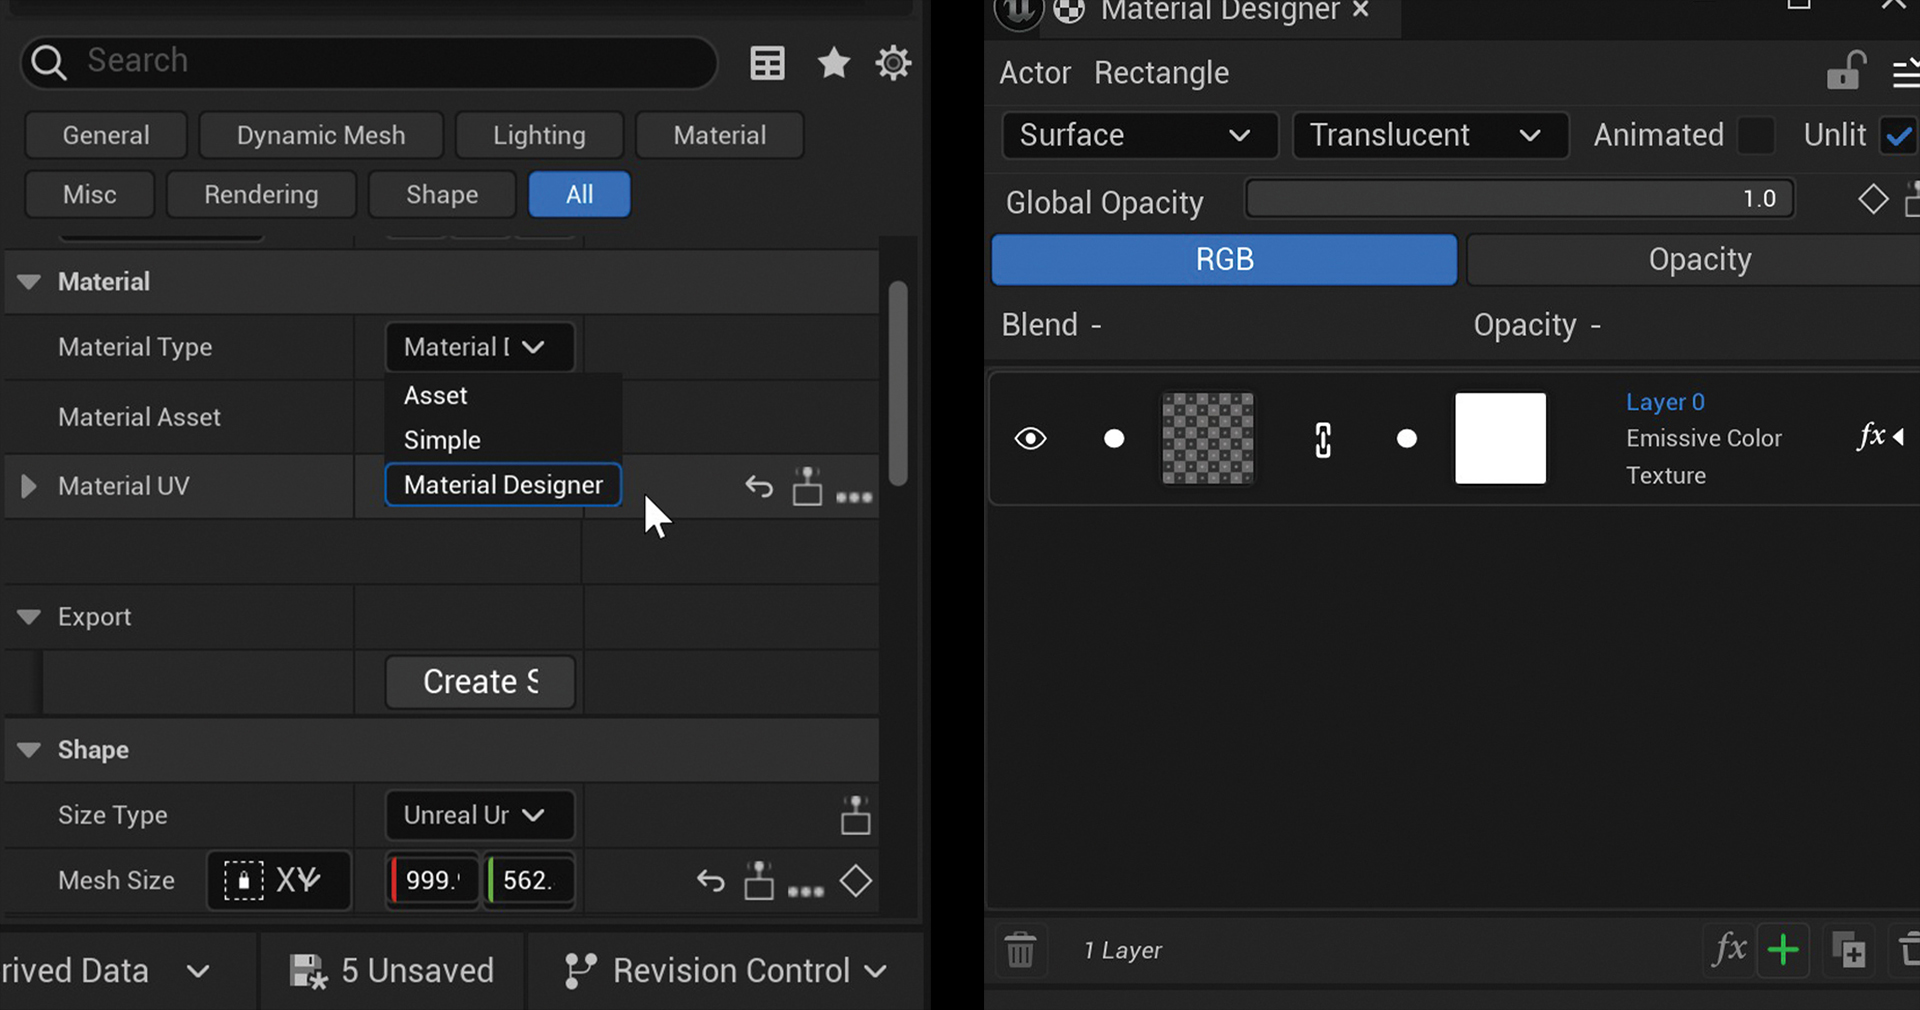
Now we need to apply imagery to this mesh. There are three settings in Details>Material: Simple brings up a choice between a solid colour or gradient fill; Asset opens the ability to fully design textures with an advanced nodal system; and Material Designer is a relatively new feature that opens a window similar to Photoshop’s Layers panel, with similar controls. I chose Material Designer.
07. Apply textures
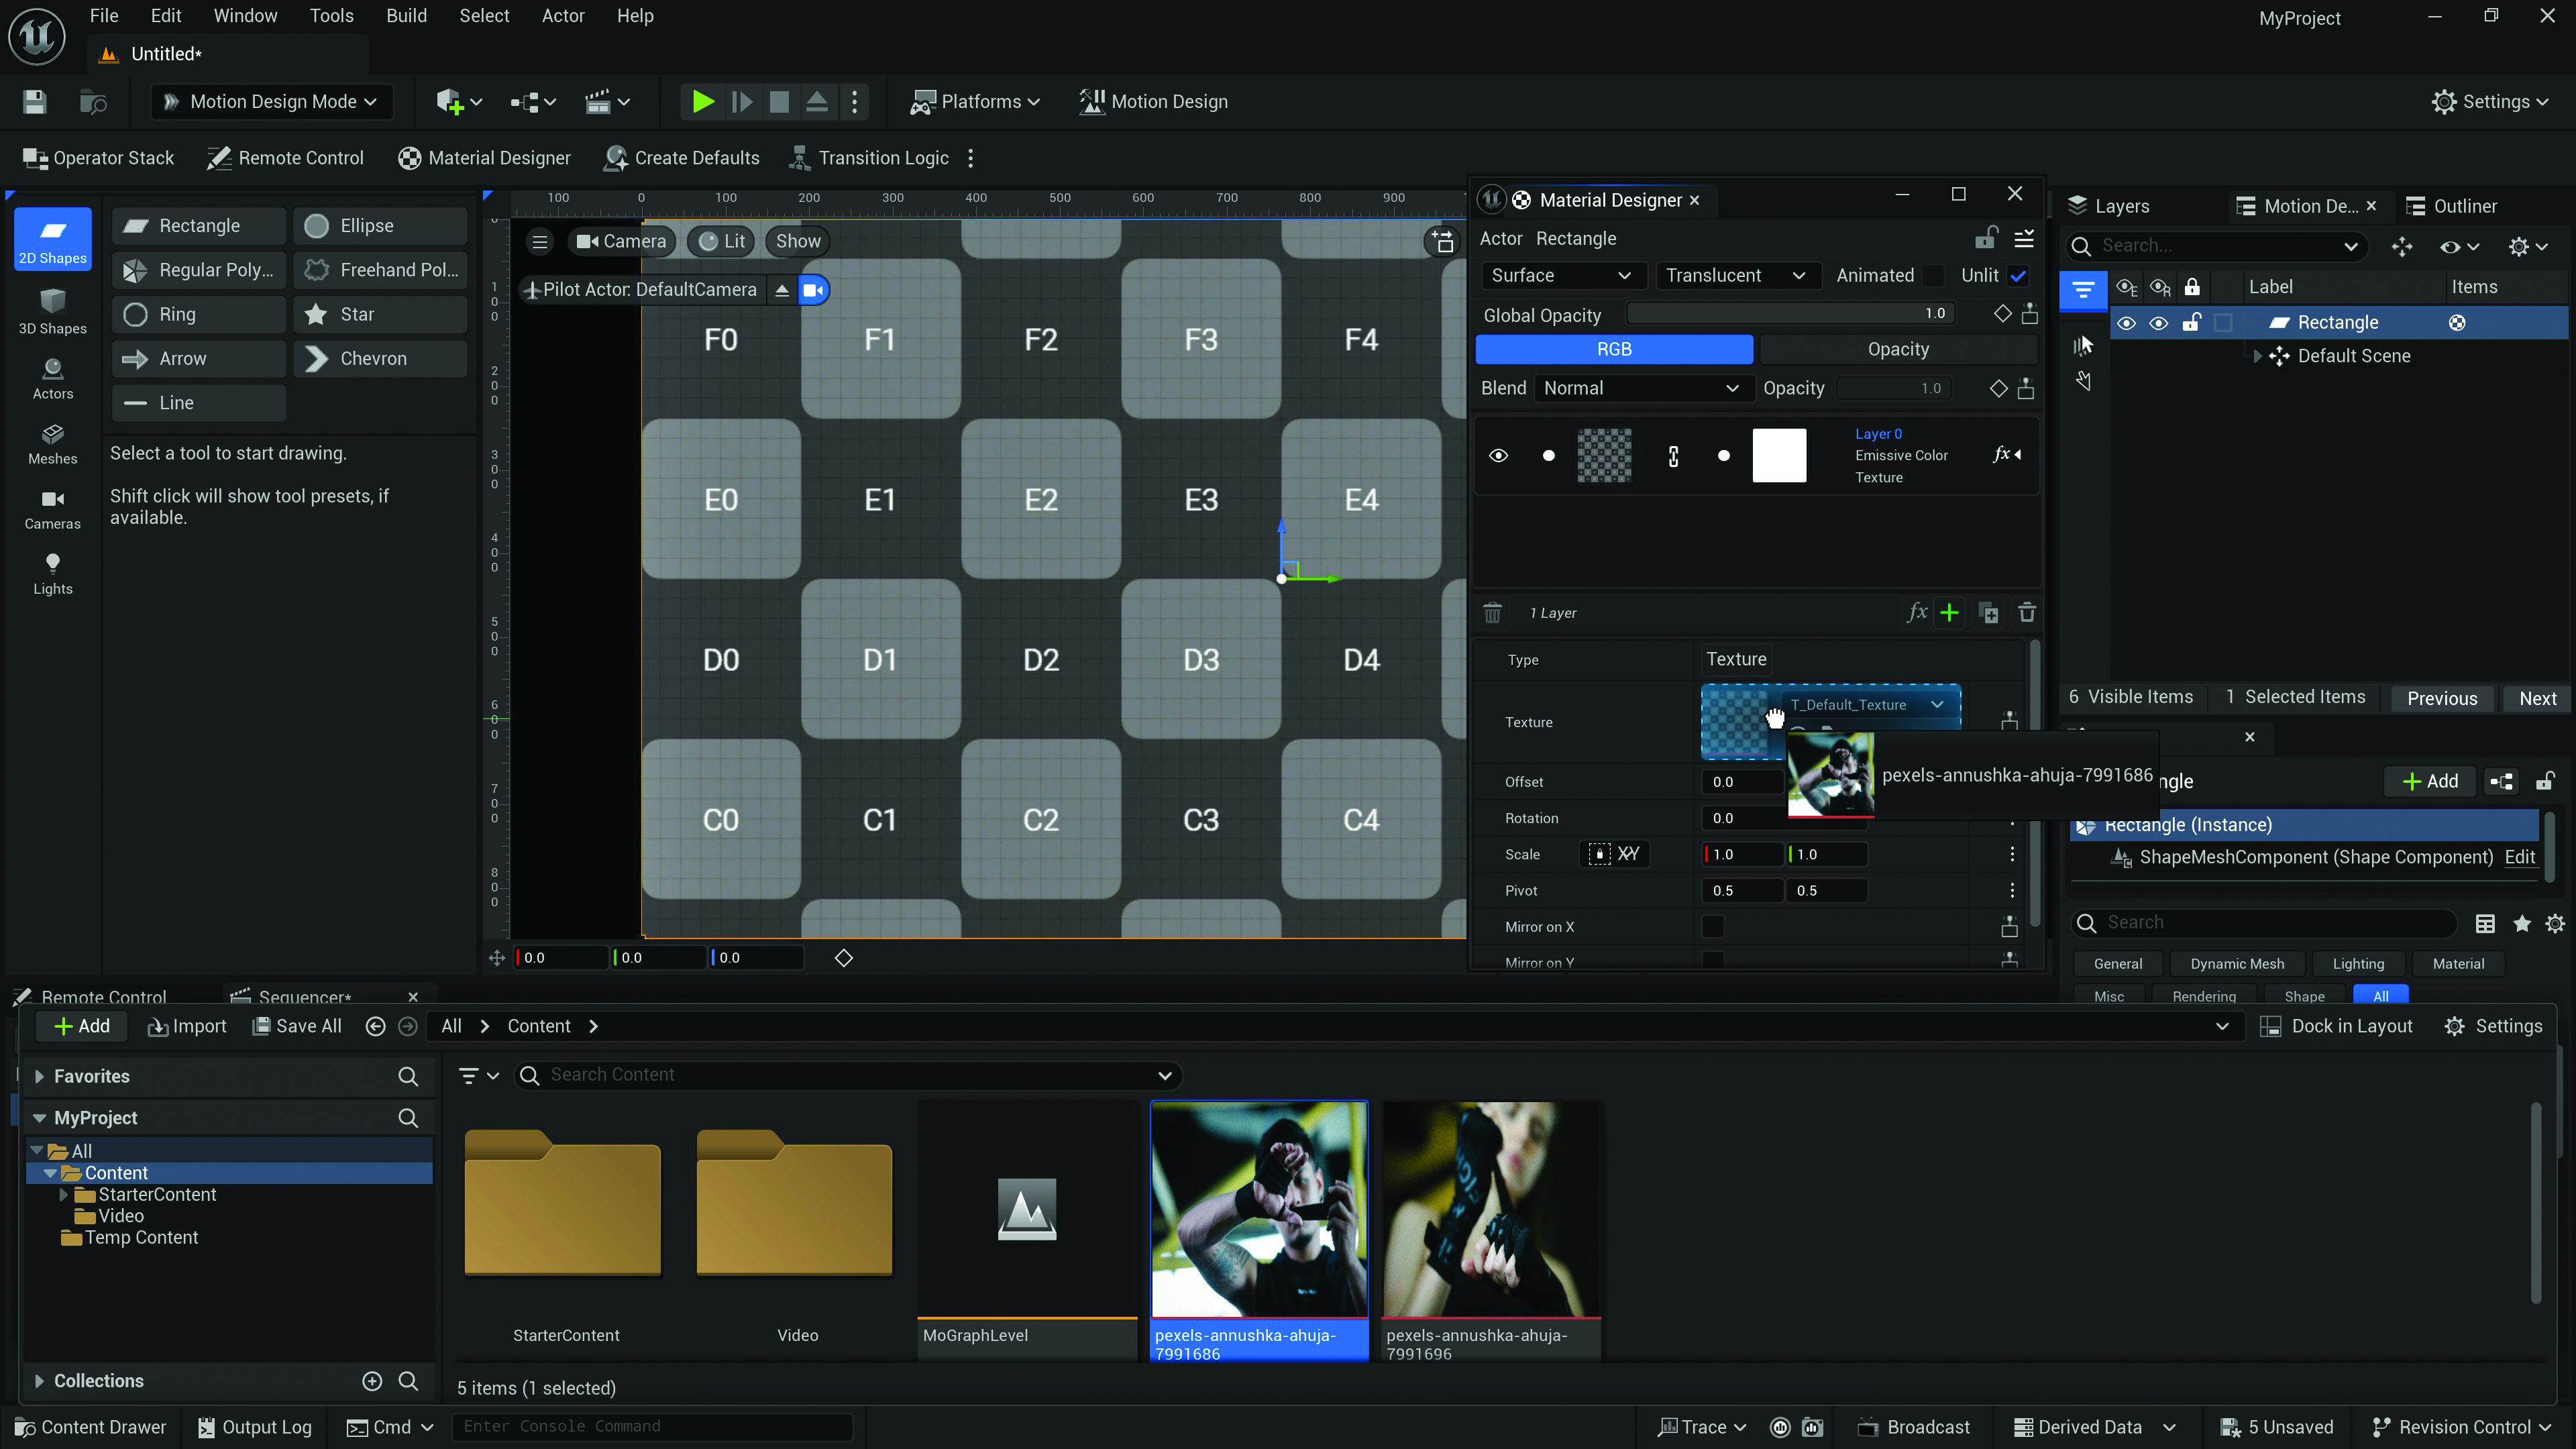
Click the RGB icon in Material Designer, which opens additional texture controls. Open the Content Drawer and drag your file to the Texture input for the current layer. The image will then appear both in the Material Designer window and on the model in the viewport. Use the Scale and Positioning controls to set the images. Do this with all the plane models you created, applying a different image to each.
08. Work with video
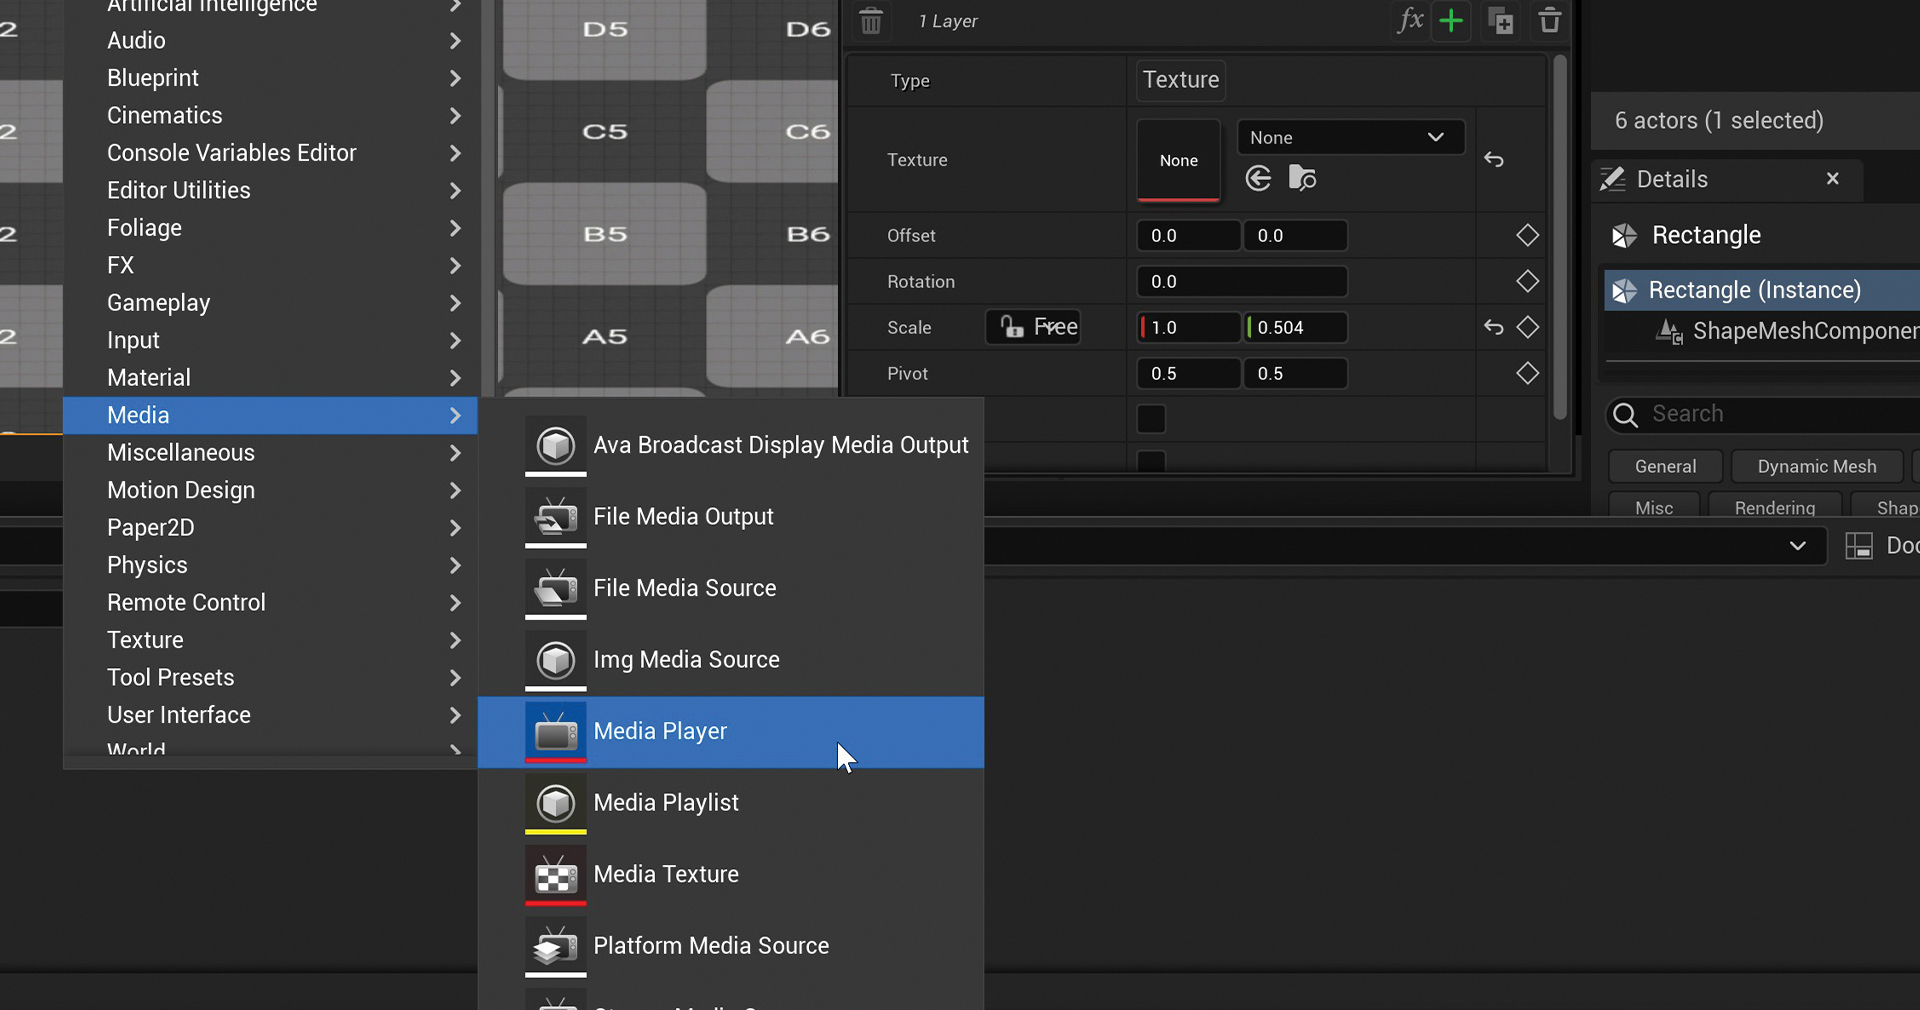
Unfortunately, video in Unreal is a different story; it’s a more involved process and unreliable. Unreal itself even suggests video be converted to a sequential image series, which won’t work for most compositing needs.
If you want to try it, textures can be applied with the Material Editor interface. As with images, simply drag the video from your desktop into the Content Drawer, or create a new folder within the Content Drawer, open it on your desktop and copy the videos into it. Right-click in the Content Drawer, go to Media>Media Player and a new dialog will appear; select the option to create a MediaTexture asset. Drag that asset to the Texture icon in the Material Designer, and the video thumbnail will appear in the Material Designer and viewport.
Given how troublesome video is in Unreal Engine, we’ll continue the project with static images instead. Set up four artboard panels with textures and let’s move on.
09. Animate images
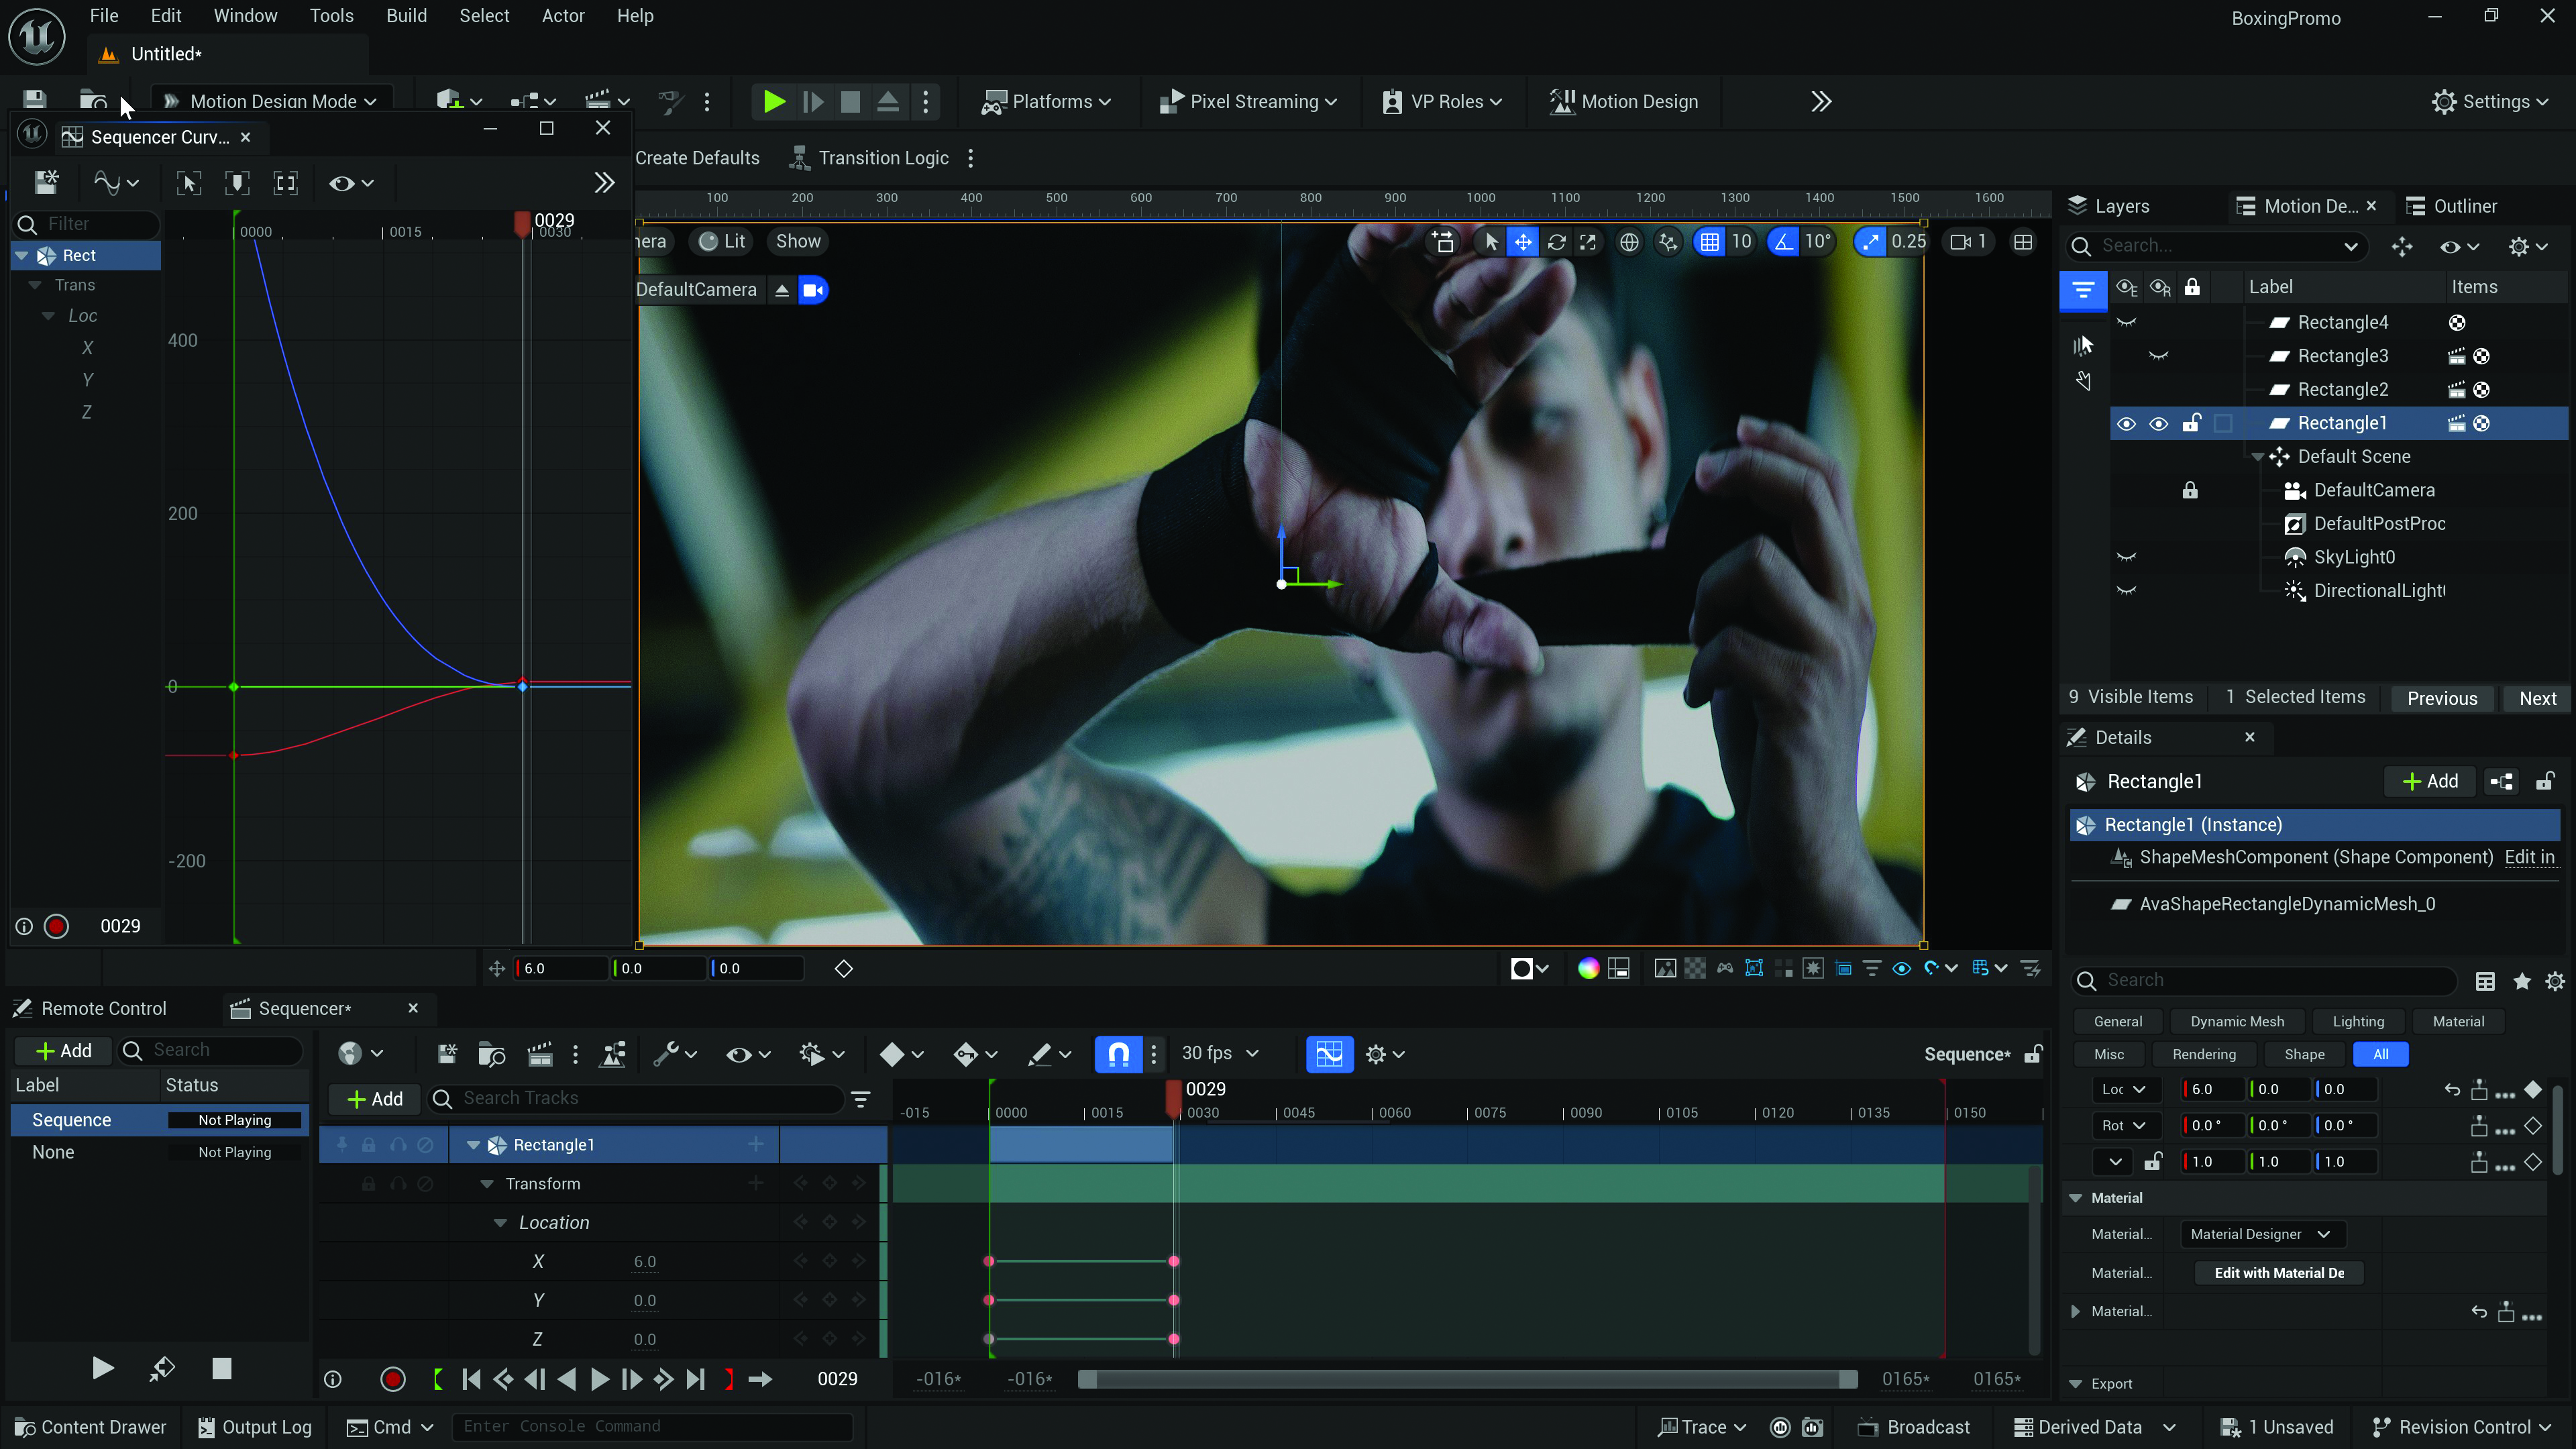
Now it’s time to get our artboards moving. Start by making Rect2, Rect3 and Rect4 invisible for now, and drag Rect1 from the Outliner to the Sequencer. Move to the start of the timeline and add a keyframe, then move one second in and add another. Back at the start of the timeline, move Rect1 straight up via the Details panel.
Now open the Curve Editor. In this Z-is-up oriented worldview, adjust the Z-curve (red) to deliver a linear scene entrance using a linear keyframe, then a smooth but swift slowing down at the end with a curve keyframe. Looking at the curves, you’ll see what we’re shooting for in the Z-curve. The X-curve (left and right) in green is static, but that Y-curve (blue) begins with Rect1 a bit closer to the camera, and as it goes down the screen it’s also moving gently away from the camera. This adds a nice bit of movement and helps with the issue of geometry strobing that had been occurring.
10. Finish the project with a title
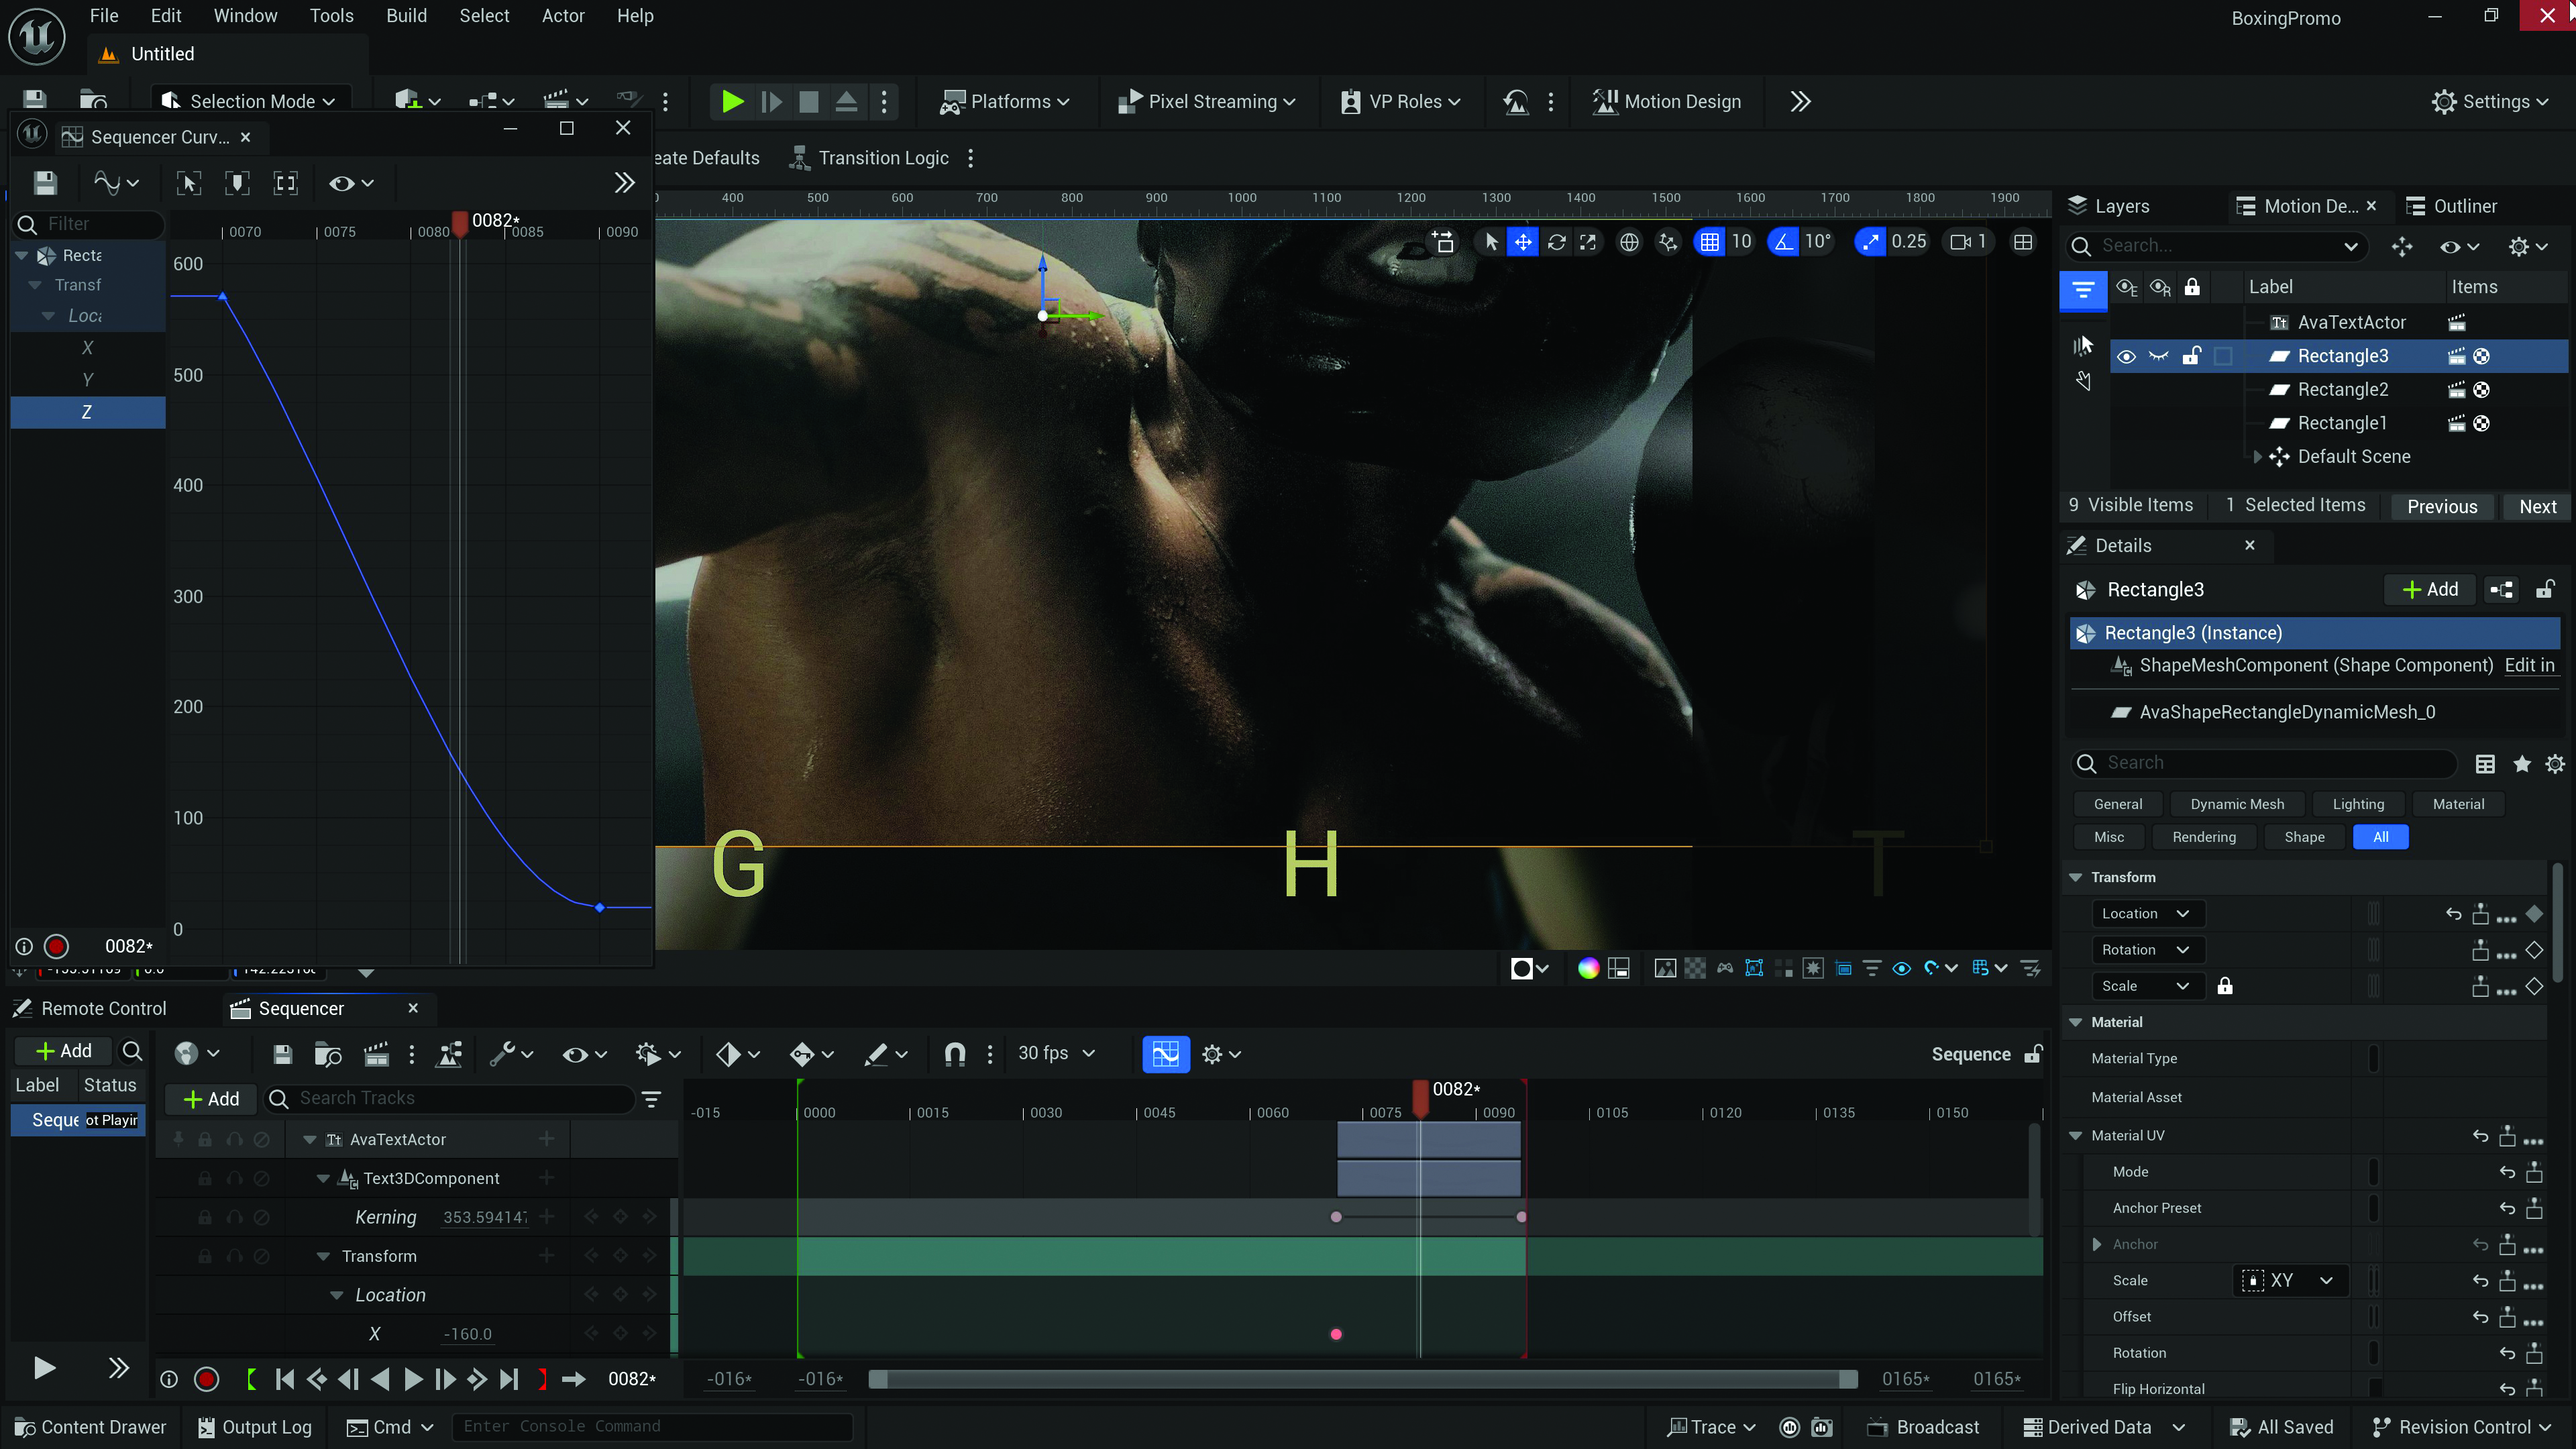
Let’s polish this project off with a little title treatment and some 3D text. This is also done with a plugin, but in our install it was activated by default. In Motion Designer it’s found under Actors>Text Actor.
Here’s a quick way to make simple text interesting. Create the text and place it on the canvas and into the Sequencer, then find the text input in the Details panel, and type your text in. Add keyframes at the start and end of the title, and make sure Kerning is set to normal at the end. Meanwhile, at the start, set the Kerning to a high enough number to spread beyond the frame. Open the Curves Editor and place a linear or breaking keyframe at the start, and a gentle curve at the end. Finally, add some colour to the text; personally, I used a light golden hue. Do note that the text had a tendency to get blocked by Rect3, so it needed to be adjusted forward as well.
When finished, we have the start of a project that’s similar to one that I’ve worked on for a major US sport. There’s no end to what can be added and enhanced, and using video clips instead of stills would certainly have upped the production value, if it had been more reasonable to accomplish.
This content originally appeared in 3D World magazine, the world's leading CG art magazine. 3D World is on sale in the UK, Europe, United States, Canada, Australia and more. Limited numbers of 3D World print editions are available for delivery from our online store (the shipping costs are included in all prices). Subscribe to 3D World at Magazines Direct.
Get the Creative Bloq Newsletter
Daily design news, reviews, how-tos and more, as picked by the editors.

Thank you for reading 5 articles this month* Join now for unlimited access
Enjoy your first month for just £1 / $1 / €1
*Read 5 free articles per month without a subscription

Join now for unlimited access
Try first month for just £1 / $1 / €1

Lance Evans is creative director of Graphlink Media, a boutique creative marketing agency that specialises in building brands and has worked with such high-profile clients as Olive Garden, Miller Beer and AMEX. Lance was an early adopter of digital tools, and was on the original beta team for Photoshop. Lance has written for Creative Bloq on a wide range of topics, from technical photography tips to the ins and outs of branding.
