How to use Houdini 20’s new feather tool
Learn to create realistic birds or fantasy beasts using Houdini's GPU-powered Feather system.
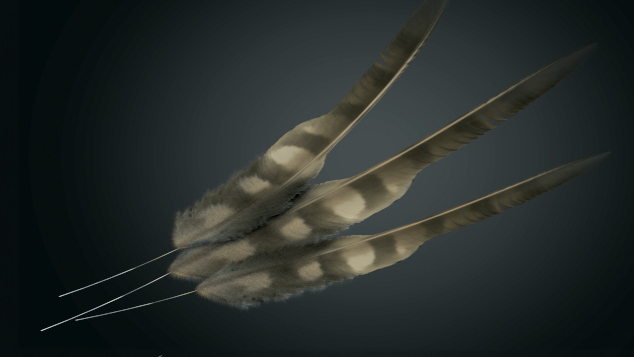
Being a 3D generalist isn’t an easy path. It requires constant learning of the best 3D modelling software and adaptation to a variety of fields, but for those driven by curiosity and a thirst for knowledge, it’s a rewarding journey.
Each day presents new challenges and opportunities for growth, which pushes us to expand our skill set and explore unfamiliar territory. For me, the best part of taking on the generalist role lies in the chance to constantly learn new skills and put them to the test across different 3D domains.
For those driven by curiosity, being a 3D generalist in rewarding
For example, the versatility of Houdini allows me to create environments, grooming, scattering systems, crowd simulations, procedural systems, and so much more. When SideFX, the creators of Houdini, unveiled the new feather system, I was immediately intrigued.
Feathers have always posed a challenge in computer graphics as they require intricate detail and realistic movement to convincingly bring them to life in the best animation software.
However, Houdini’s GPU-powered Feather system offers a comprehensive set of tools that help you streamline the process of generating highly detailed feathers. Whether it’s wing feathers, decorative plumes, down or coverts, the system provides the flexibility to create a diverse range of feather types with simplicity.
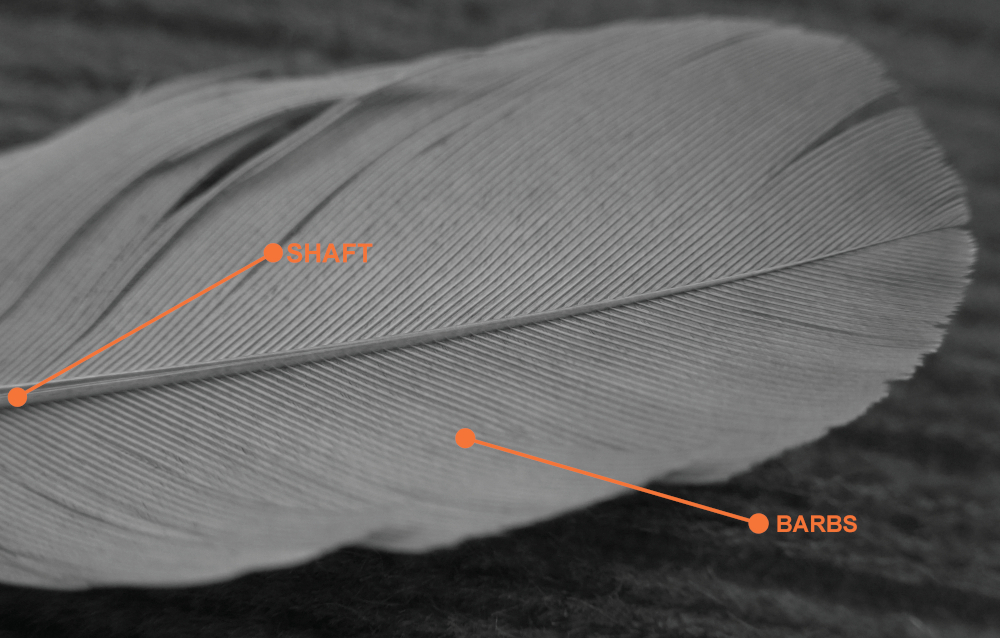
It’s important for us to understand the anatomy of a feather and its components:
Shaft: This is the long central part that holds the vanes
Vanes: The vanes are the plumed parts of the feather that grow from the central shaft.
Barbs: The individual strands that grow from the shaft. Each barb has a little shaft and tiny barbs, known as barbules.
In this article, we’ll delve into the intricacies of Houdini’s feather tools, covering everything from the basic techniques of feather creation to advanced workflows for adding realism and detail.
We’ll explore how to use freehand curves and reference images (a feather atlas) to trace our feathers, as well as techniques for detailing using noise and clumping. On top of that we’ll delve into grooming workflows, which are essential for effectively scattering the feathers.
Get the Creative Bloq Newsletter
Daily design news, reviews, how-tos and more, as picked by the editors.
But our journey doesn’t end there. We’ll also touch on Solaris, Houdini’s USD-based layout and lighting toolset, to demonstrate how we can seamlessly integrate our feather groom into a larger scene.
Finally, we’ll utilise Karma, Houdini’s cutting-edge render engine, to shade, light and render our groom, showcasing the power and versatility of Houdini’s end-to-end pipeline.
Whether you’re tasked with grooming a realistic bird for a nature documentary or adding intricate detail to a fantastical creature for a blockbuster film, Houdini’s feather tools provide a robust solution for achieving stunning results. (For more, read our selection of Houdini tutorials.)
So, let’s fire up Houdini and embark on this exciting journey into the world of feather creation. Get ready to show off your avian friends like never before. (If you're inspired by my workflow, take a look at the best 3D art for ideas.)
01. Condensed workflow
When we’re working with feathers there are two different workflows: the condensed and the uncondensed. In the context of feathers, a condensed workflow involves working with feathers as some sort of packed geometry and relying on the GPU for visualisation.
This means we can efficiently create and groom our feathers in Houdini using some specific nodes that are capable of handling this complex virtual geometry, but we can’t manipulate primitives or points. At any moment we can use an ‘F. Uncondense’ node to switch to an uncondensed workflow.
02. Uncondense the workflow
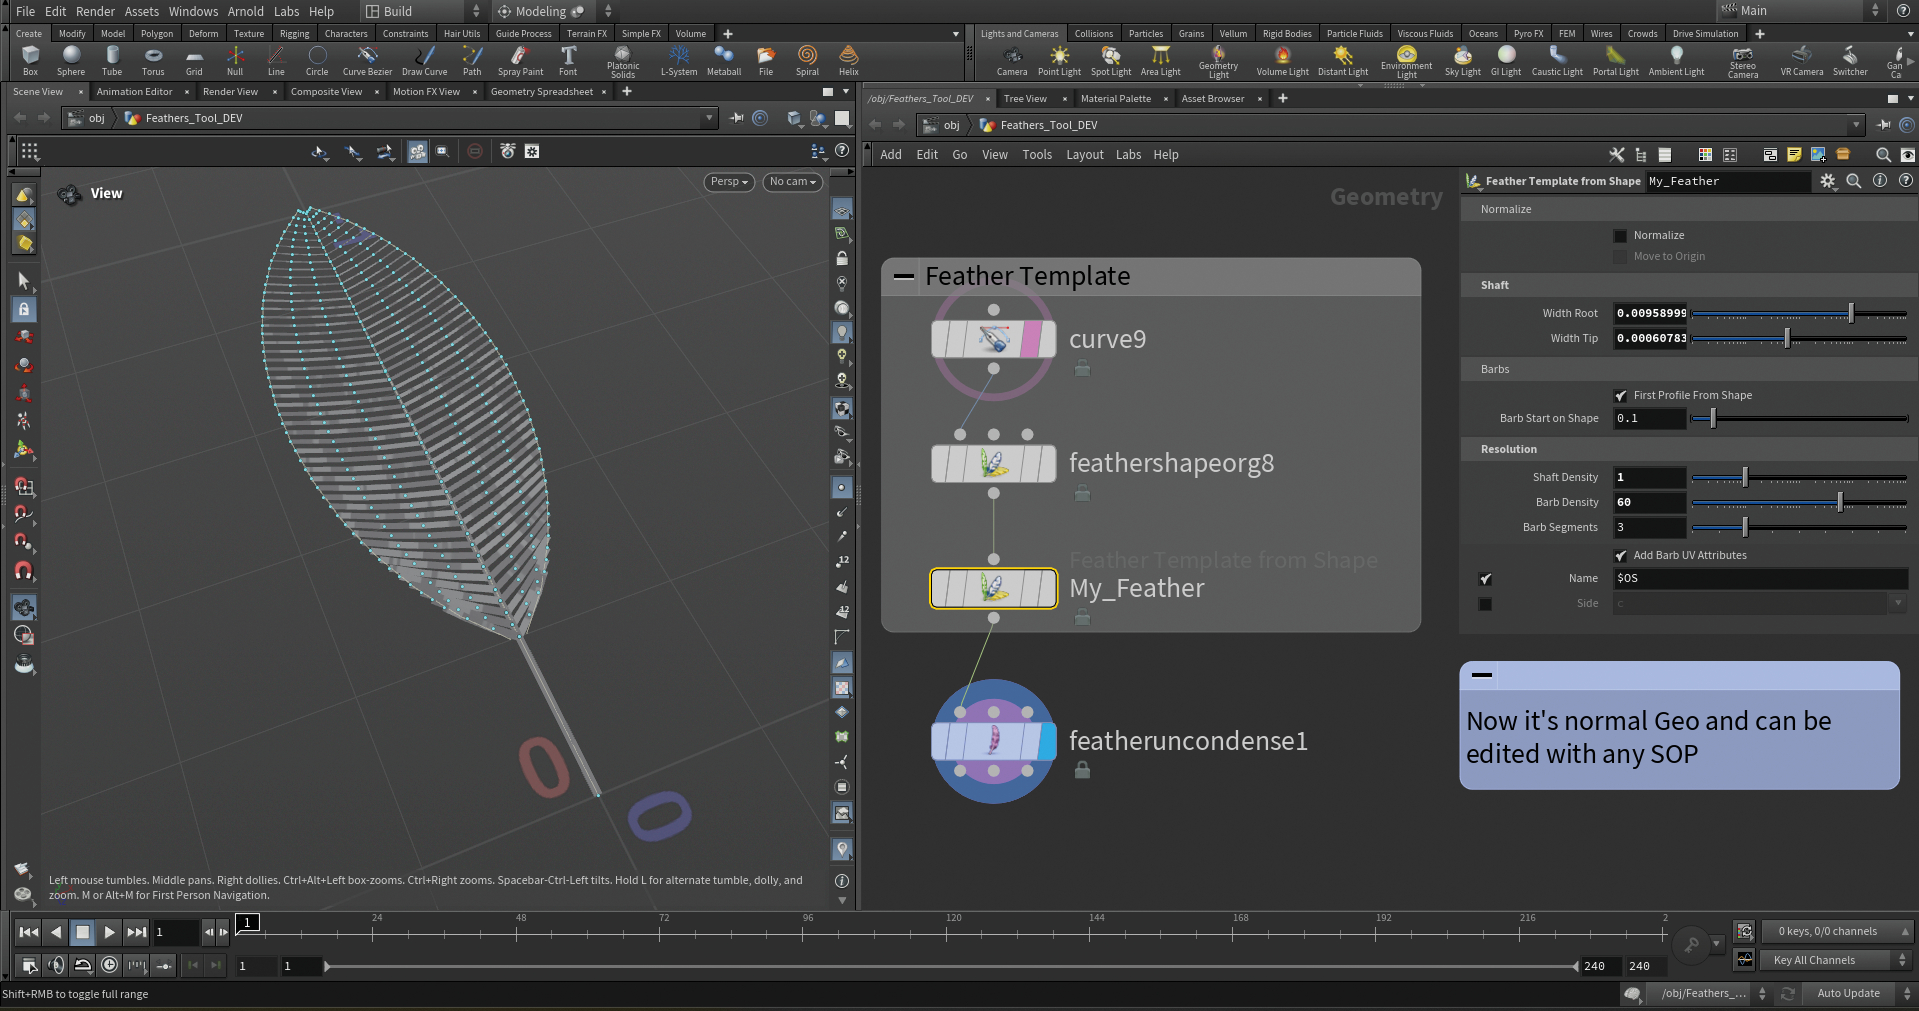
The uncondensed workflow is based on the Feather Uncondense SOP. This node will convert the virtual GPU-based condensed feather into proper geometry, allowing the use of any SOP-level node to tweak the feather's appearance.
Some of the useful nodes that you can use on an uncondensed feather are the Edit SOP to manually transform certain elements of the feather, or a Mountain SOP to add different kinds of noise, which are impossible to add when the feather is condensed.
Overall, following this approach allows for greater control and attention to detail, with the trade-off that it can be heavier to compute, so you’ll need to rely on caching out your feather
03. Finding a feather atlas
When working with feathers in Houdini, the first step is always to import a feather atlas. These are detailed diagrams featuring all manner of bird feathers, and useful for identifying species and studying the characteristics of feathers. You can download an atlas for your own research from either bit.ly/3Qi3H48 or bit.ly/44gBwID.
To import a feather atlas into your Houdini scene, first create a grid using a UV Texture SOP and change the Y Scale to -1, then add a UV Quick Shade SOP and path it to your feather atlas
04. Making feather templates
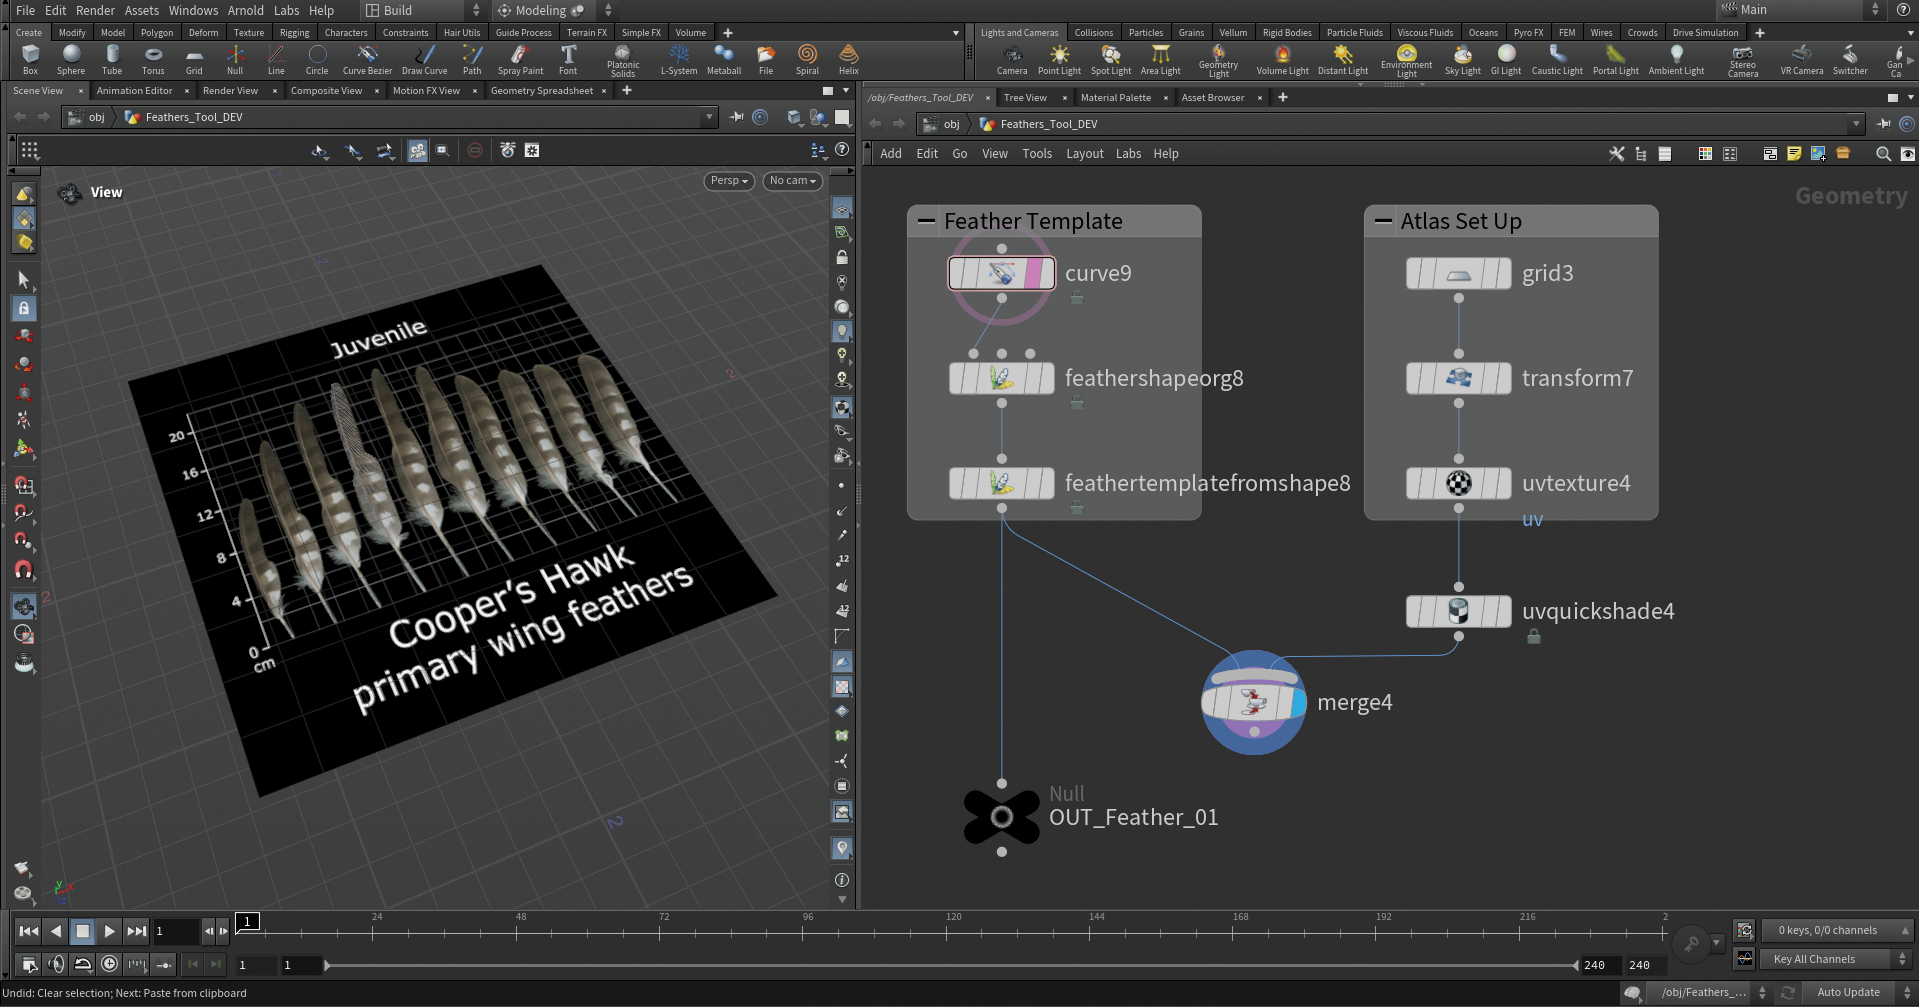
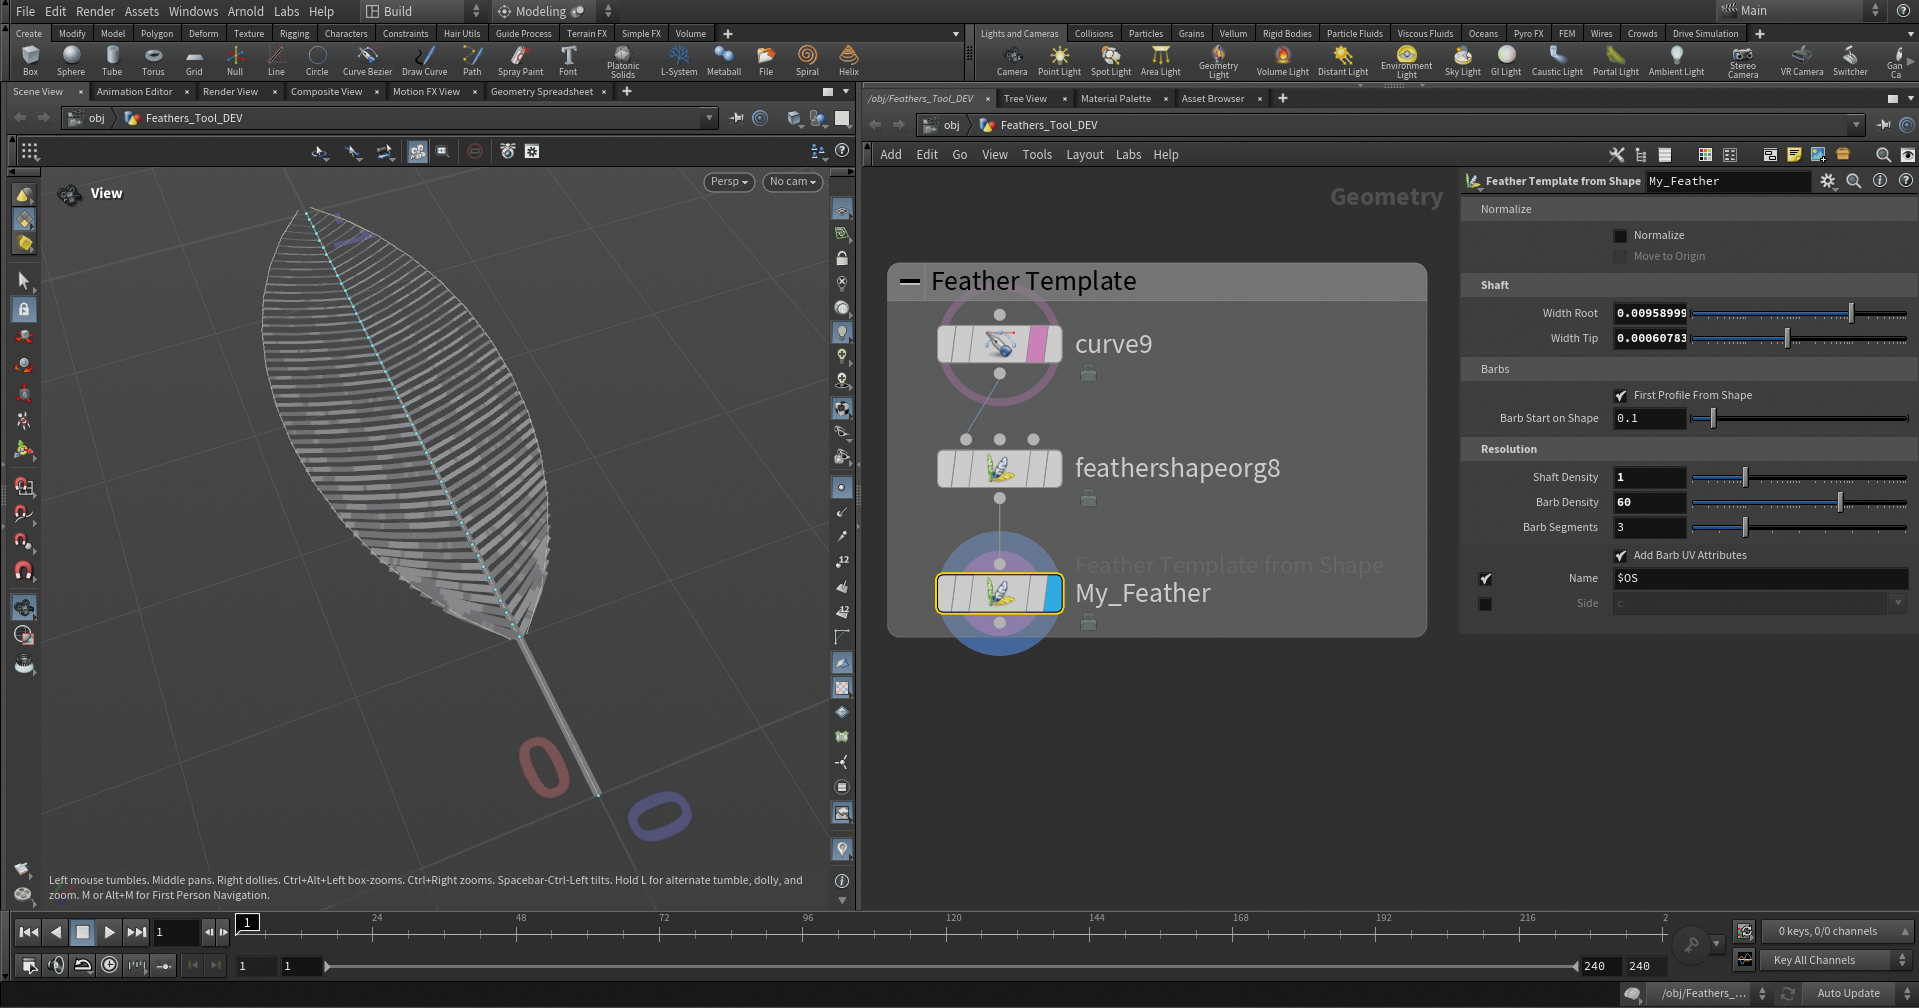
Now it’s time to actually create our first feather! If you’re already familiar with the process of creating feather templates, or if you just want to make a quick start, you can use Houdini’s Feather Template tool.
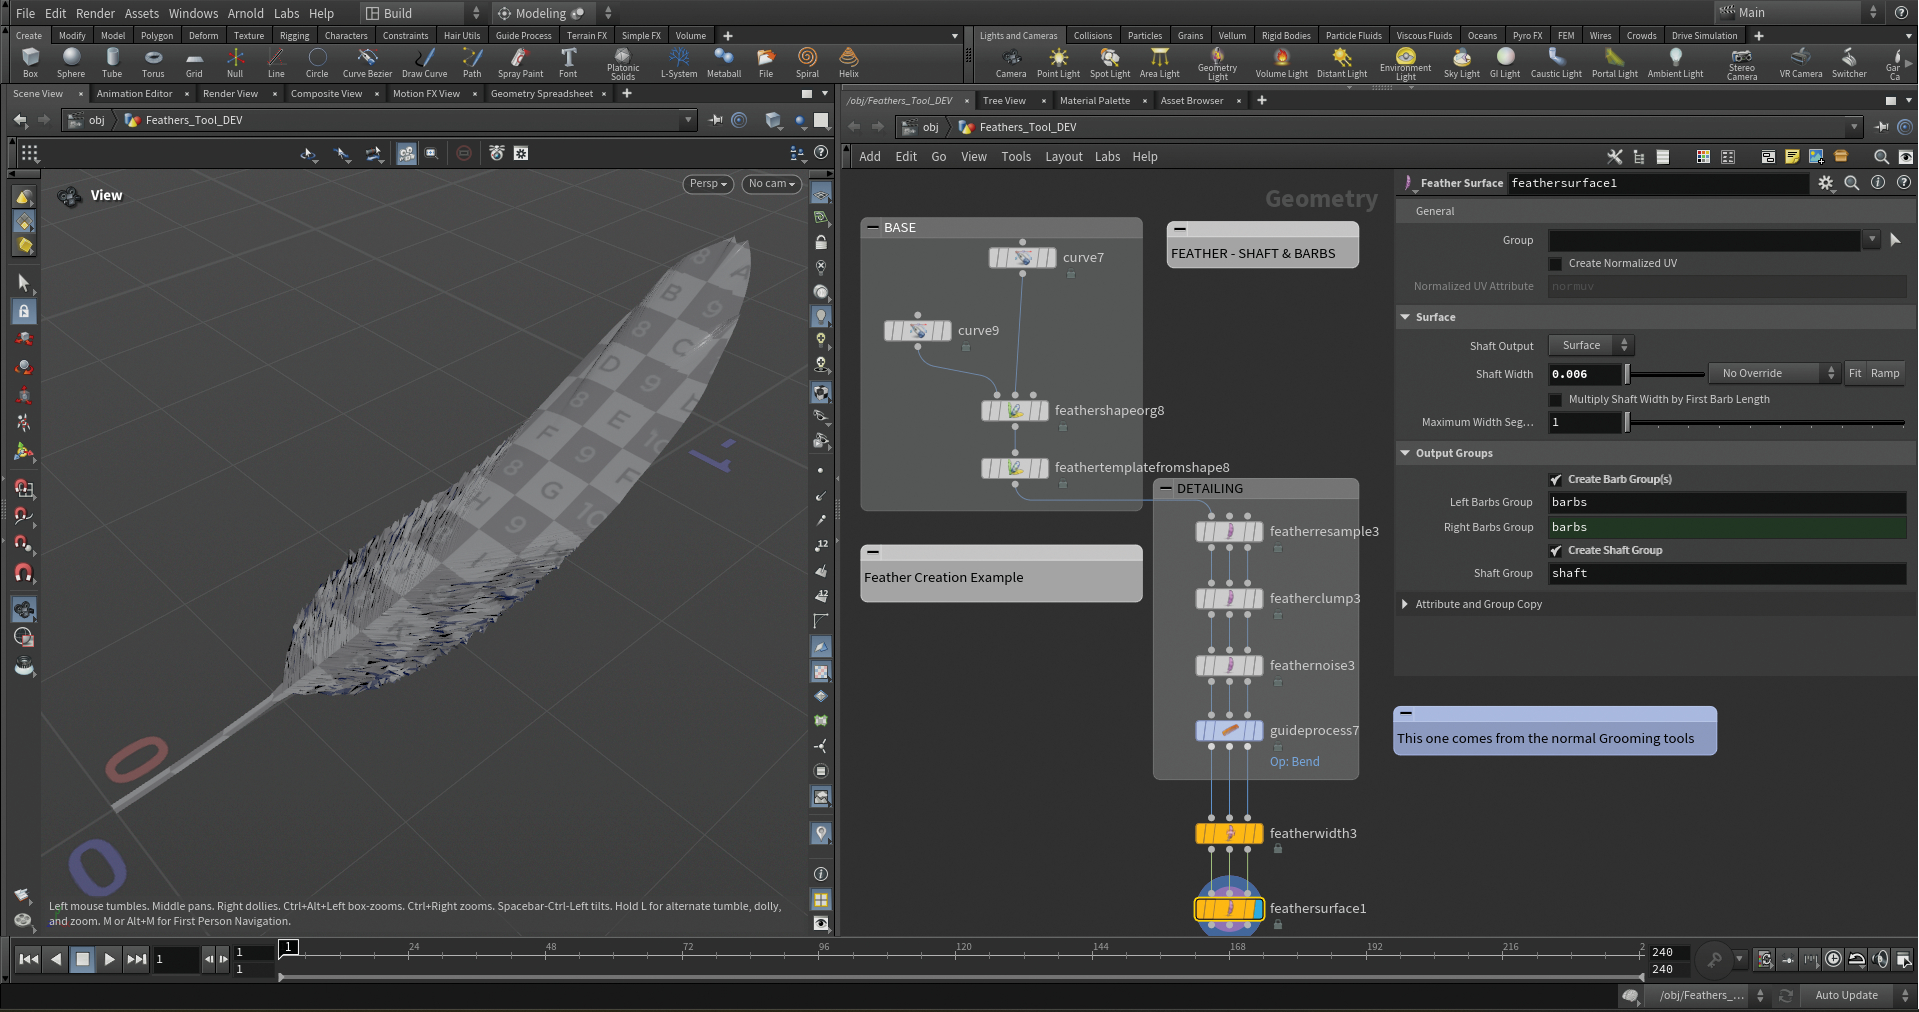
This conveniently creates a complete network with all the relevant nodes required for a basic feather. Every time you call up the Feather Template tool, Houdini will create a set of three nodes: a Curve SOP, a ‘Feather Shape Organize SOP’, and a ‘Feather Template from Shape SOP’.
05. Understanding the template structure
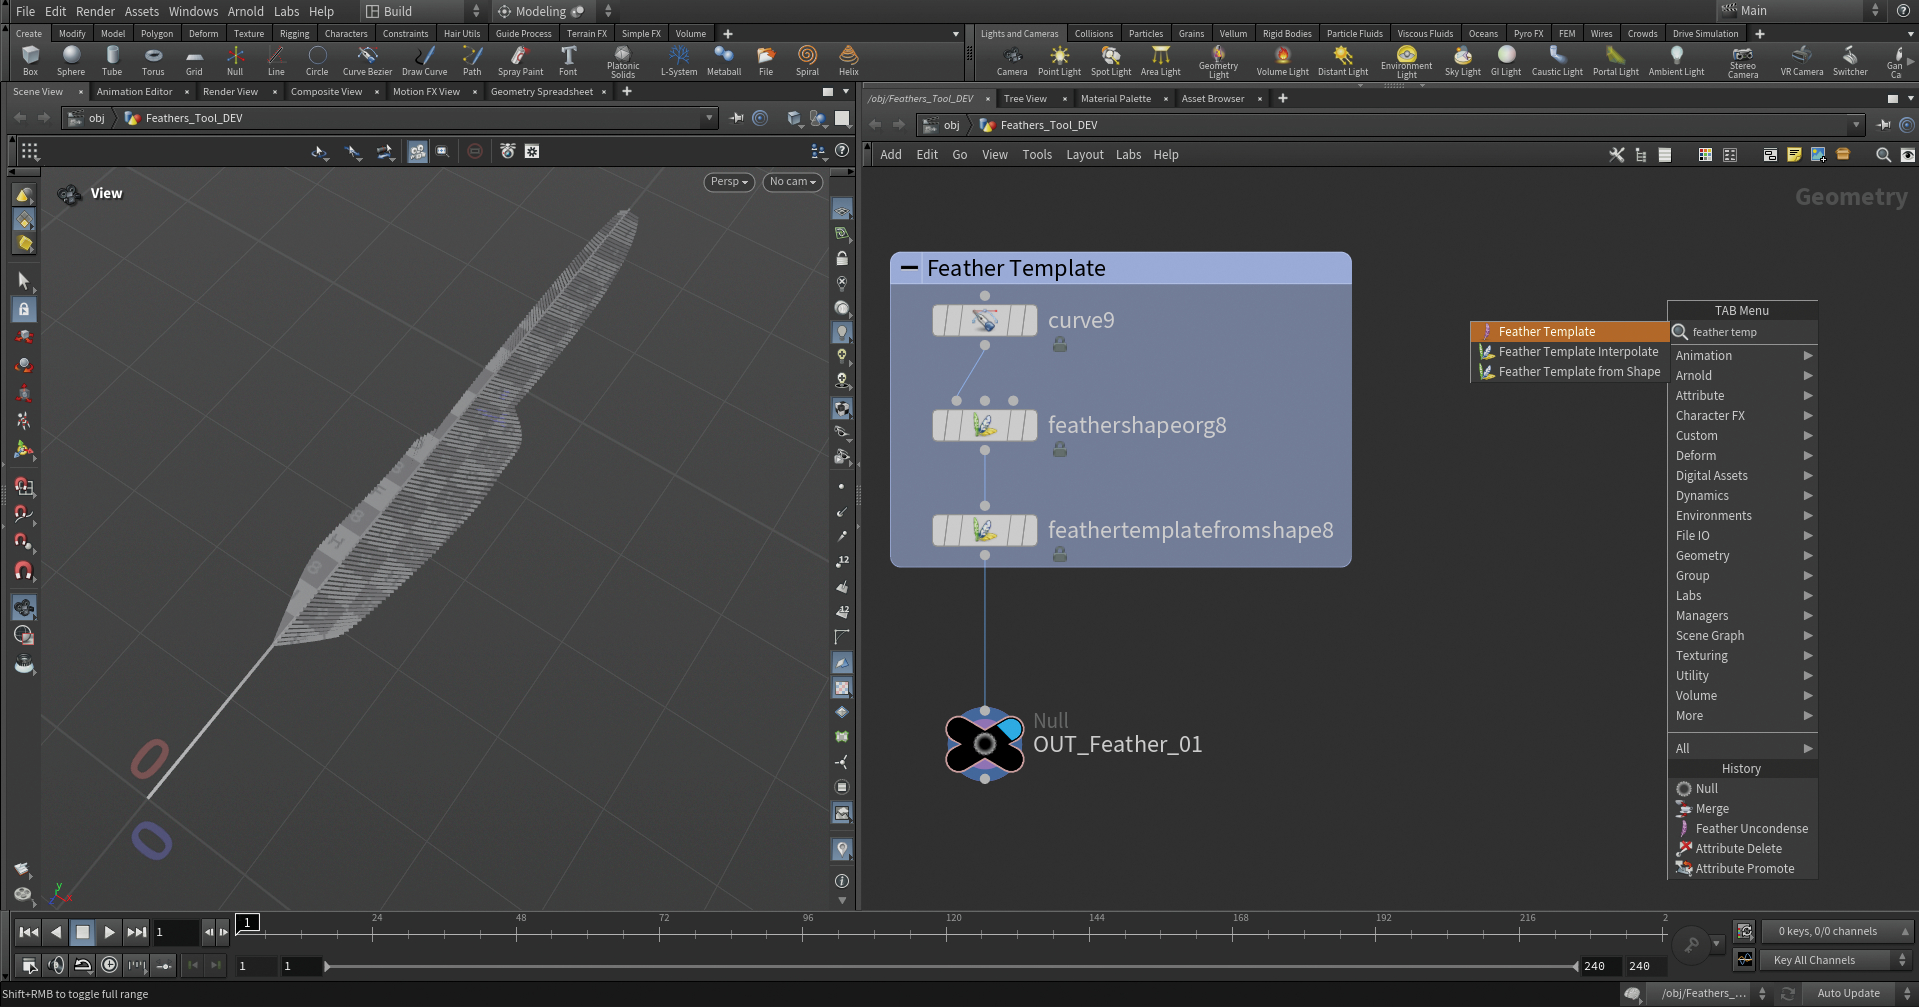
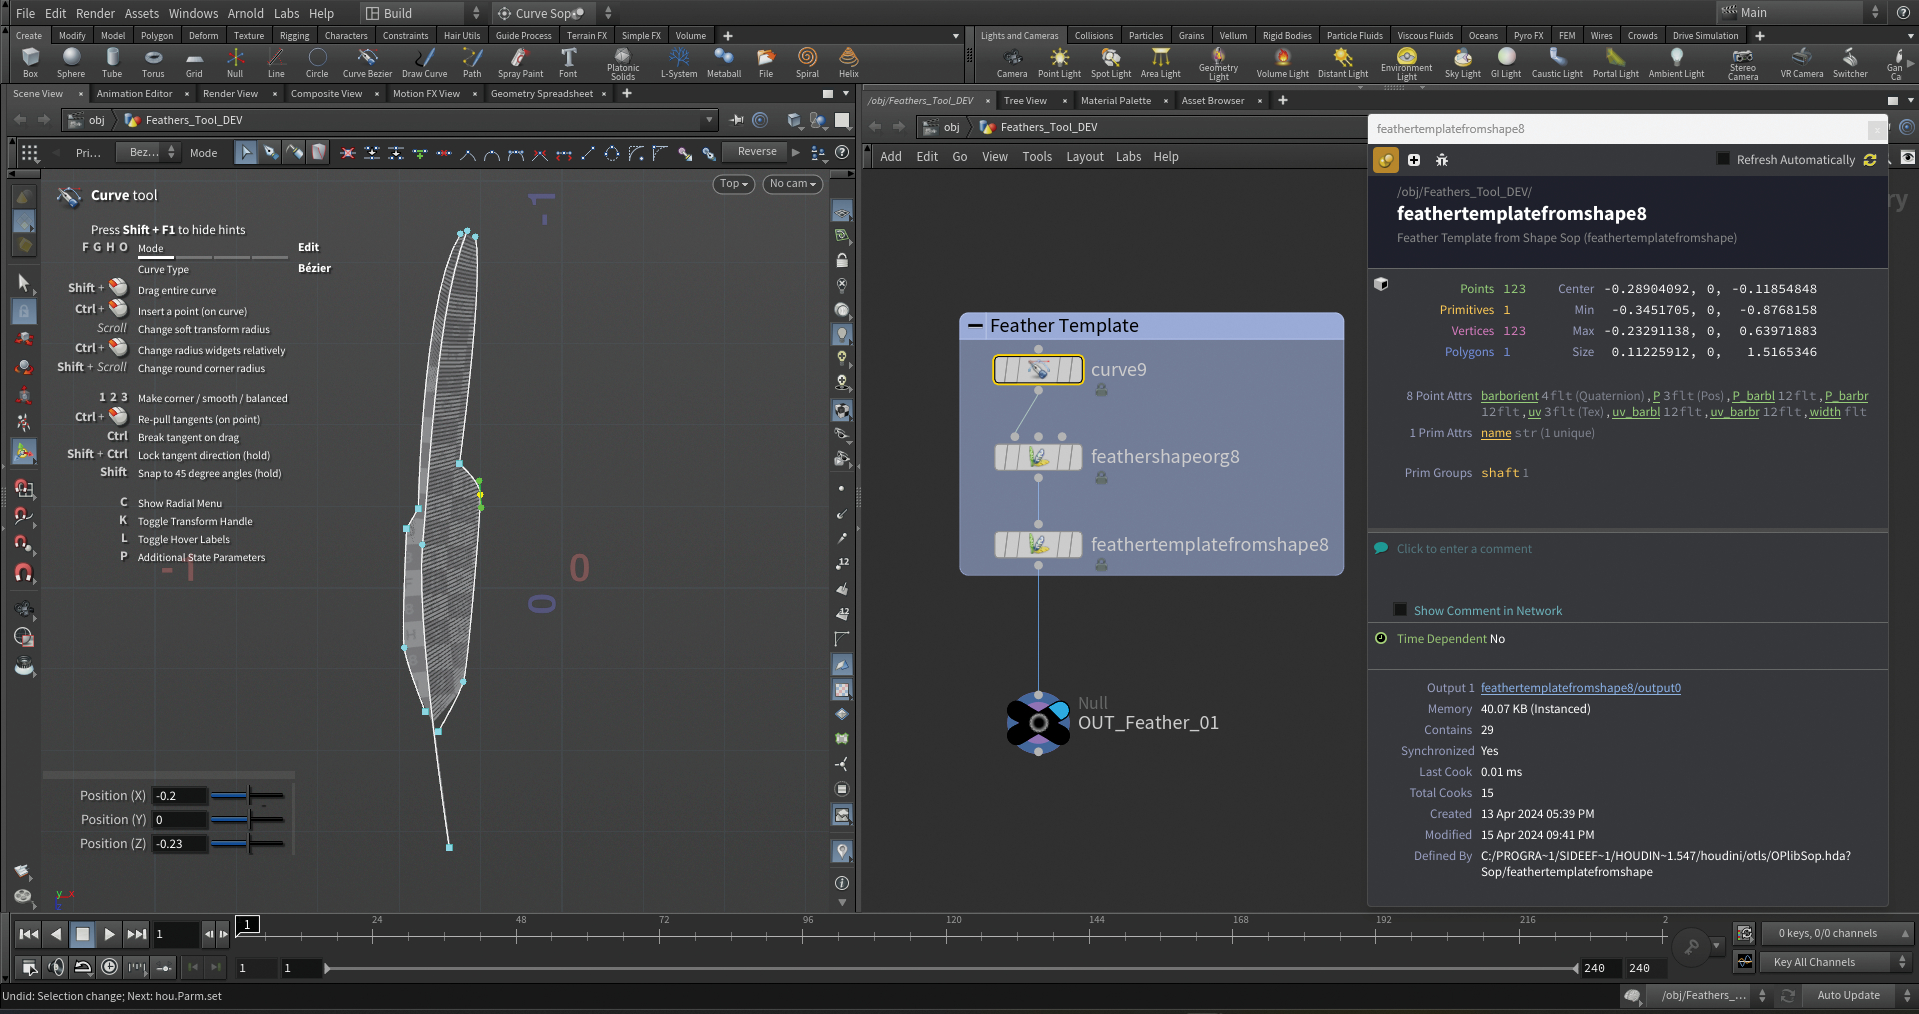
The Curve SOP provides three curves: a shaft and two boundaries representing the vanes. You can delete them and make your own custom curves if you want.
The ‘Feather Shape Organize SOP’ creates a name primitive attribute to identify the feather at a later stage, and the shaft and shape groups for further edits down the node stream.
The ‘Feather Template from Shape SOP’ turns the shape into a feather with barbs and also creates a wide range of point attributes like Barborient. Additionally, you can set a name for the feather.
06. Feather clumping details
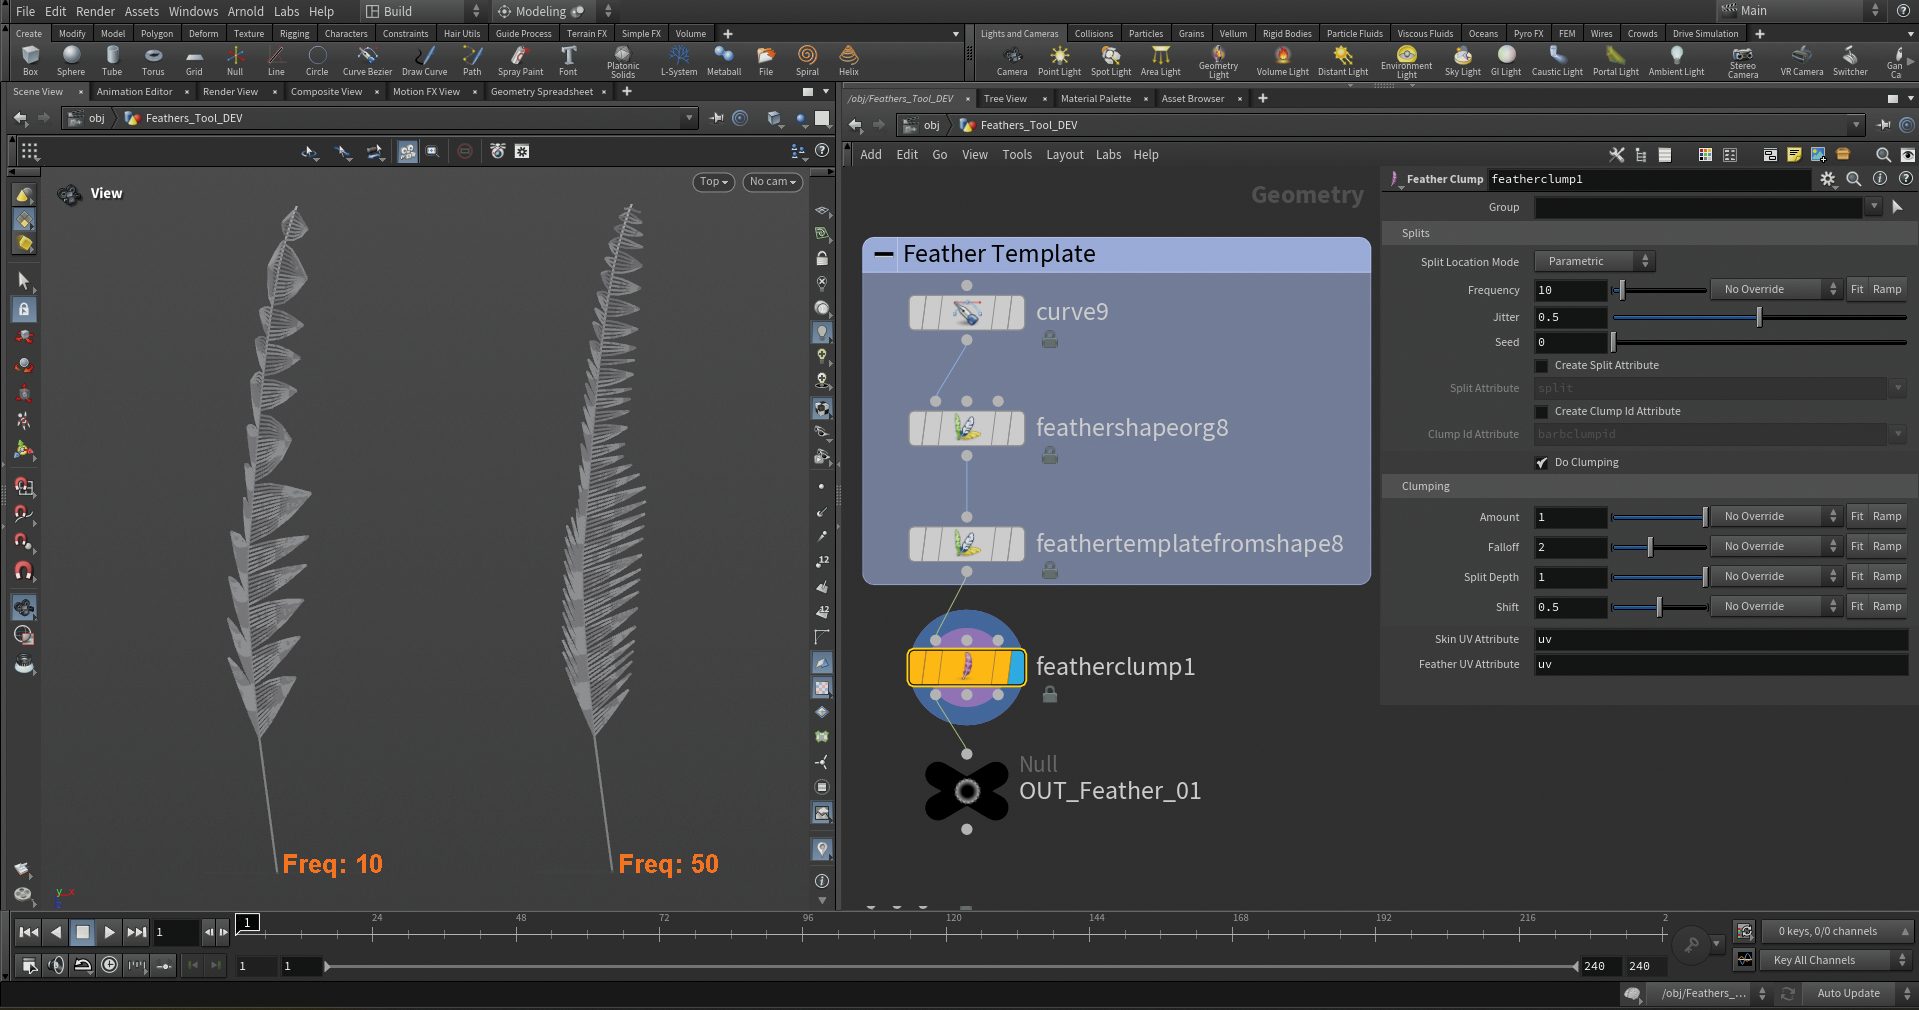
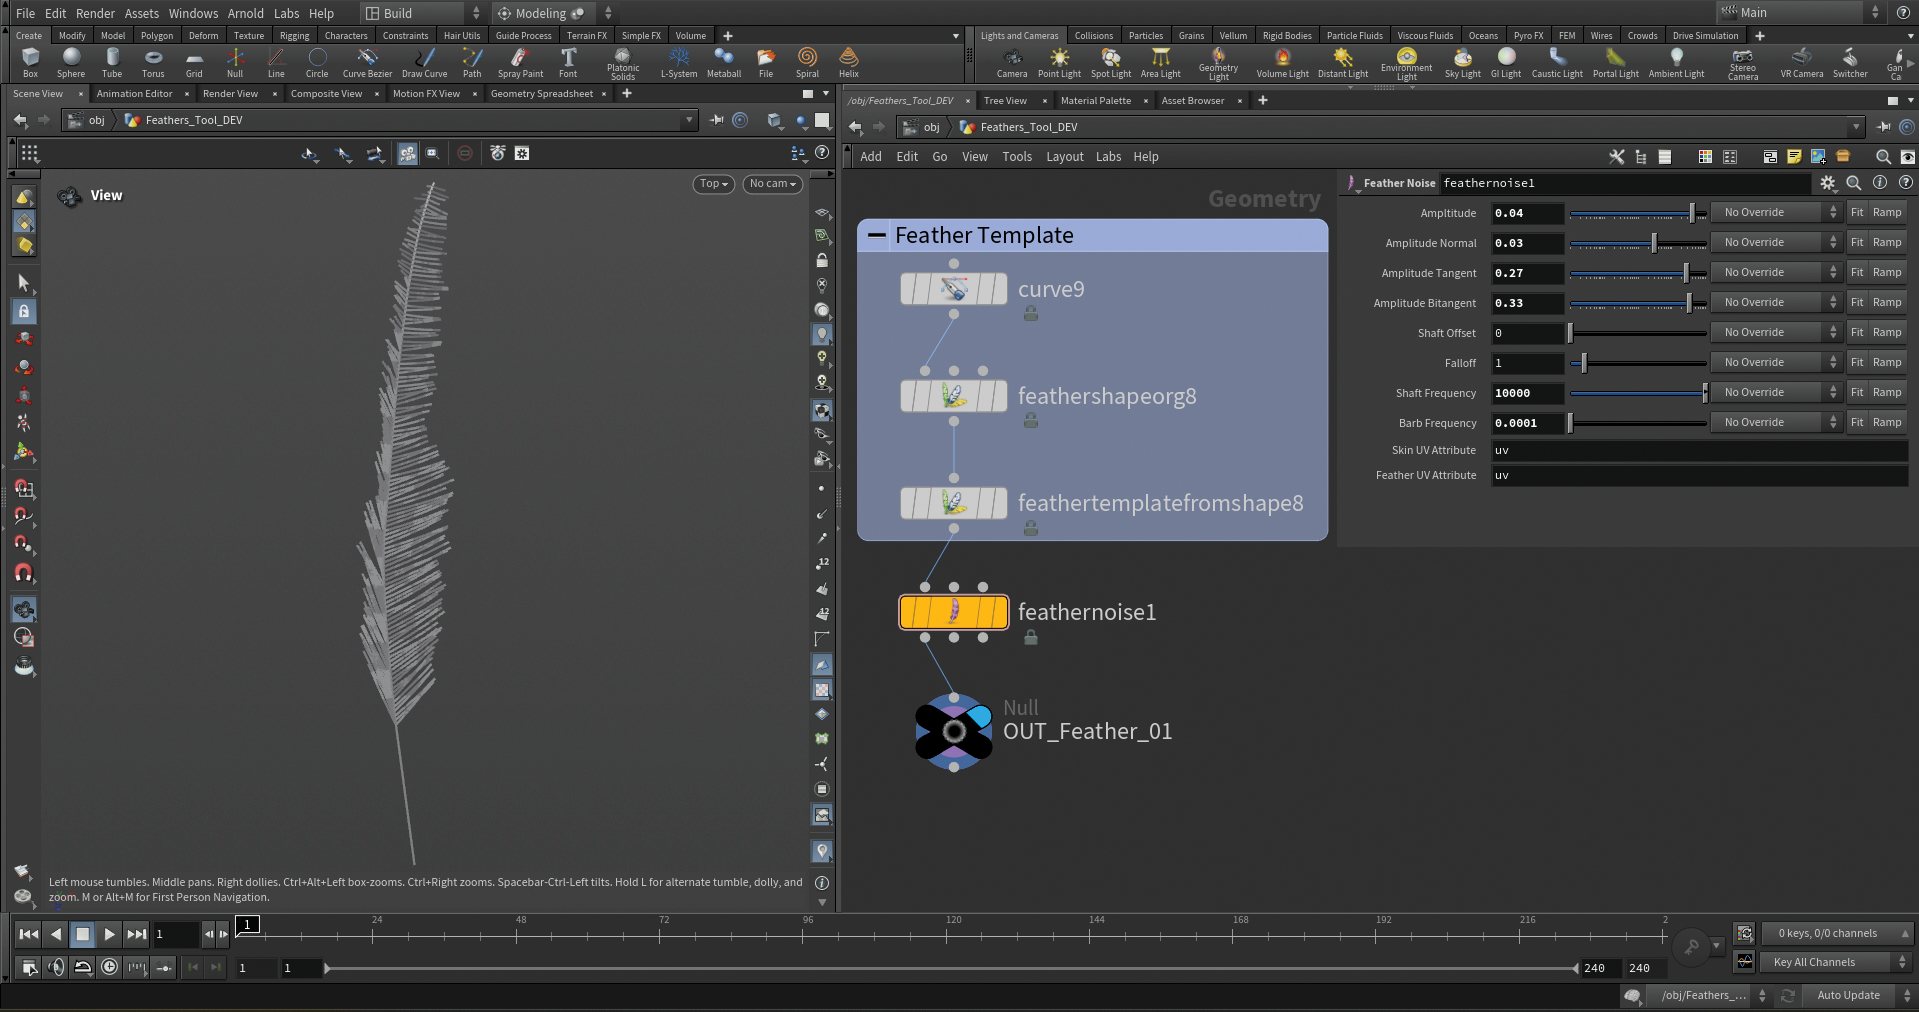
The Feather Clump SOP is an important node for mimicking the natural clumping of a feather and adding further details to the feather geometry.
This node is used to simulate the natural tendency of feathers to clump together in certain areas. With this node we can control the grouping and clustering of the barbs, copying the way they naturally form into bundles or tufts.
This tool is particularly useful for creating variations in the feather’s density and distribution, as well as adding visual interest to the overall arrangement. I’d recommend playing with the parameters here, as it’s a highly intuitive process.
07. Adding noise to the feathers
On top of the clumping capabilities, Houdini also features a Feather Noise SOP that’s used to introduce noise into the barbs of a feather, which in turn generates diverse positions for a more authentic and lifelike appearance.
This enables independent control over the level of noise found along the normal, tangent and bitangent axes, as well as the frequency seen along the shaft and barbs. By using noise in our project, we can add realism and complexity to the feathers, which helps them to feel more dynamic.
Additionally, animated noise can be used to quickly simulate any environmental factors you might need such as wind or general movement.
08. Making a texture mask
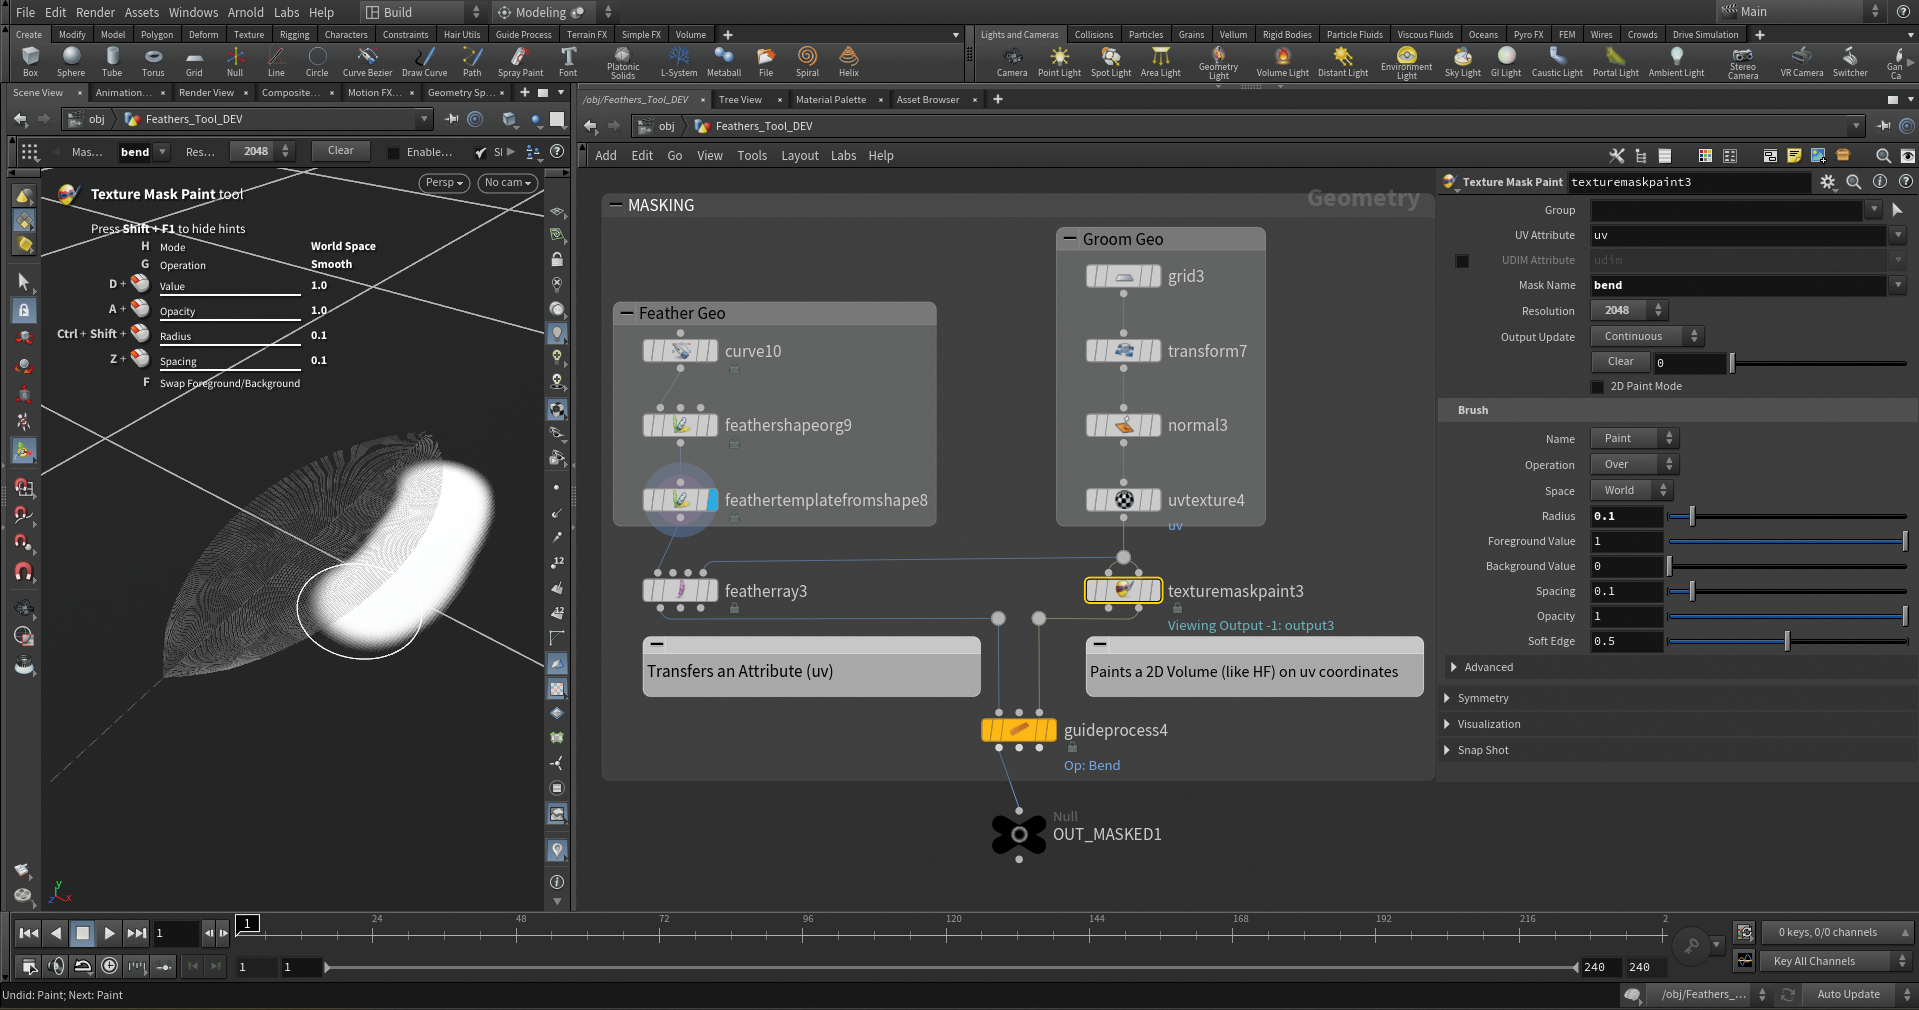
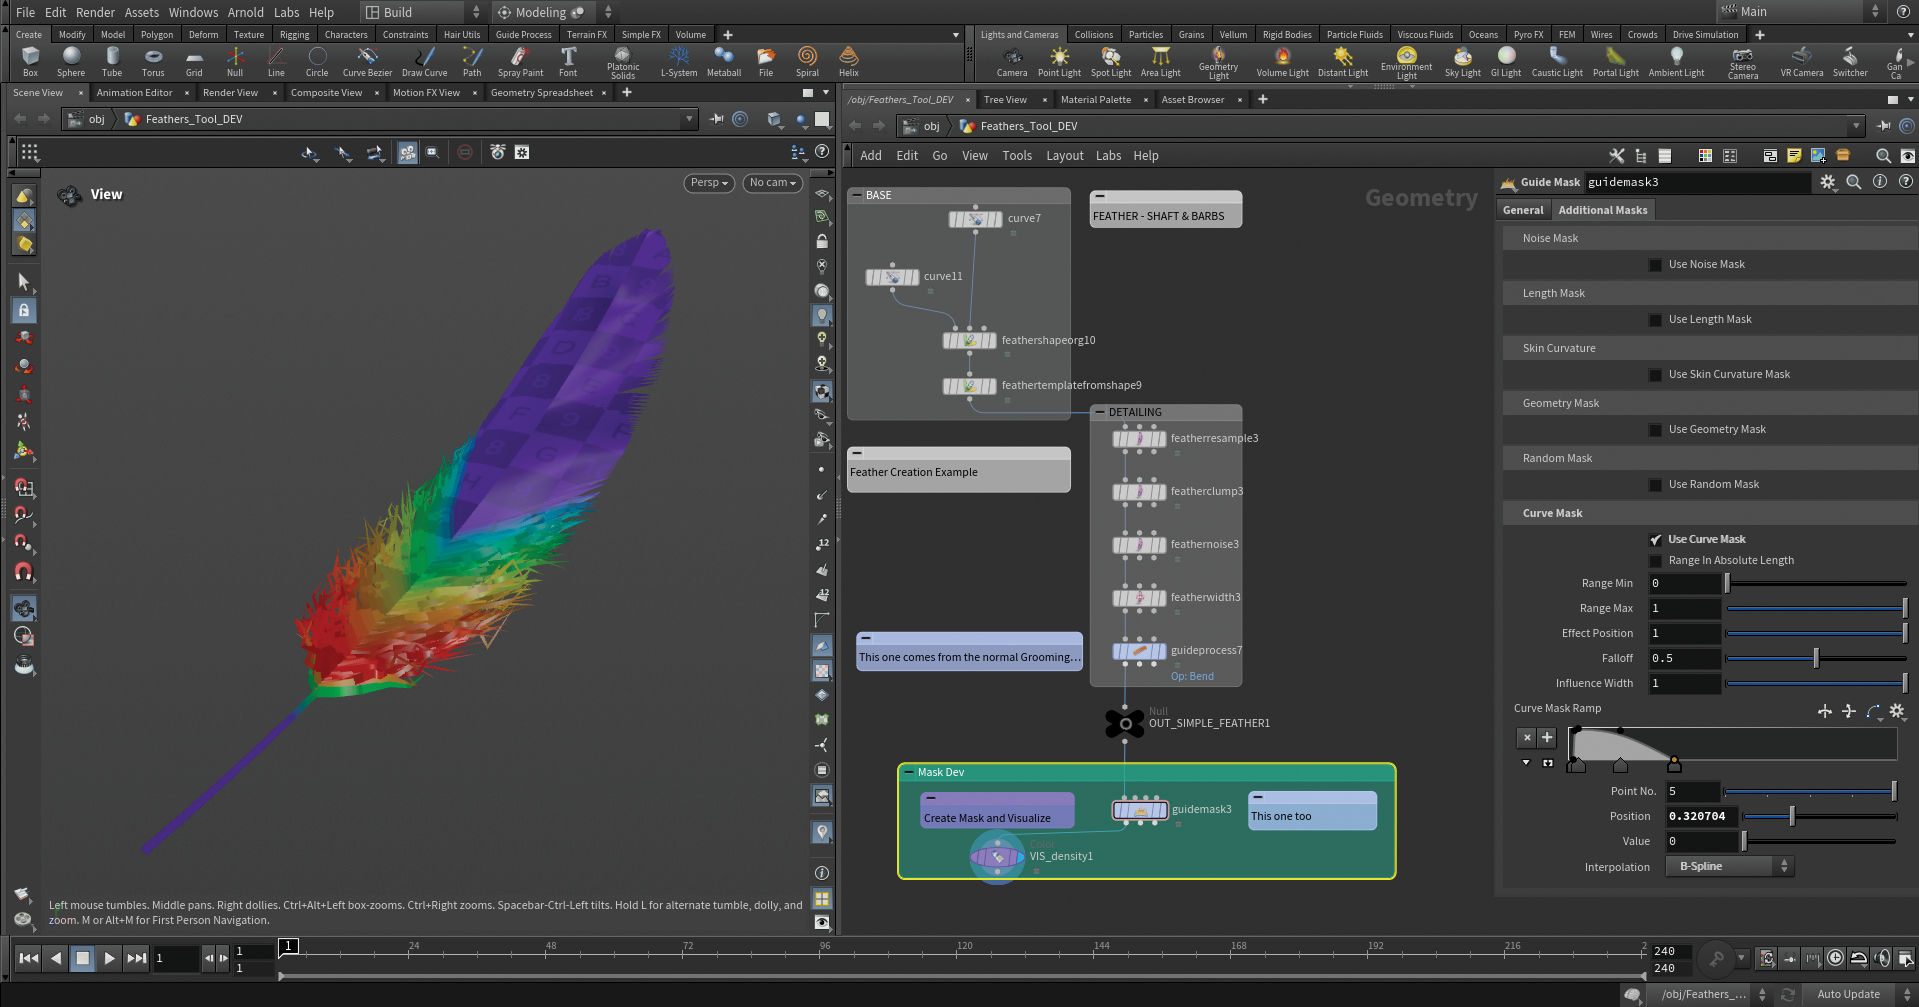
Our next step is to use the Texture Mask Paint SOP to create a mask. This node will store the mask as texture primitive. Connect it to a ‘Scatter In Mask SOP’ to create some points in the painted area and lastly connect it to a Hair Generate SOP. Use the Guide Mask SOP to create a procedural mask, name it in the Output Attribute parm, then in Curve Mask use the ramp to create the mask. Use a Color SOP set to ‘Ramp by Attribute’ and add your Output Attribute name.
See our list of the best 3D art here.
09. Adding extra SOPs
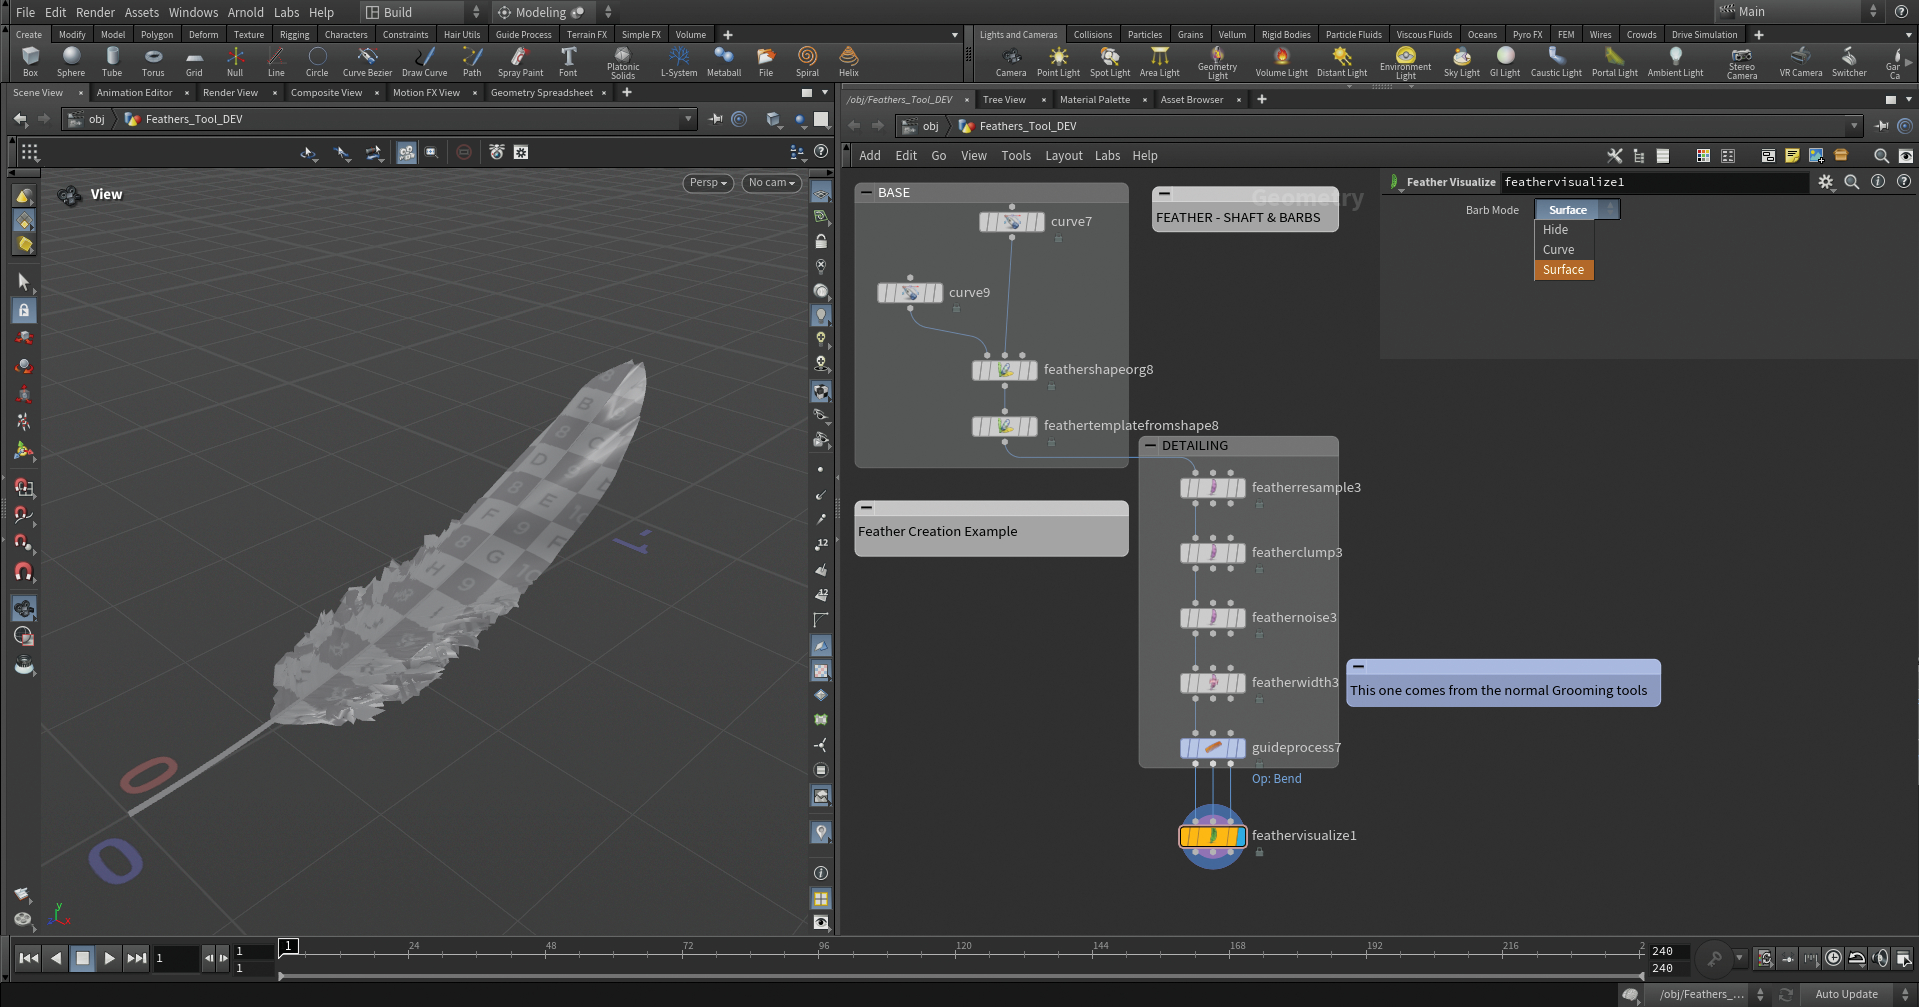
The Feather Visualize SOP is used to change the visualisation of the feather. It takes the feather primitives as input and generates polygonal representations of the them. Keep in mind that it’s only a representation, and the geometry is still condensed.
The Feather Width SOP is also incredibly useful to control the width of the shaft and the barb independently.
The Feather Surface SOP, meanwhile, instead takes feather primitives as input and generates polygonal representations of the feathers.
10. Grooming tools
Houdini’s new feather tools are compatible with the software’s existing grooming tools, which enables artists to integrate feather grooming seamlessly into their character and creature workflows. This streamlines the process of creating and styling your feathers alongside other hair and fur.
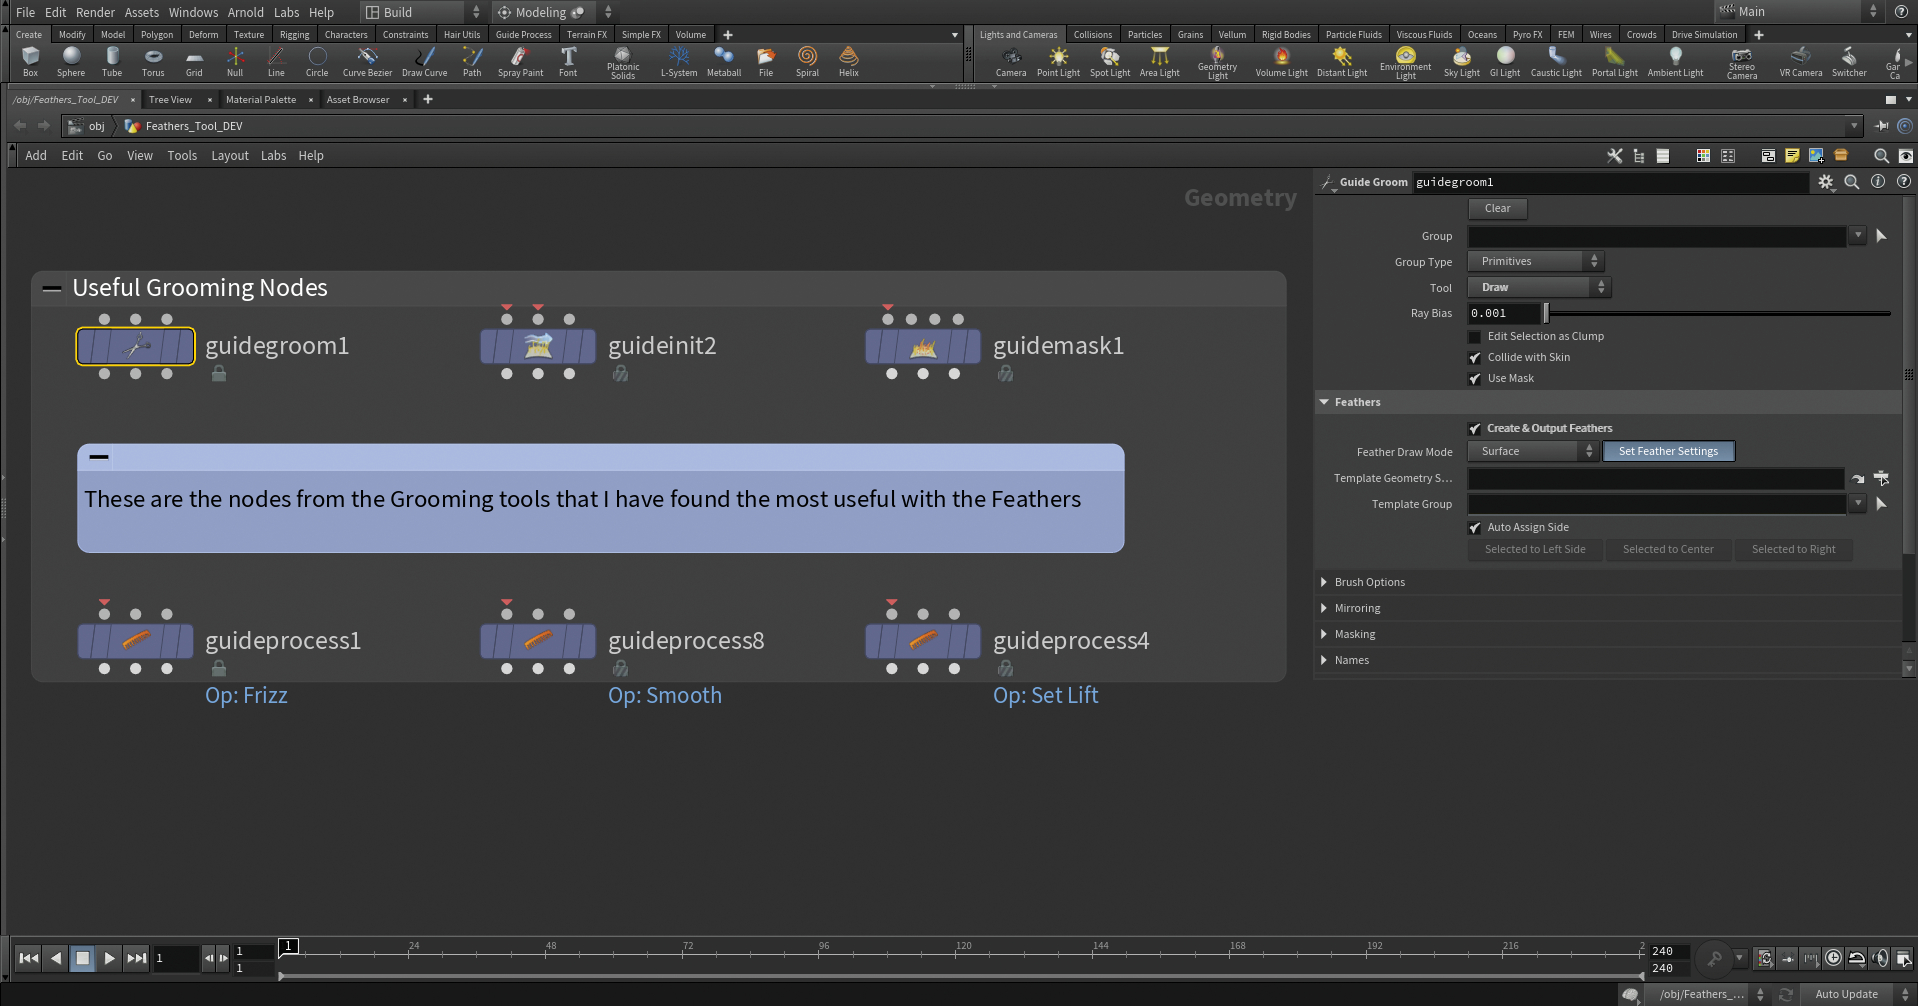
If you’re new to hair, fur and feathers, you might need a little routine to become familiar with the grooming process. To groom our character we start by adding guides, which are used to set up the initial direction and length of the feathering. Later, the instances are interpolated between the guides. Instead of grooming large amounts of feathers, you only manipulate the guides and the interpolated feathers will follow.
11. The grooming workflow
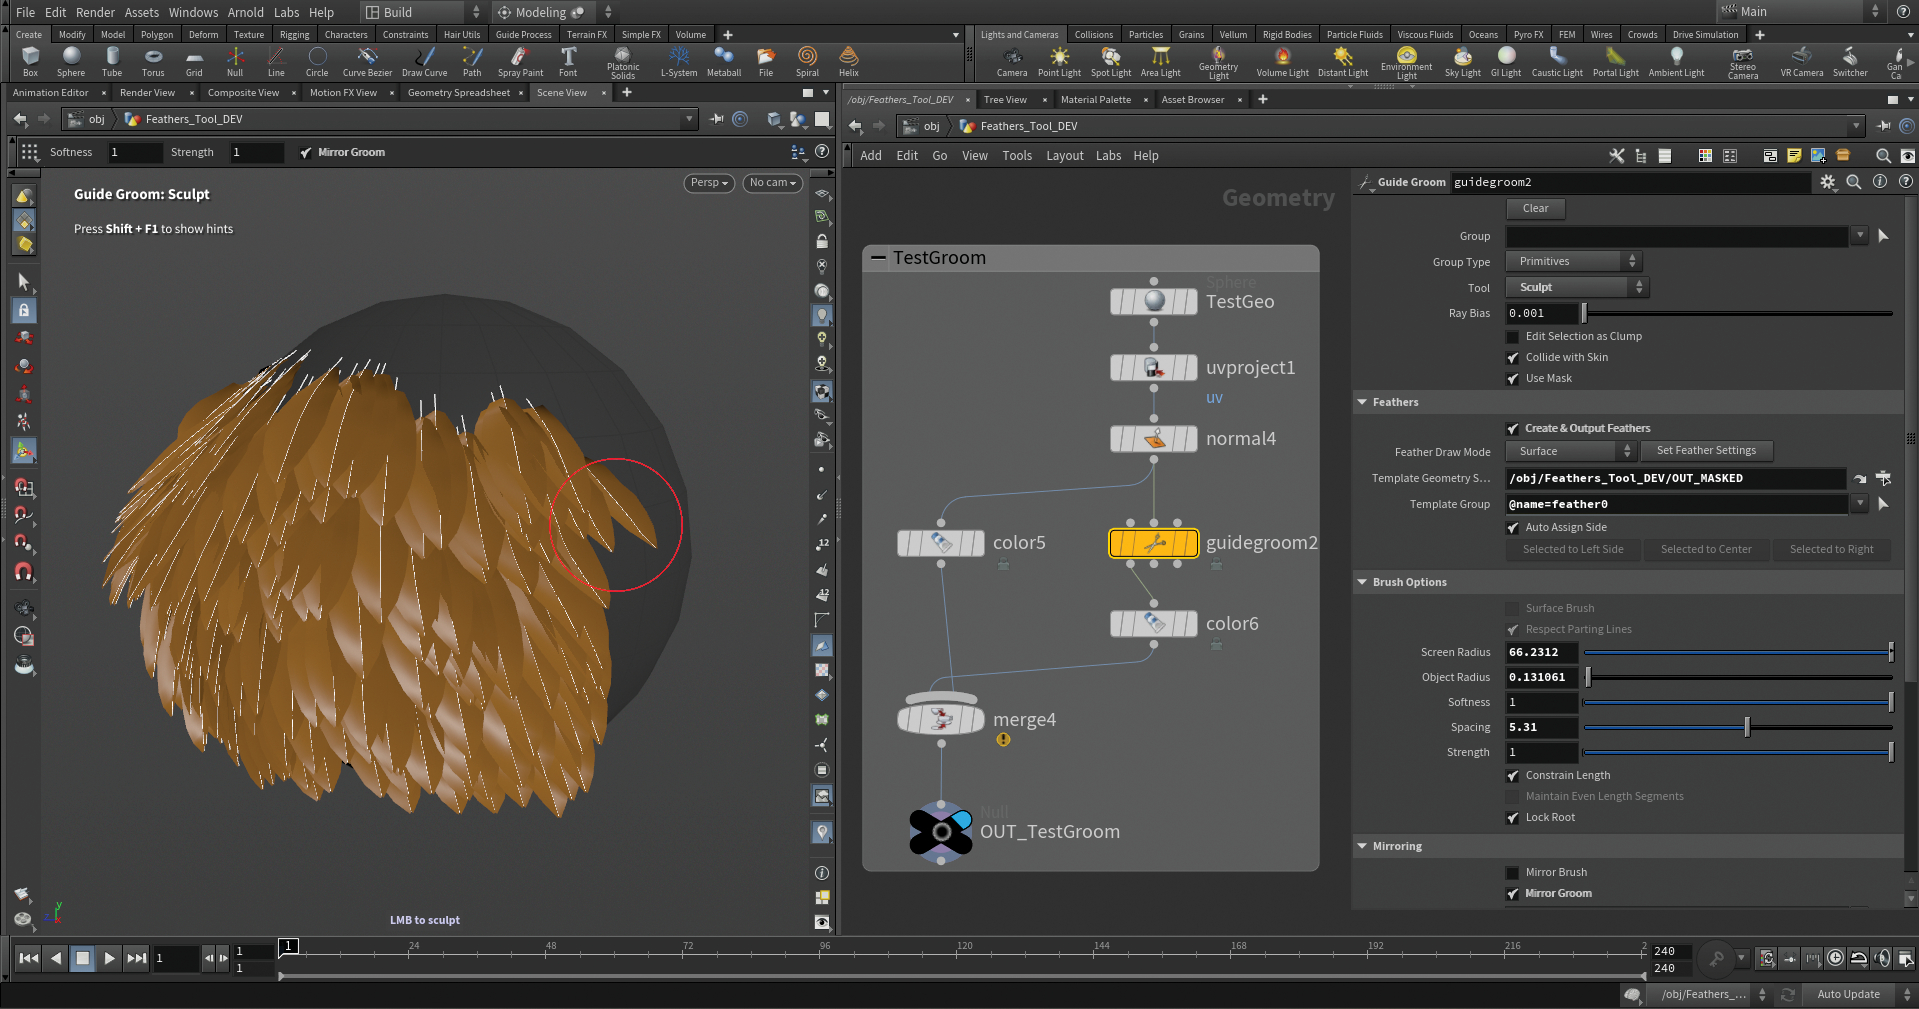
Let’s create a Guide Groom node after our geometry. The first step is to make the node aware that we’re going to use feather primitives. In the node properties, tick ‘Create & Output Feathers’, path it to your atlas and choose the feather you want to paint. Lastly click Set Feather Settings.
This button does two things: it turns on Orientation Attributes, and sets it to Barborient instead of Orient. The Guide Groom node has multiple painting modes. The most used are Draw, which lets you draw out curves from the object’s surface; Plant, which lets you add points where you want the feathers to appear; Paint/Sculpt, which lets you sculpt your guides; and Template, which lets you paint another feather type replacing your existing feathers.
12. Solaris starter
Solaris is a revolutionary suite of tools encompassing look development, layout and lighting, designed to empower artists in crafting USD-based scenes that seamlessly transition from asset creation to fi nal render. If you’ve previously been rendering within Houdini, you’re used to navigating through various contexts such as /obj, /mat, and /rop.
However, when we take a closer look, this divided way of working doesn’t fully make the most of Houdini’s strengths. One of the primary objectives of Solaris is to streamline and unify these contexts into a singular, cohesive network environment.
By consolidating multiple workflows within a single network, Solaris is increasing in popularity and I think it’s definitely worth giving it a look.
13. Setting up your scene in Solaris
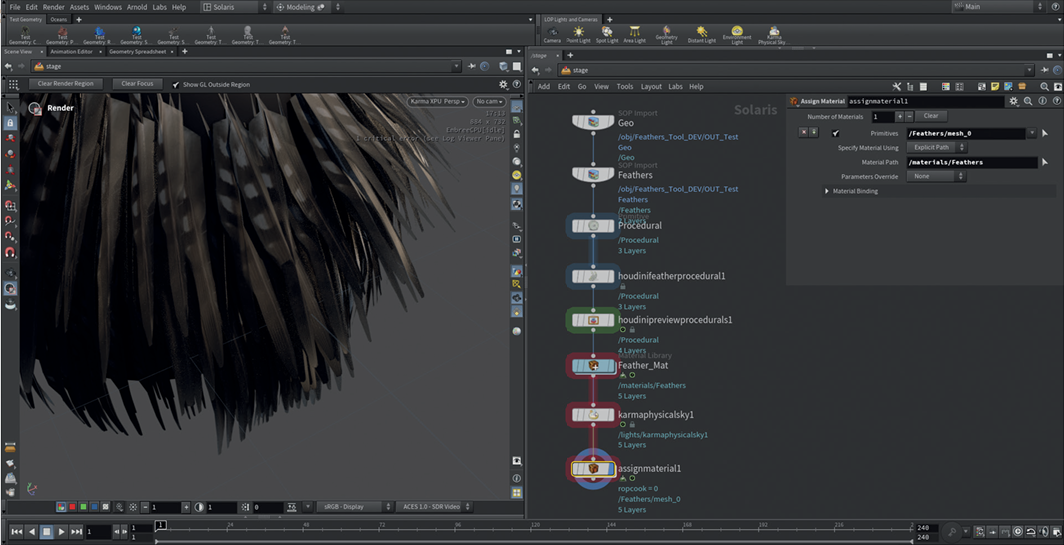
To get started, make sure to set your desktop to Solaris so you can look at the Scene Graph Tree (SGT). Because we want to recall our geometry from SOPs, we’ll create two SOP Import nodes, which are just like an Object Merge as they grab geo from SOPs, and pull it over to LOPs. Let’s path them correctly and connect one after the other; don’t worry, their order isn’t important.
To visualize the feathers, create a Primitive node, call it ‘Procedural’, set the primitive kind to Component and create a Houdini Feather Procedural node (HFP). In the HFP we want to path our primitive node to the Procedural Prim parm and our guides to the Groom Rest parm.
14. Preparing shading and rendering
Time for the shading! Create a Material Library node and then set up a Karma Material Builder within it. Here we’re going to delete the pre-existing MtlX Standard Surface and substitute it with a Karma Hair material. At this point we can start to take a look at our Karma Hair node and check out the main parameters to see what they do.
15. Key parameters
Within the Color tab, the main parameters are ‘melanin’ (the amount of melanin from 0 (white), to 1 (black), passing through multiple shades of brown); ‘melaninRedness’ the redness amount (for blonde, brown, black and so on, which should be kept low); and ‘melaninRandomize’ (the amount of variation in your melanin distribution, which adds in white and red hairs).
Under the Specular tab, the most important attributes are ‘roughness’ (how rough your feather looks), and ‘roughnessRandomize’ (the chance to have different values all around). If you want to assign a realistic color based on the feather atlas, there is a technique you can use: start the shading process by simply importing the atlas texture (MtlX Image) and then plug it into ‘baseColor’ and ‘diffuseColor’ of the Karma Hair material.
16. Assigning colours to your feathers
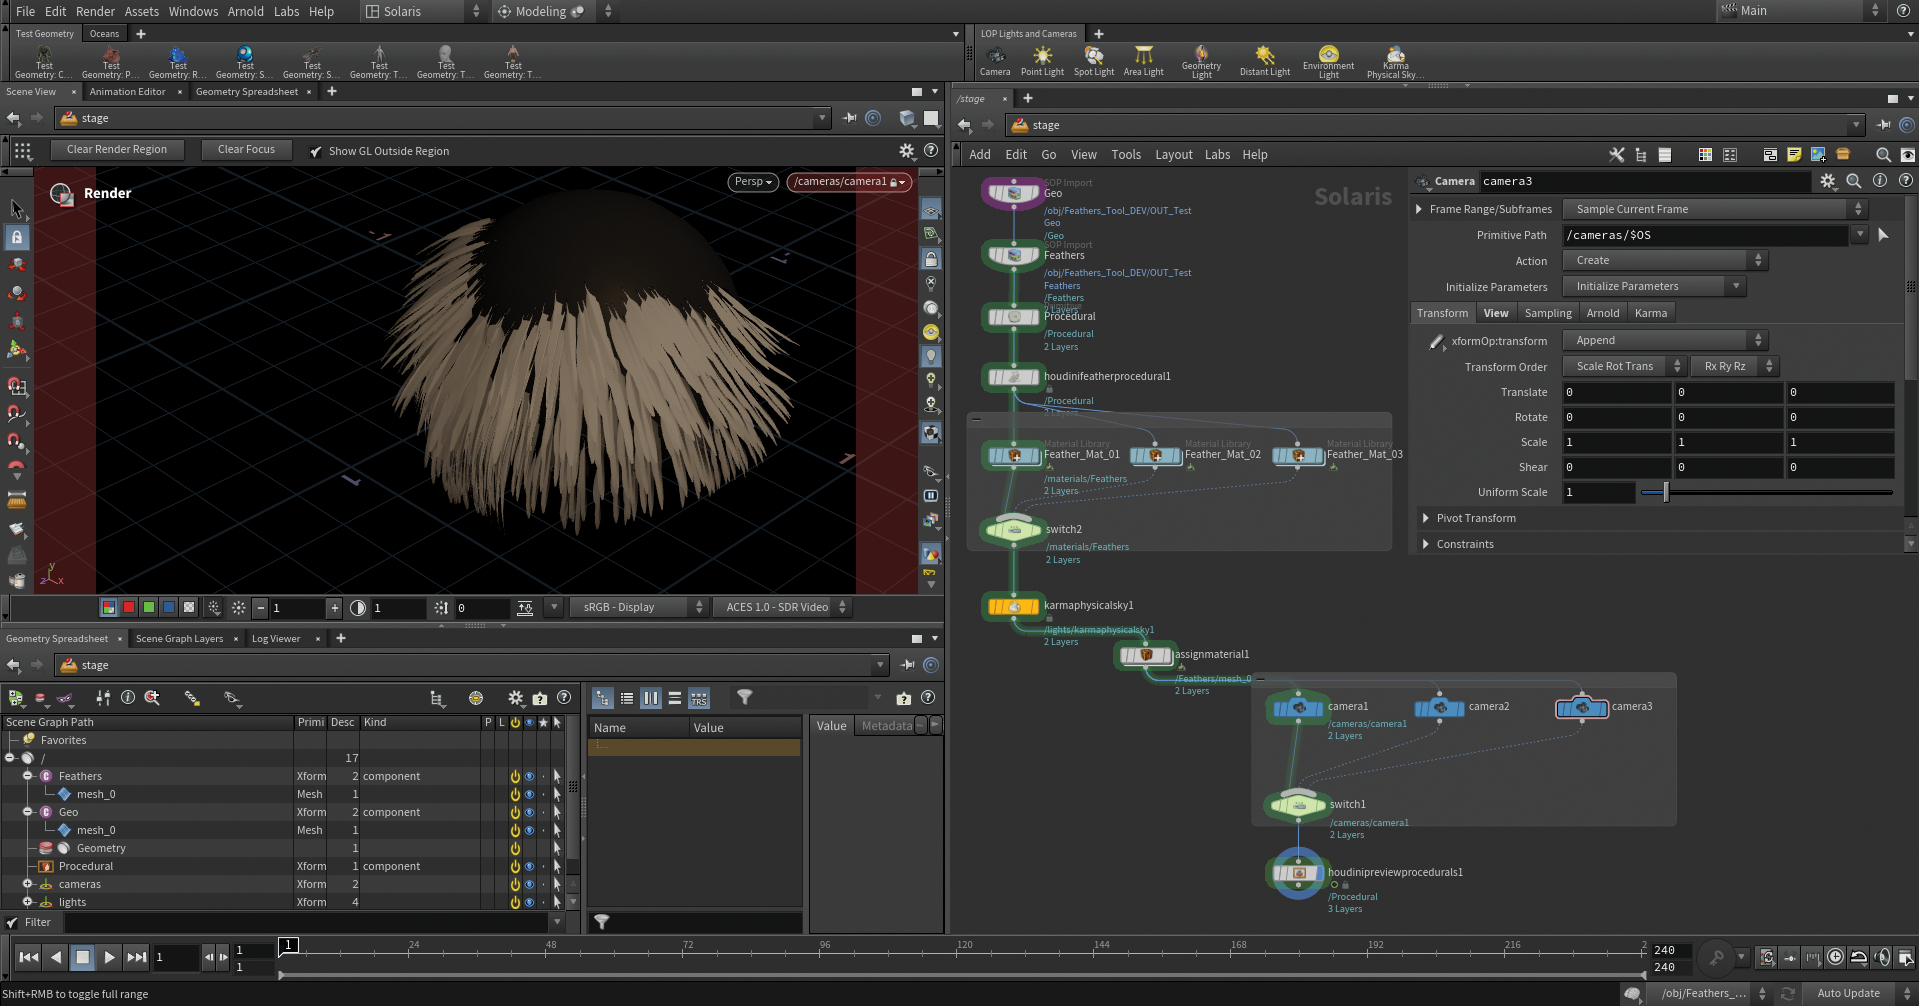
A quick way to assign a texture to your feather is by sampling it from the feather atlas image. This process can be a little tedious the first time around. Given your feather was traced on the grid with the atlas texture as previously explained, we’ll transfer the UVs from the grid across to the feather. The Feather Ray SOP is the fastest way to do this.
Connect your Feather Geo to the first input and the grid with the atlas assigned. In the third input, specify that you want to transfer the ‘uv’ attribute in the Feather Ray node properties.

Thank you for reading 5 articles this month* Join now for unlimited access
Enjoy your first month for just £1 / $1 / €1
*Read 5 free articles per month without a subscription

Join now for unlimited access
Try first month for just £1 / $1 / €1

Mario is a an Adobe Certified Professional in Photoshop, Premiere Pro, and After Effects. He is also a Houdini specialist, and has three years of experience in photography and two years in the VFX / animation industry.
You must confirm your public display name before commenting
Please logout and then login again, you will then be prompted to enter your display name.
