
The idea for this project stemmed from my love of Brandon Sanderson’s Mistborn novels and my desire to visually realise the world I was reading about. In this tutorial you can discover how to use Cinema 4D and After Effects to create a high-end motion graphics animation to be used for a title sequence. (There are more Cinema 4D tutorials and After Effects tutorials here on Creative Bloq to read.)
Choosing to invest time into this personal project rather than taking on any additional client work was a conscious decision, driven by my passion for fantasy literature and visual storytelling.
My creative process mirrored my usual approach working with clients, involving idea generation, script-storyboard development, style frame creation, animatics and shot finalisation. However, the freedom allowed me to push my boundaries and experiment creatively more than usual.
The animatic is crucial for defining the story. Establishing timings, 3D space, cameras, and sound design are essential components, ensuring coherence and effectiveness in storytelling during production
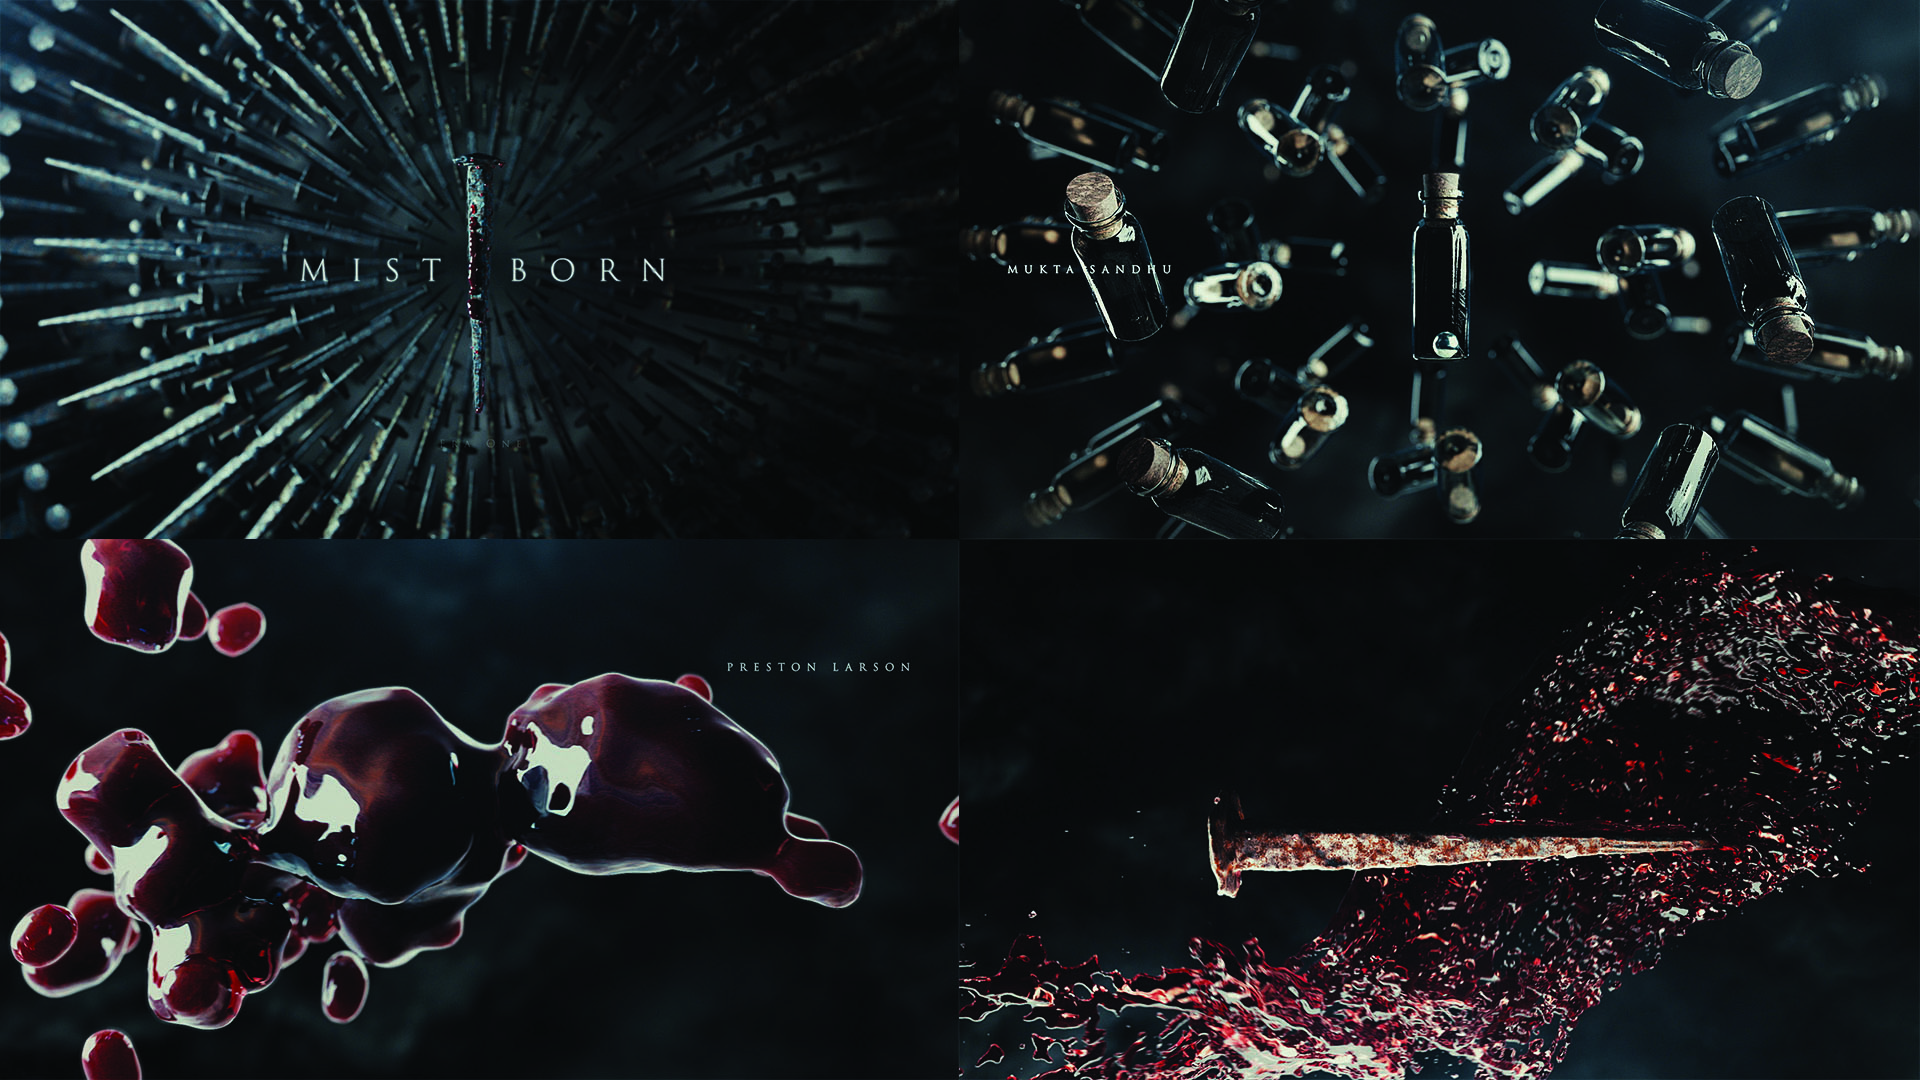
I drew inspiration from Allomancy, Feruchemy, and Hemalurgy – the fundamental forms of magic in the Mistborn universe – aiming to capture their visual essence. Each form of magic required a distinct symbolic representation.
For Allomancy, I used images of bottles and coins to evoke metals and their manipulation. Feruchemy, centered on storing attributes within metal, was represented by bracelets, embodying containment and preservation. Hemalurgy, the most sinister of the three, was depicted with nails and blood, symbolizing its brutal method of stealing power from others.
To truly capture the essence of Mistborn, I dived into its narrative and characters. For example, I used elements such as a book that one of the characters in the series is writing to serve as a little nod to the intricacies of the story. These elements, seemingly distinct on the surface, weave together to form a tapestry that reflects the complex interplay of themes and motifs in the series.
This project resonated with me as it matched my interests. While I’ve had similar ideas for personal projects in the past, this felt like the perfect opportunity to bring my love for Mistborn and visual storytelling together.
Get the Creative Bloq Newsletter
Daily design news, reviews, how-tos and more, as picked by the editors.
This was a solo fan art project, created using Cinema 4D and After Effects, the main tools I always use when I’m developing projects. The primary plugins I used to create this piece were X-Particles and Red Giant, and everything was rendered with Redshift. Follow along below, but also read up on the best animation software for more motion graphics tools.
01. Start with research
Diving into research is my go-to approach for delving into any subject and sparking my inspiration. It’s the cornerstone of how I kick off all of my projects, including this one centered around Mistborn.
Following my deep dive, I curated a mood board filled with captivating images, videos, quotes and ideas I stumbled upon. This mood board serves as my compass, guiding the visual direction and narrative trajectory of the project.
Ultimately, I chose to hone in on the process of papermaking, exploring the intricate steps that artisans take to craft this specific type of paper.
02. Continue pre-production
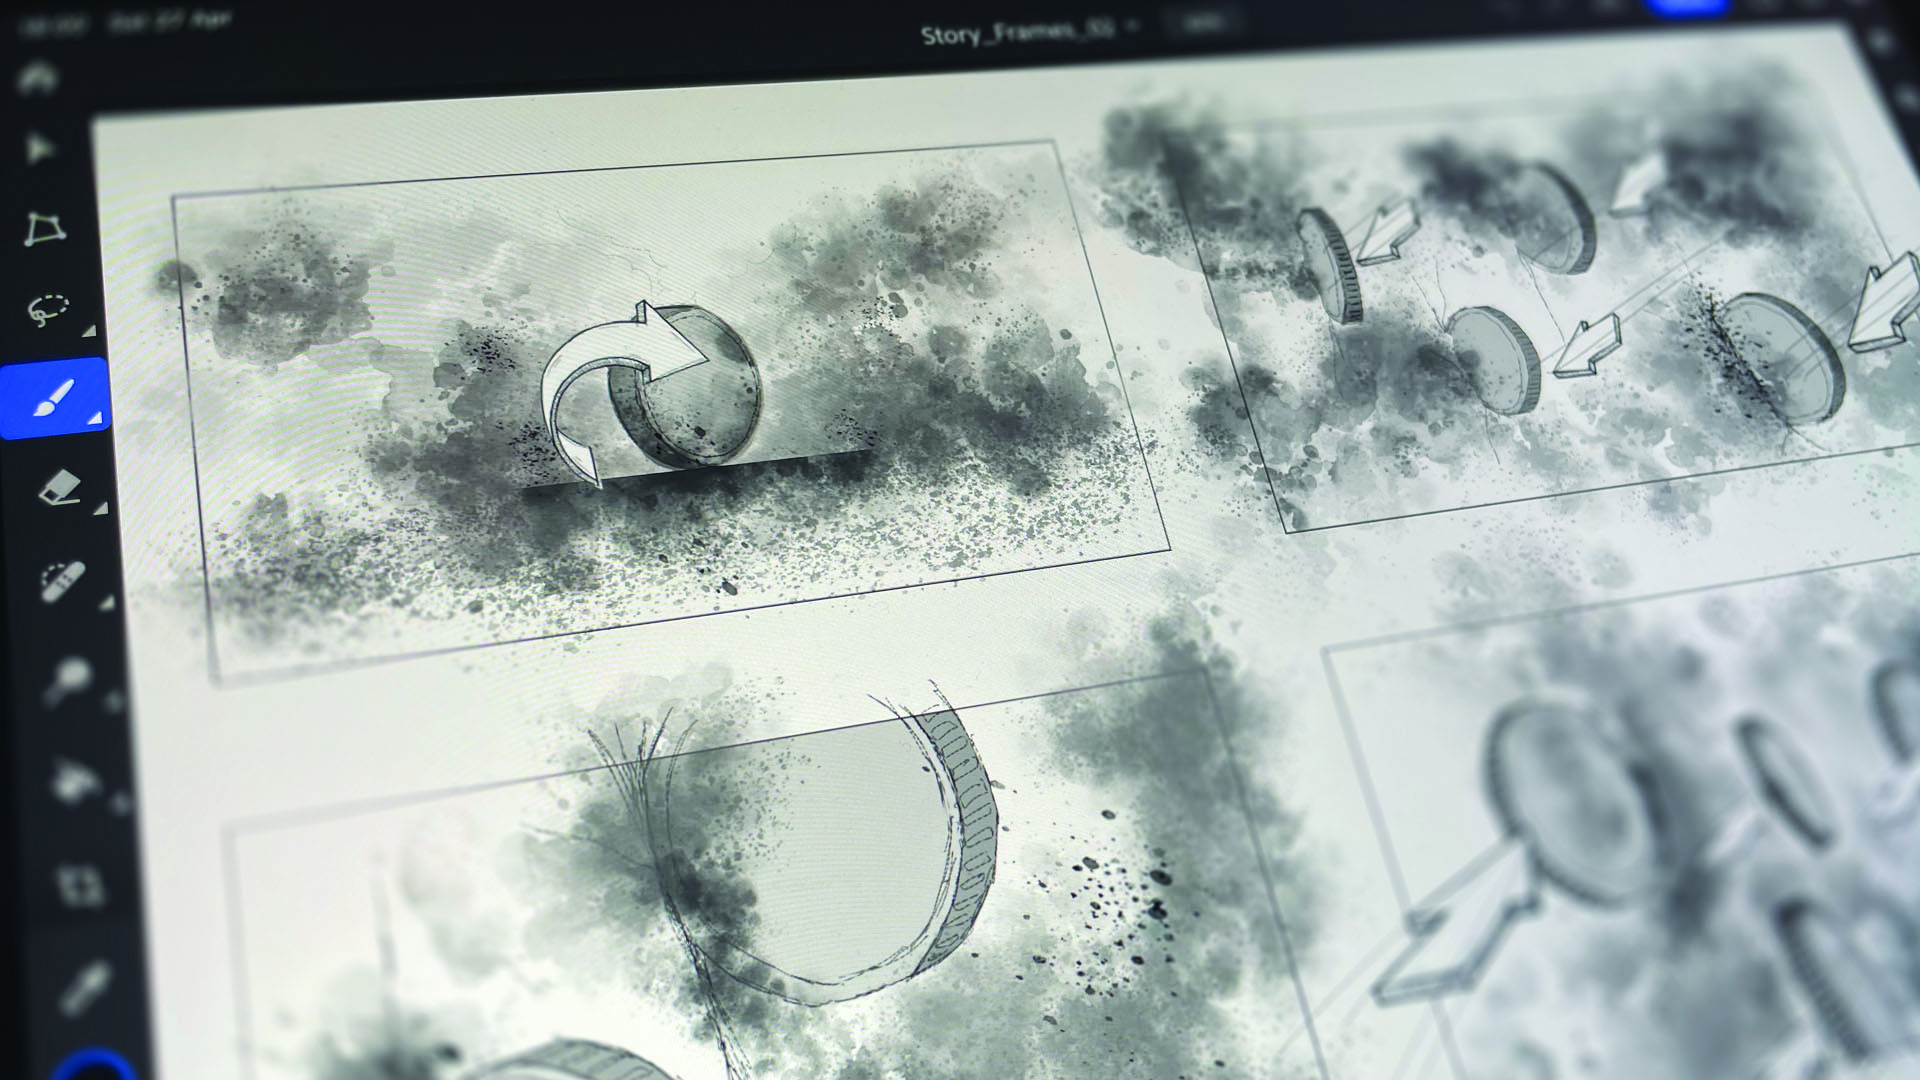
I begin the visual planning by sketching a basic storyboard, gradually fleshing out each shot with more details before fine-tuning timing and structure.
Moving over from sketches, I substituted them with simple 3D models and animated cameras crafted in Cinema 4D’s Viewport. This allowed me to build the initial cut of the animatic, paving the way for the refinement of each shot.
03. Create the book
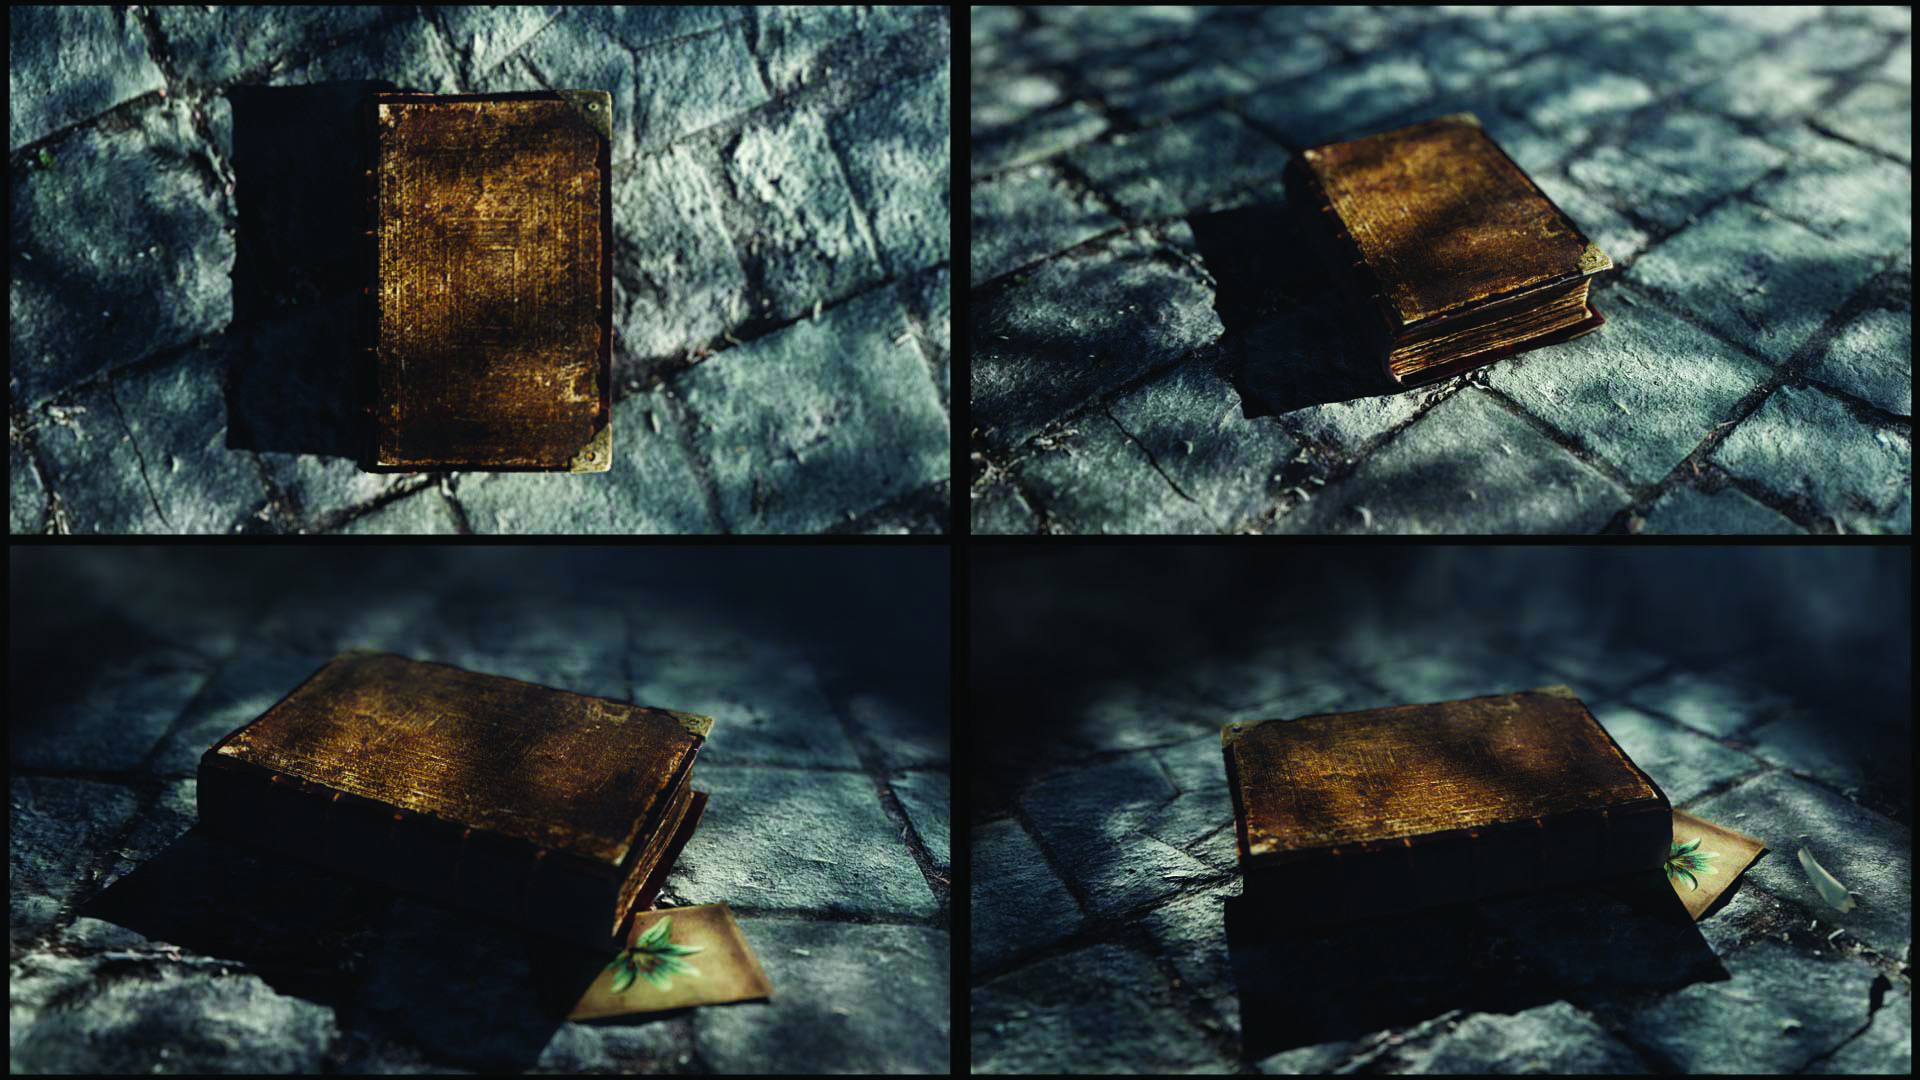
After acquiring a free-to-use model of a book, I customized it to align with my vision. Using Cinema 4D’s sculpting tools, I adjusted the asset to closely resemble my concept. I also replaced all the textures to enhance the overall appearance and bring the book in line with the aesthetic. This allowed me to personalize the asset and place it consistently into the project.
04. Mold a coin to meet the aesthetic
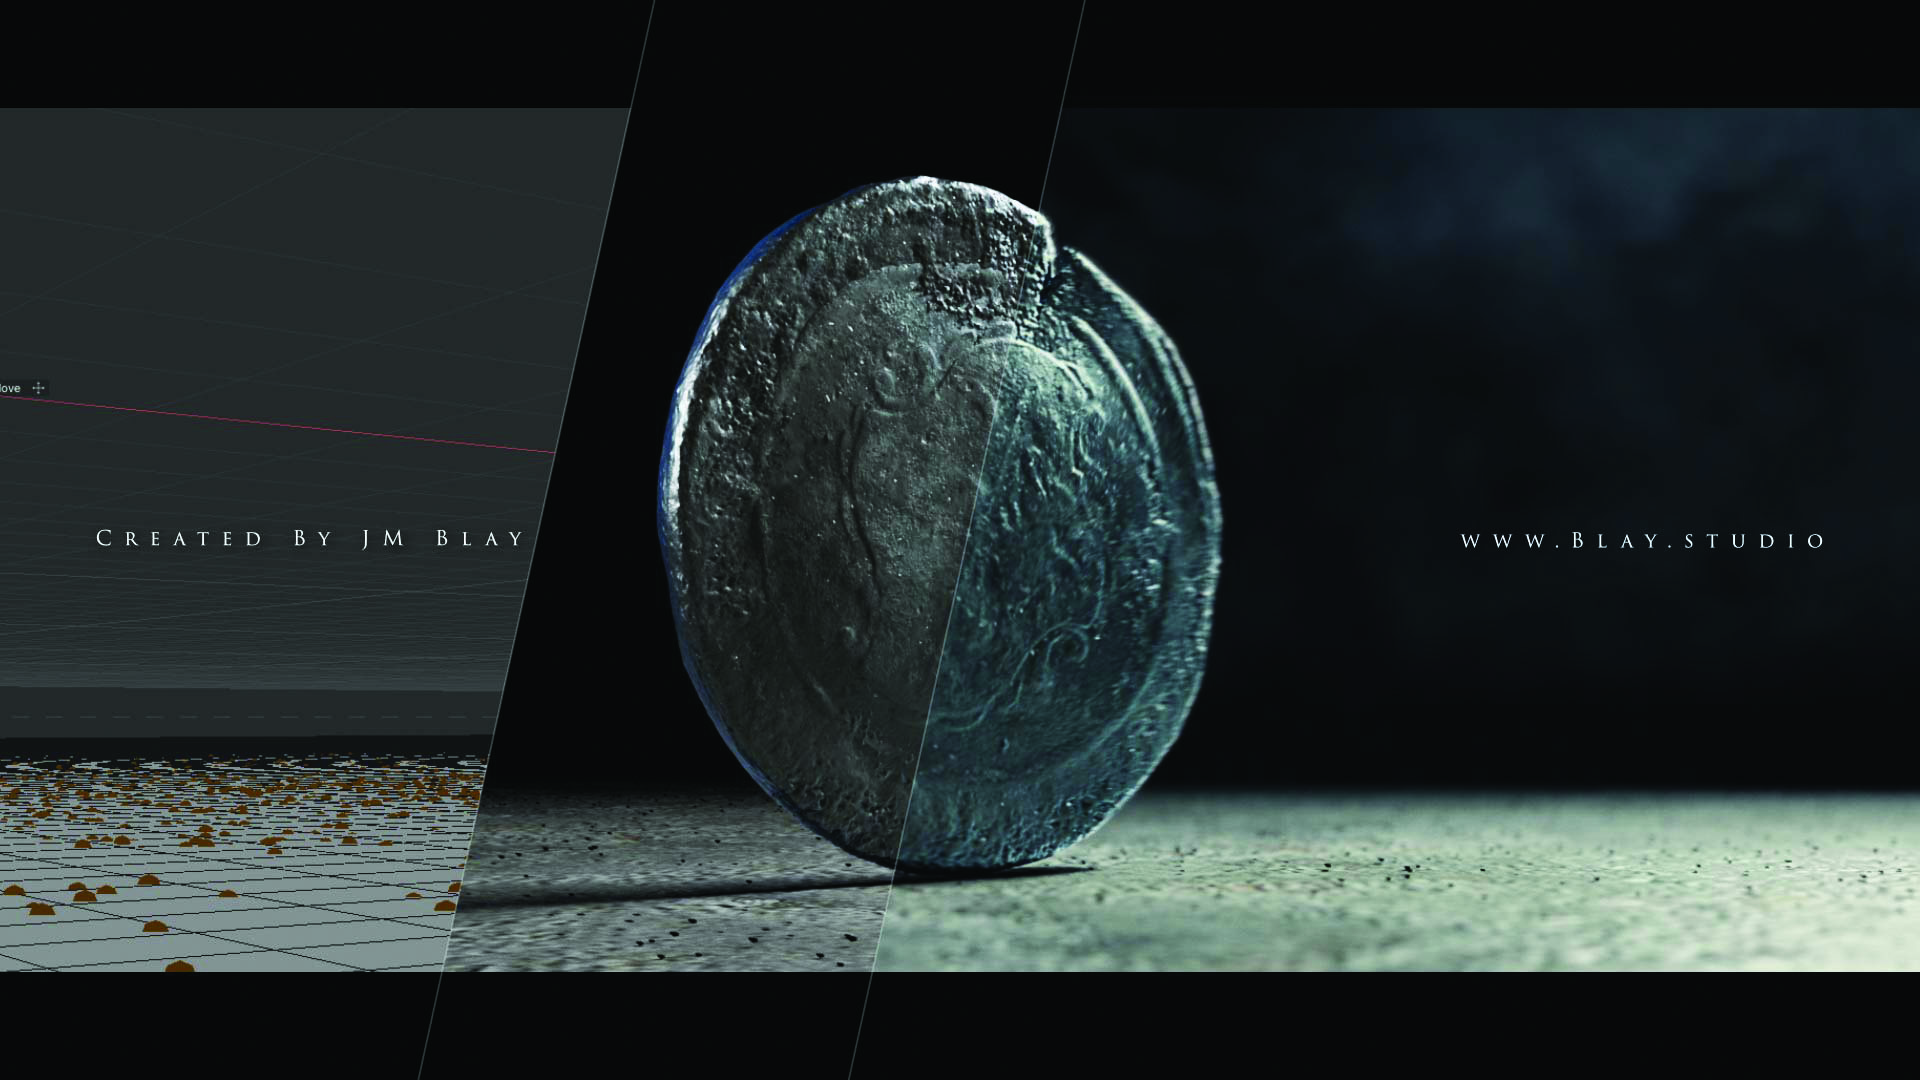
To craft a coin suitable for the world of Mistborn, I combined various free-to-use models with my own modeling and texturing efforts. Using downloaded models as the foundation, I meticulously molded and textured a new coin to match up with the aesthetic of the fantasy universe.
The aim was to capture the essence of the Mistborn world in the design of the coin. Through careful attention to detail, plus a little of my own ingenuity, I set out to produce a coin that seamlessly integrated into the rich tapestry of the lore and mythology from the books.
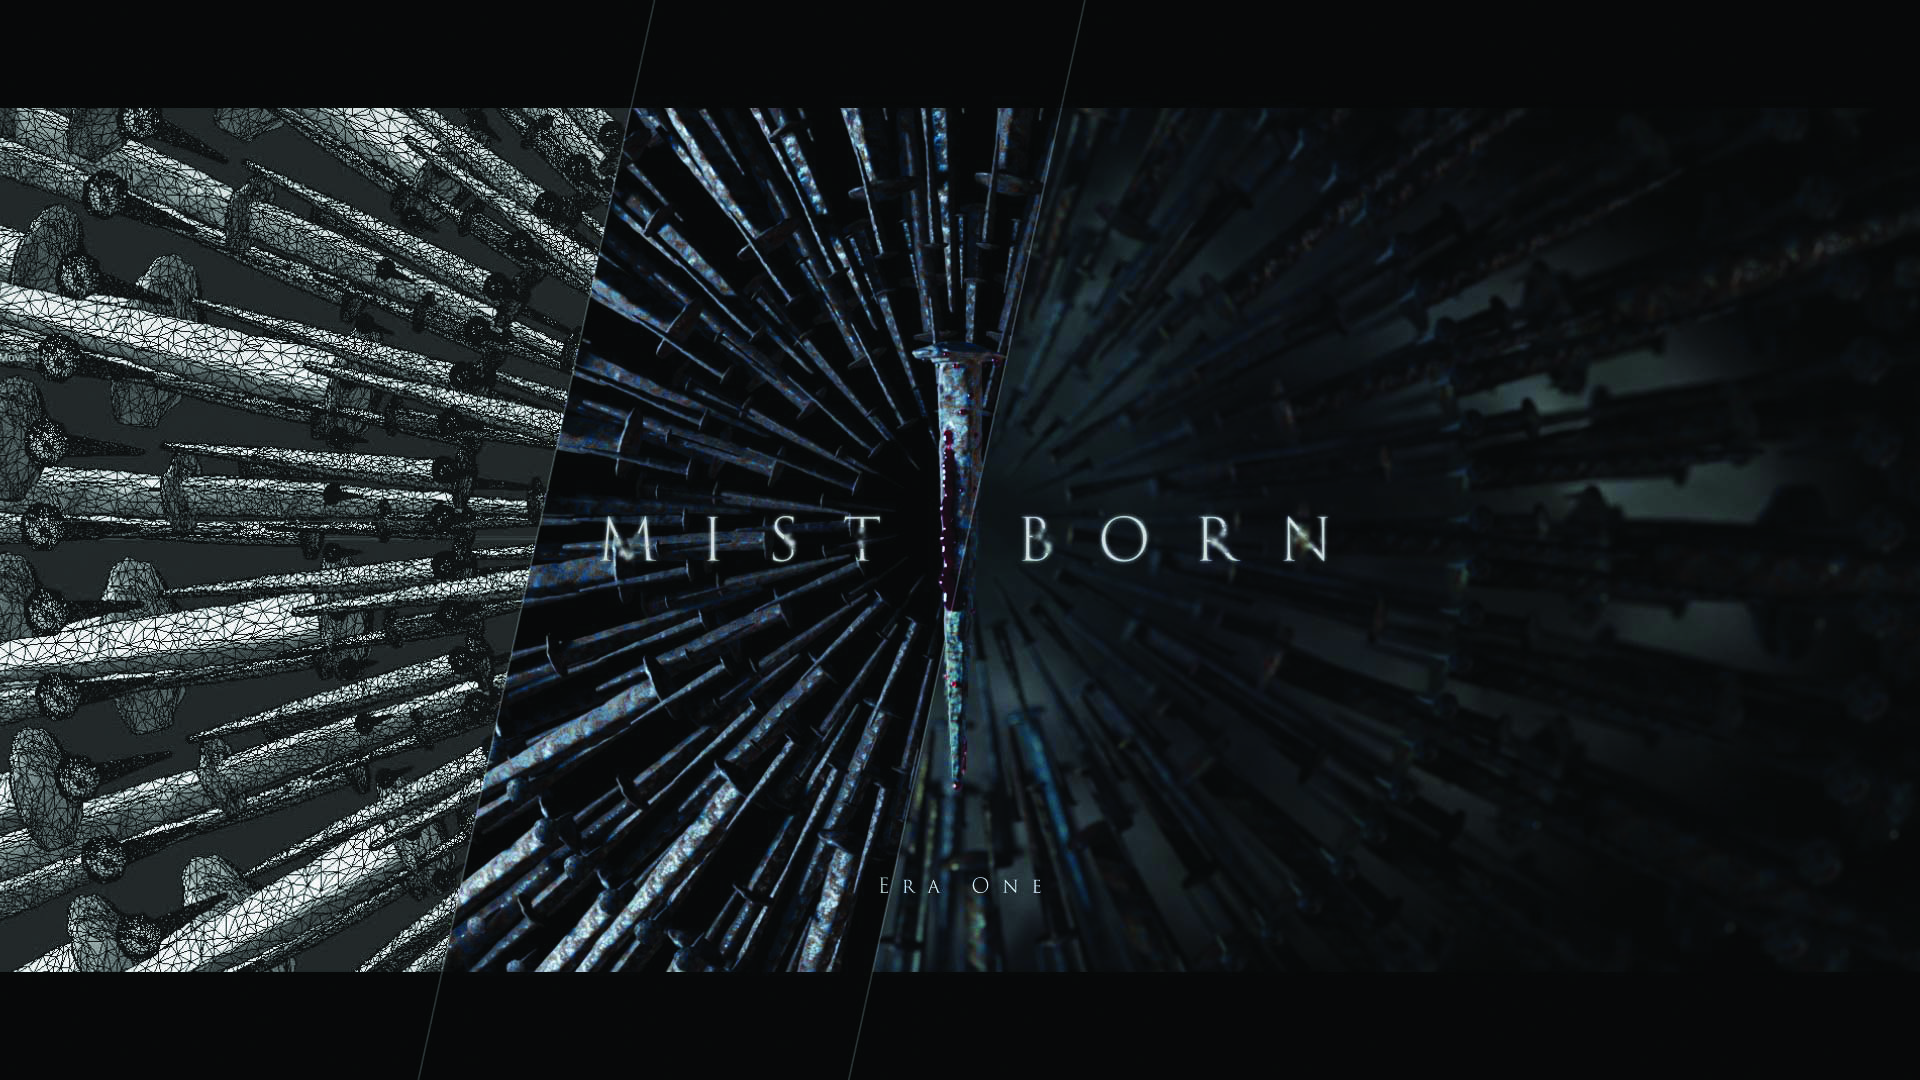
05. Forge the old nails from spikes
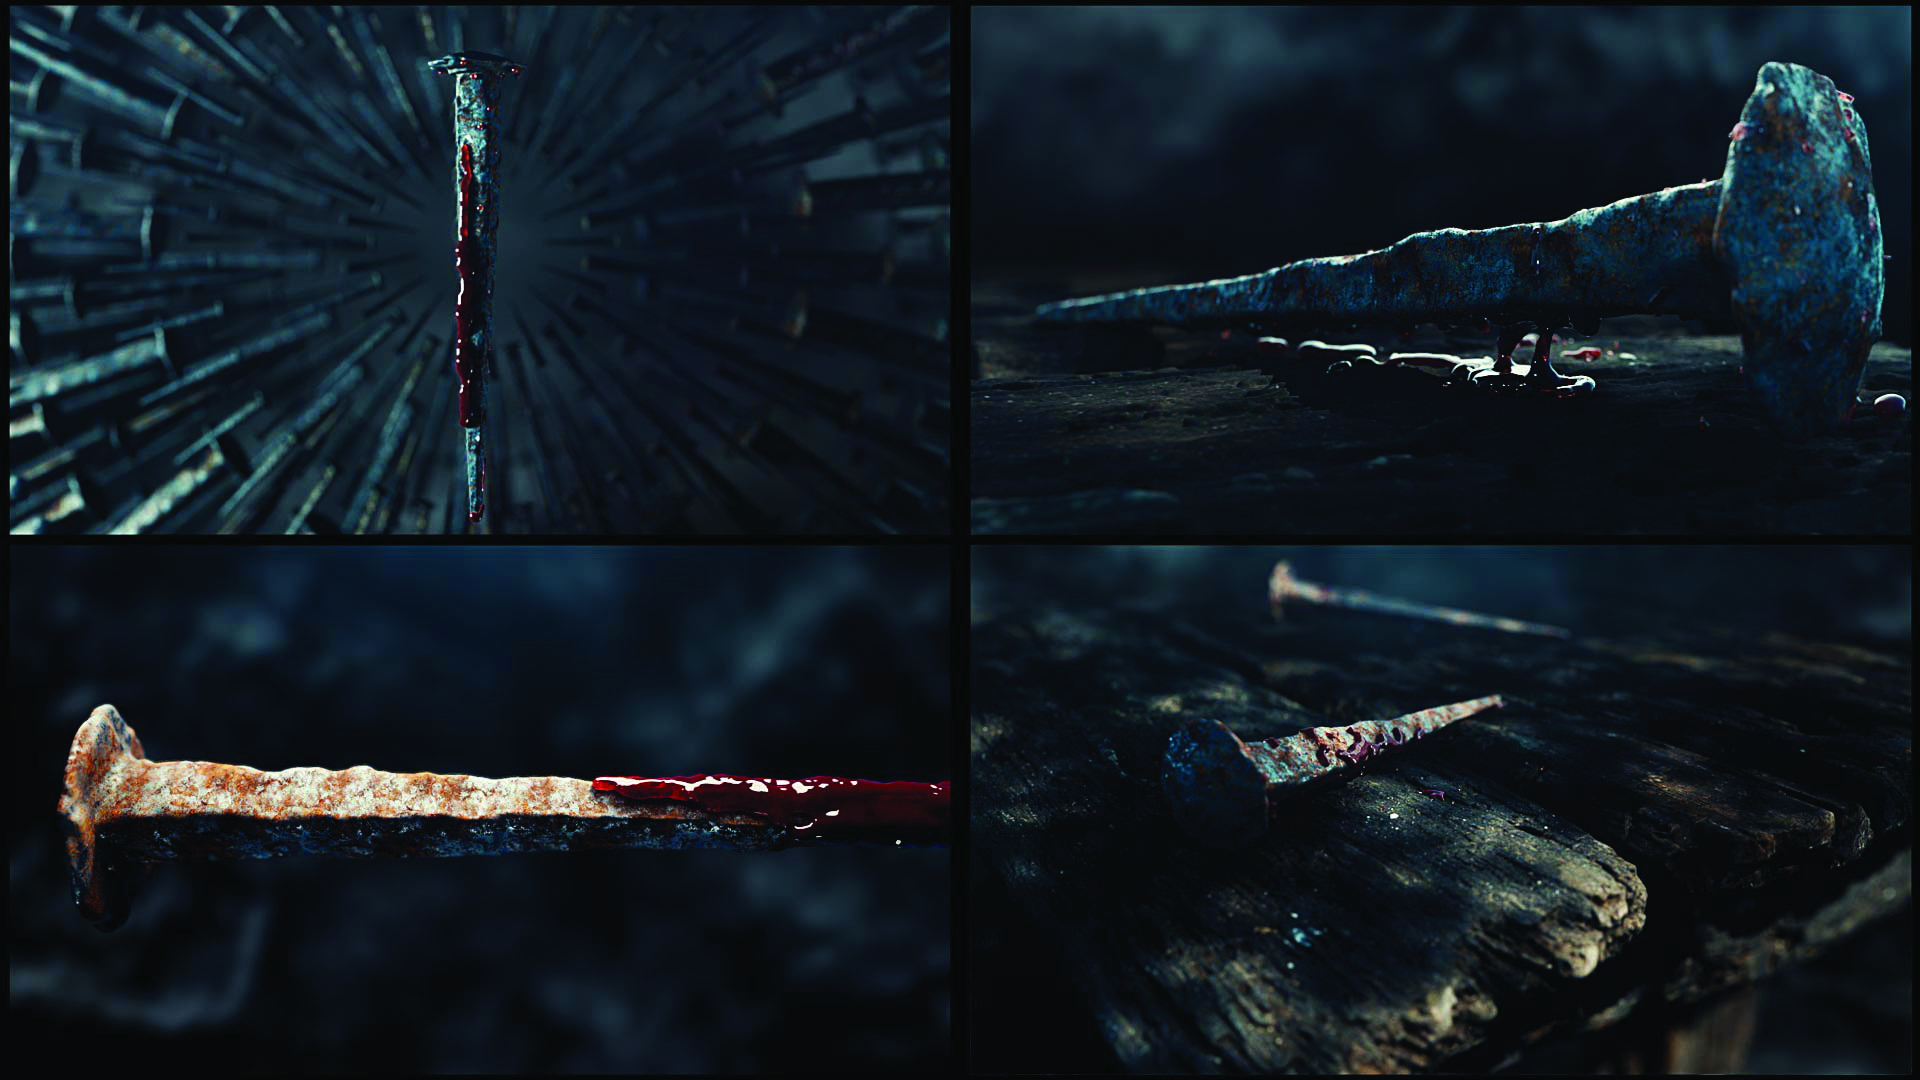
After modeling some basic spikes in Cinema 4D, I refined them using the Sculpt tool and applied textures to achieve the appearance of old, beaten up nails. I carefully textured each pin, beginning with editing a picture in Photoshop to create a tile.
Using Crazy Bump, I generated various maps including Displacement, Normal, Opacity and Roughness from the final tile file. These maps were then used to create the final material in Redshift, which ensured that each pin had the desired appearance and texture for the video.
06. Craft the bracklets
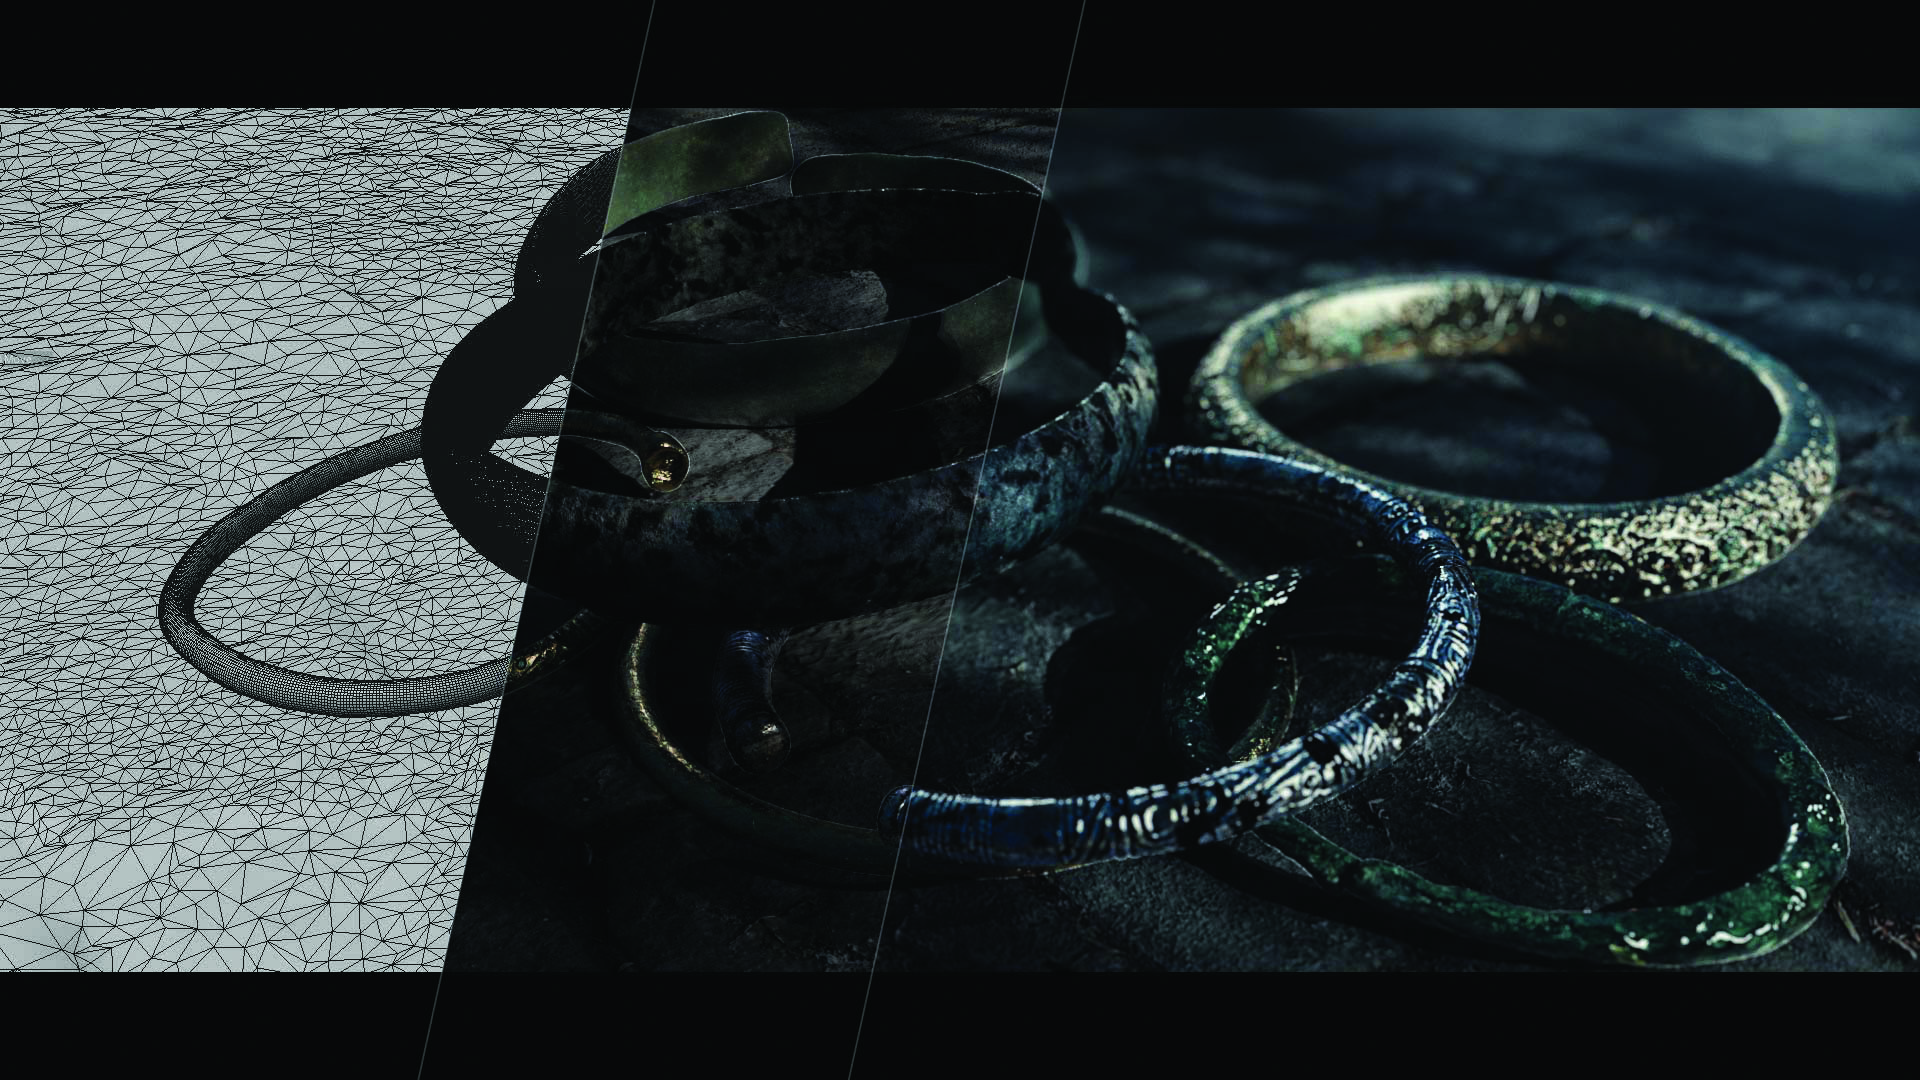
For the bracelets, I wanted to include a diverse array of elements. Initially I downloaded a couple of free models to serve as the foundation. These underwent extensive modification using the sculpting toolset in Cinema 4D, as well as a complete retexturing. I created four unique bracelets from basic torus objects to mirror the intricate designs just as they’re depicted in the book.
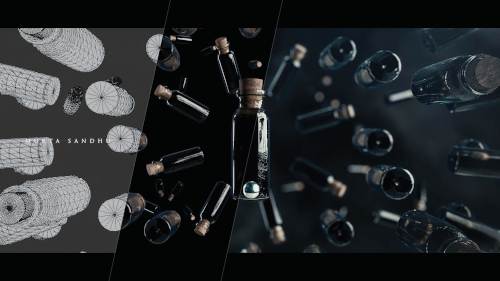
07. Make glass vials
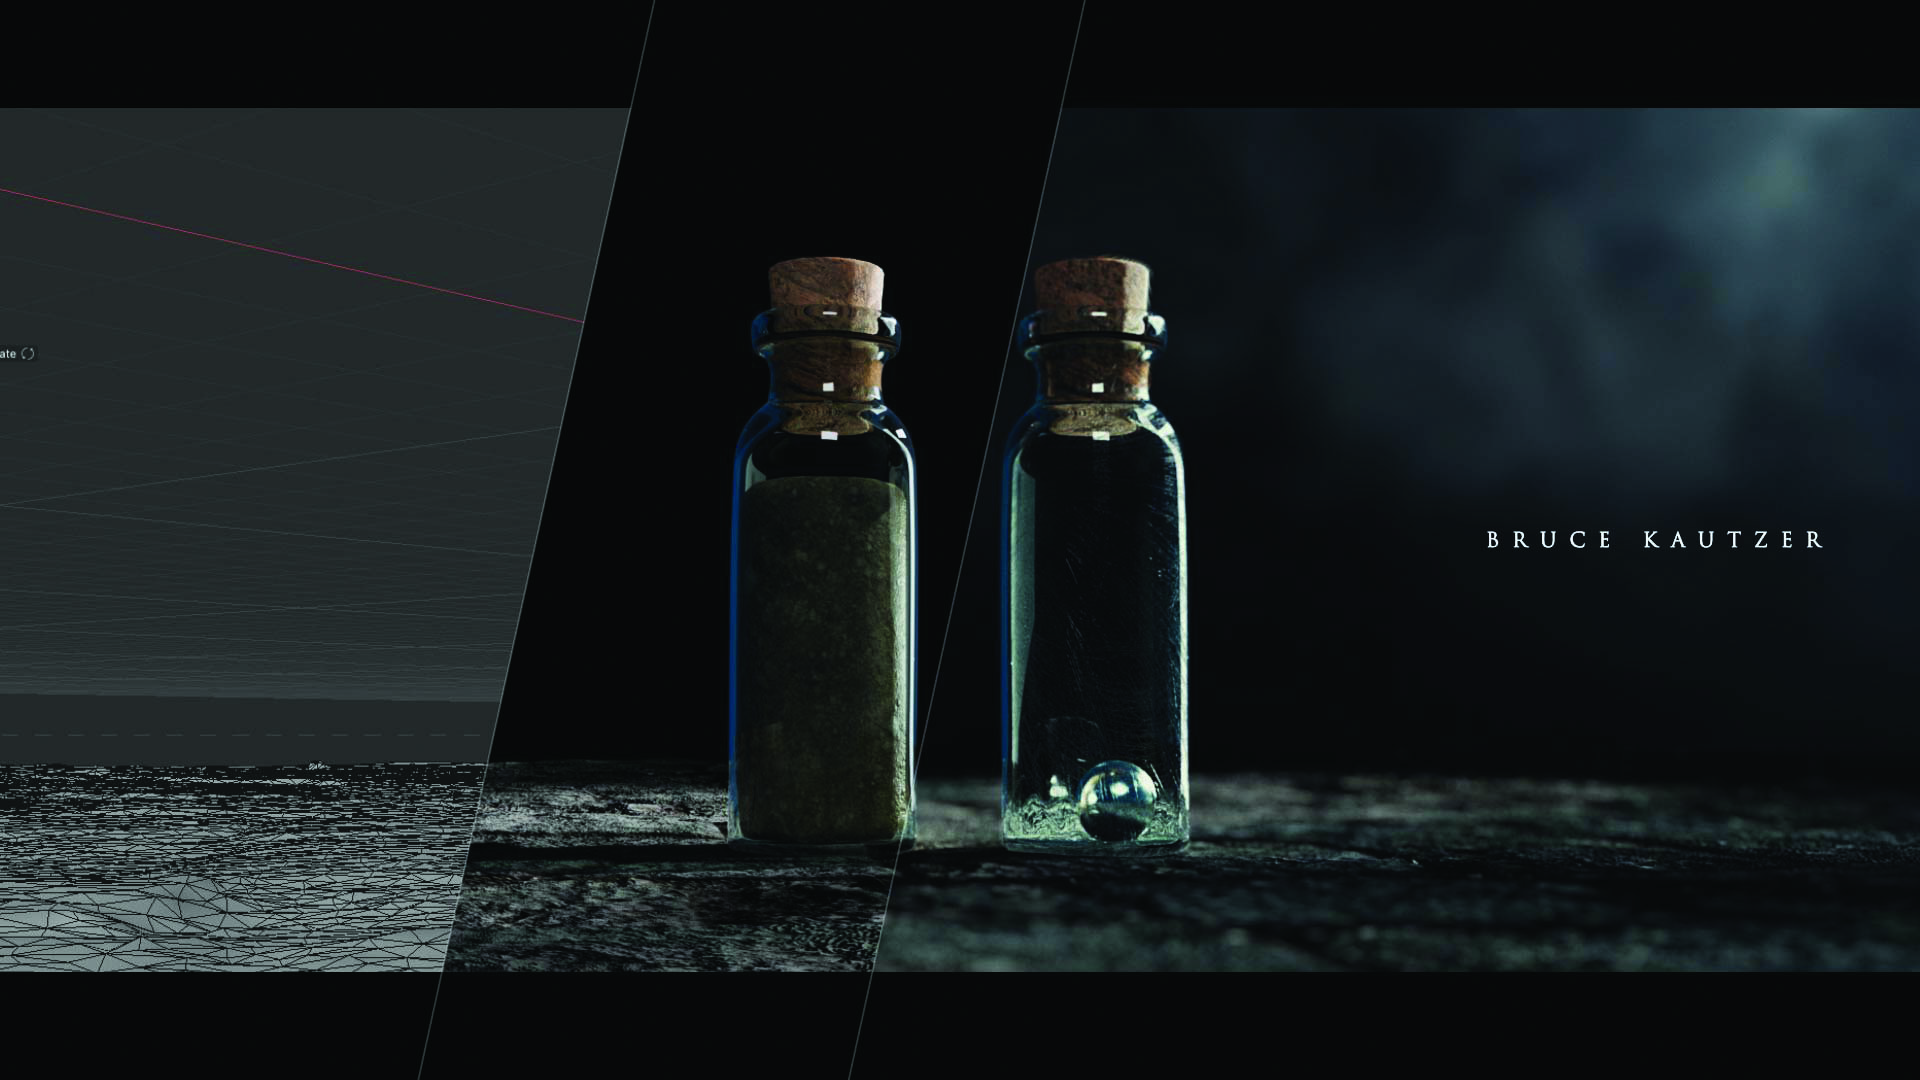
Starting with a cylinder, I carefully shaped the glass vials until they matched the intended basic form. Employing a Subdivision Surface, I then refined them to achieve a smoother finish.
Similarly for the bottle caps, I used another cylinder, enhancing its appearance with a Taper effector. I relied on Greyscalegorilla textures as a foundational base for both the glass and cork materials. Subtle modifications were made to get with the final appearance I was after so that each element contributed to the setting.
08. Breaking the vials
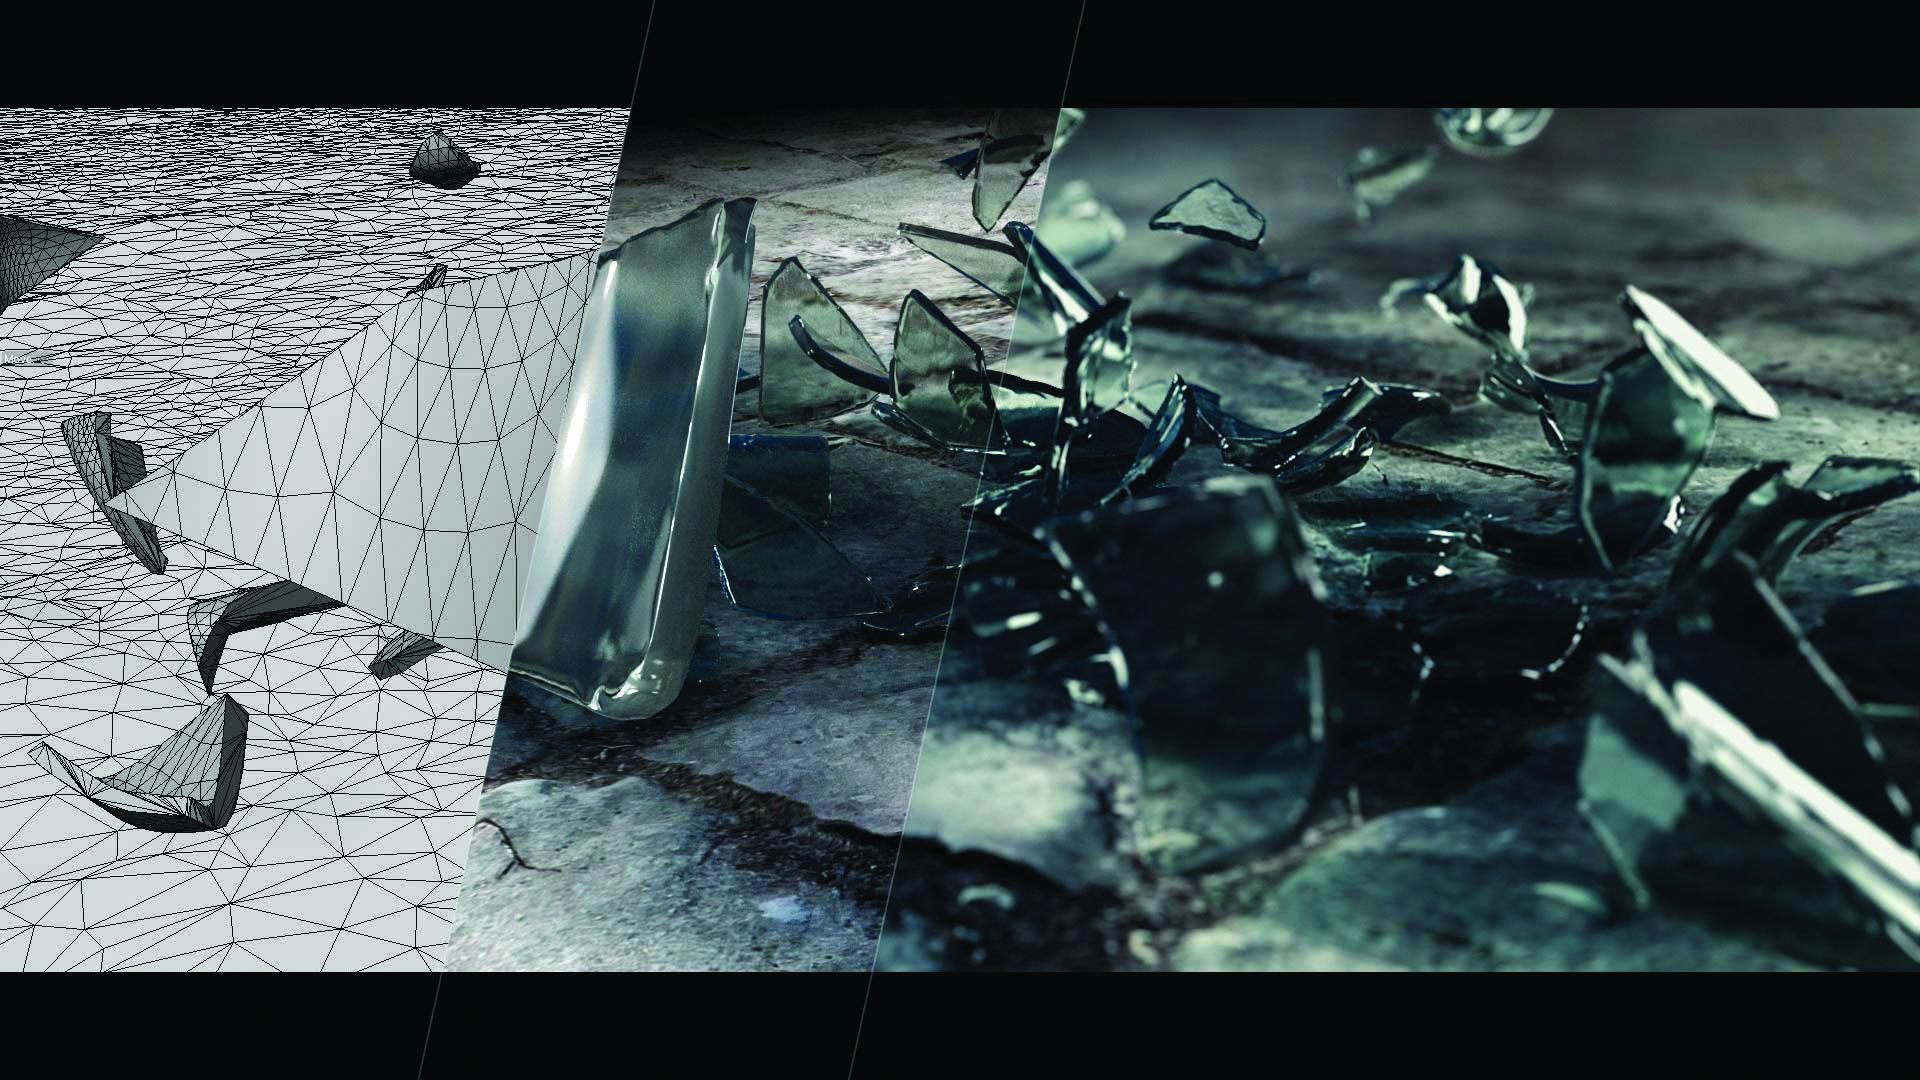
I created a simulation to drop a glass vial onto the floor, adjusting the collider to simulate friction and a slight bounce to mimic the shattering of glass.
After refining the simulation, I implemented a Voronoi Fracture system to break the bottle into random pieces, with the focus on generating more fragments towards the bottom.
Once the simulation was finalized, I cached the data and exported it as an Alembic file, which was then imported into the scene to compose the final shot.
09. Microscopic blood
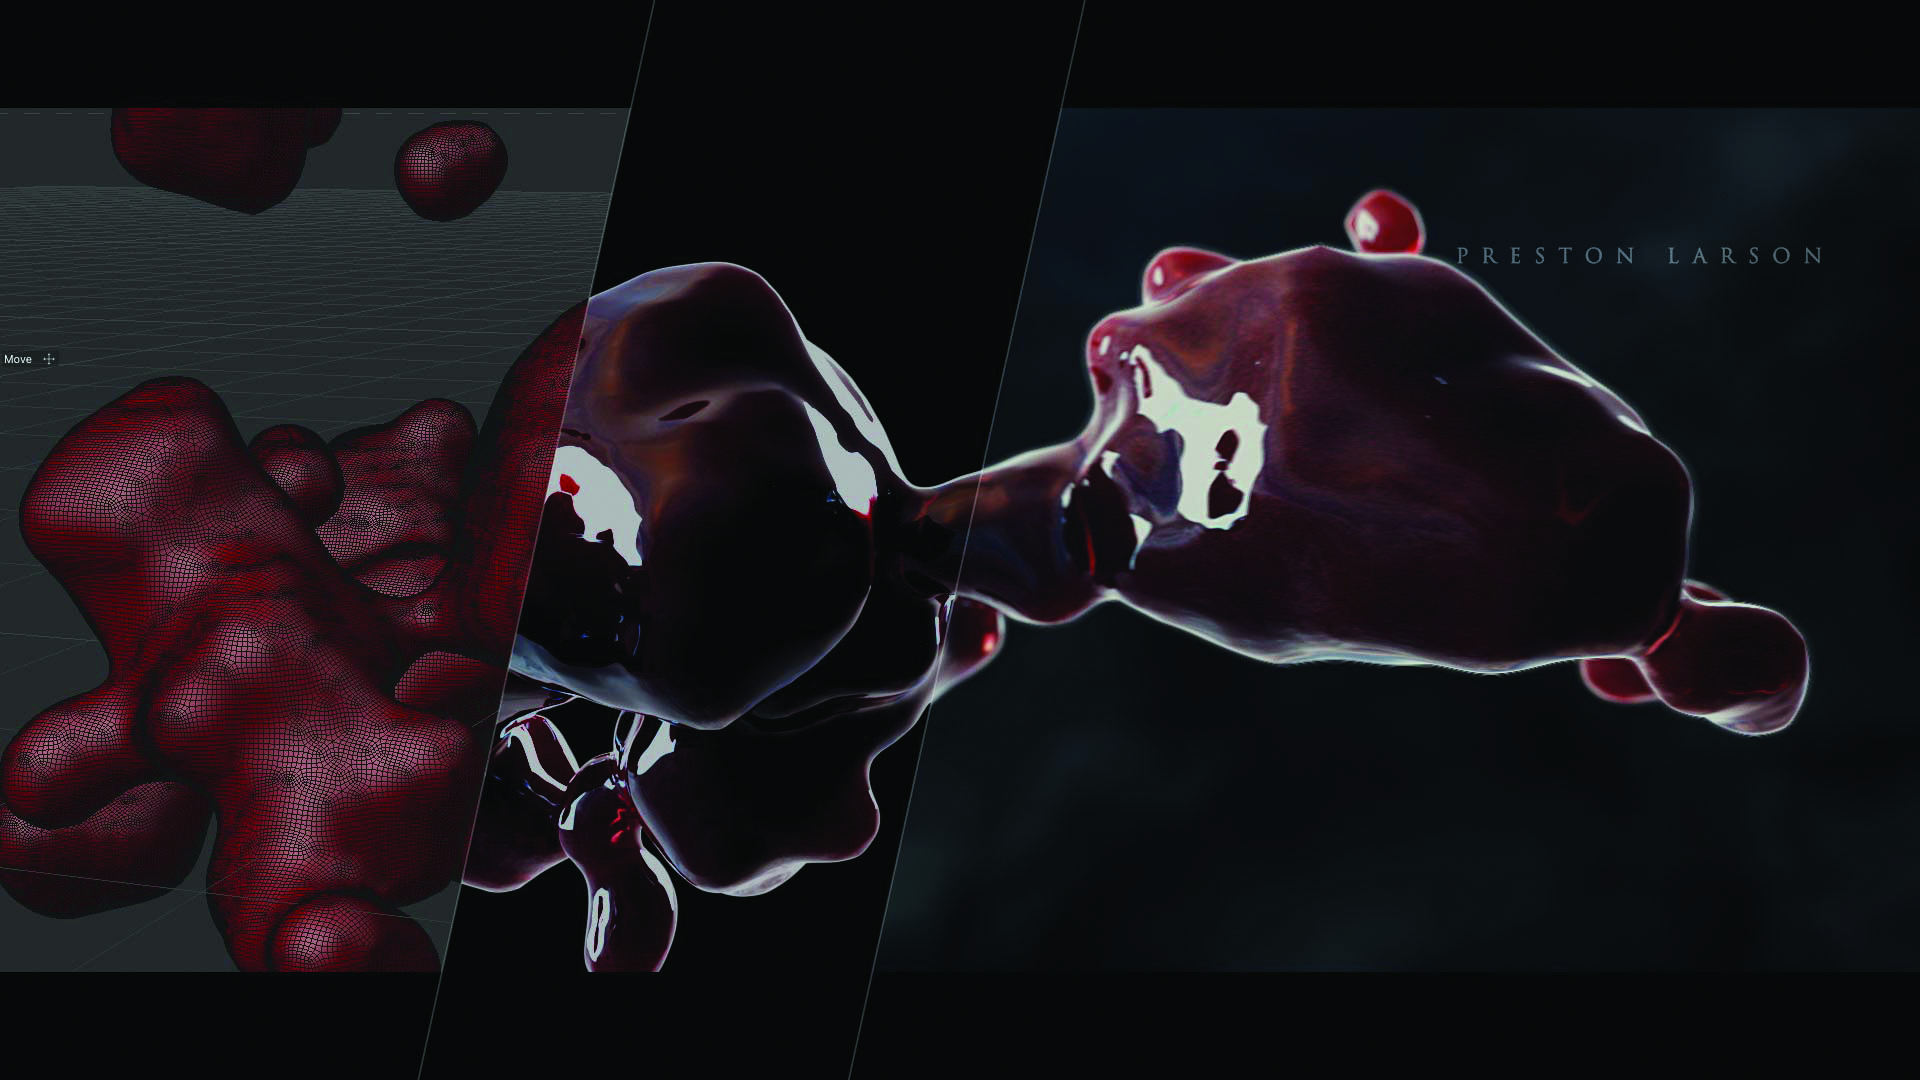
Using X-Particles in Cinema 4D, I configured a simulation with two emitters, both emitting from a sphere, and employed an xpJoint. To enhance the scene, I incorporated dynamics such as xpConstraints, xpFluidFX, and xpSheeter.
Refining the sequence, I then used modifiers including an xpAttractor to converge the simulations towards the centre, xpTurbulence to introduce motion variation, and xpGravity set to -50cm in Strength.
When the simulation looked accurate, I exported the entire setup as an Alembic file and reimported it into the scene for lighting and texturing adjustments.
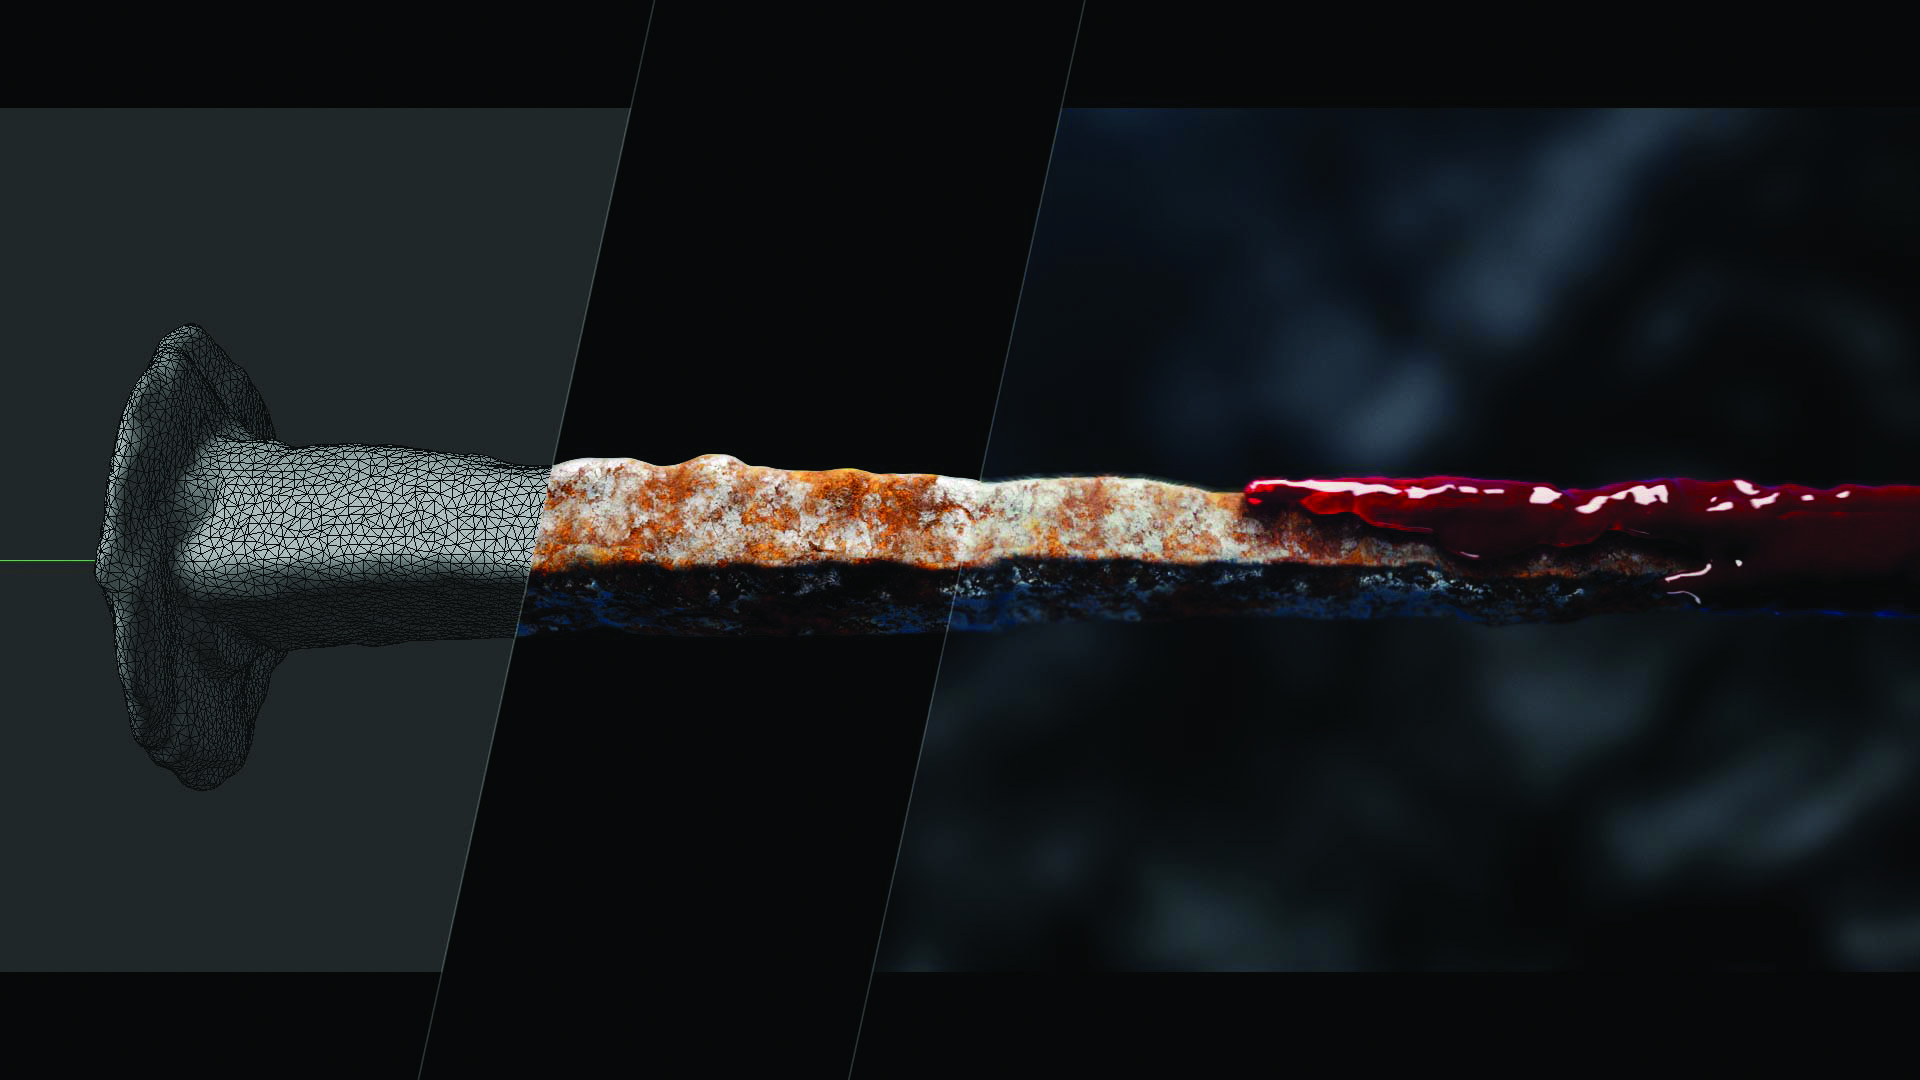
10. Add blood to the nail

In X-Particles, I constructed a simulation with a single emitter from a moving sphere. With a helix, I directed the particles using an xpFlowField, then generated an xpExplosiaFX simulation, configuring the parameters and using an xpKill modifier to eliminate unwanted particles.
With the setup complete, I generated an xpOVDBMesher and cached the simulation. For texturing, I again used Greyscalegorilla textures for blood and tweaked the Subsurface for Transmittance and Scatter Scale for a thicker appearance.
11. Dripping blood effect
I created a simulation with a solitary emitter placed to emit from a circular source at the nail’s edge. Thanks to the xpFollowSurface modifier, I orchestrated the particles to adhere to the nail’s contours.
For added dynamism, I introduced xpTurbulence and xpGravity. I also integrated dynamic components like xpFluidFX, xpConstraints and xpSheeter to get a fluid-like quality for added realism.
12. Narrative symbolism
In Cinema 4D, I meticulously crafted the three symbols using a consistent approach to maintain not only a uniform appearance, but also a cohesive narrative. Each of the symbols – the nails, bracelets and bottles – represented a distinct form of magic.
The initial step involved embedding each element in radial cloners to give the impression of rotating rings in motion. Each ring exhibited unique rotational dynamics while maintaining a consistent speed.
To capture the mood of the scene, I orchestrated a camera movement, starting from the simulation’s center and gradually panning backward to reveal the entirety of the ring. Ultimately, all three simulations converged similarly.
13. Design posters with AI assistance
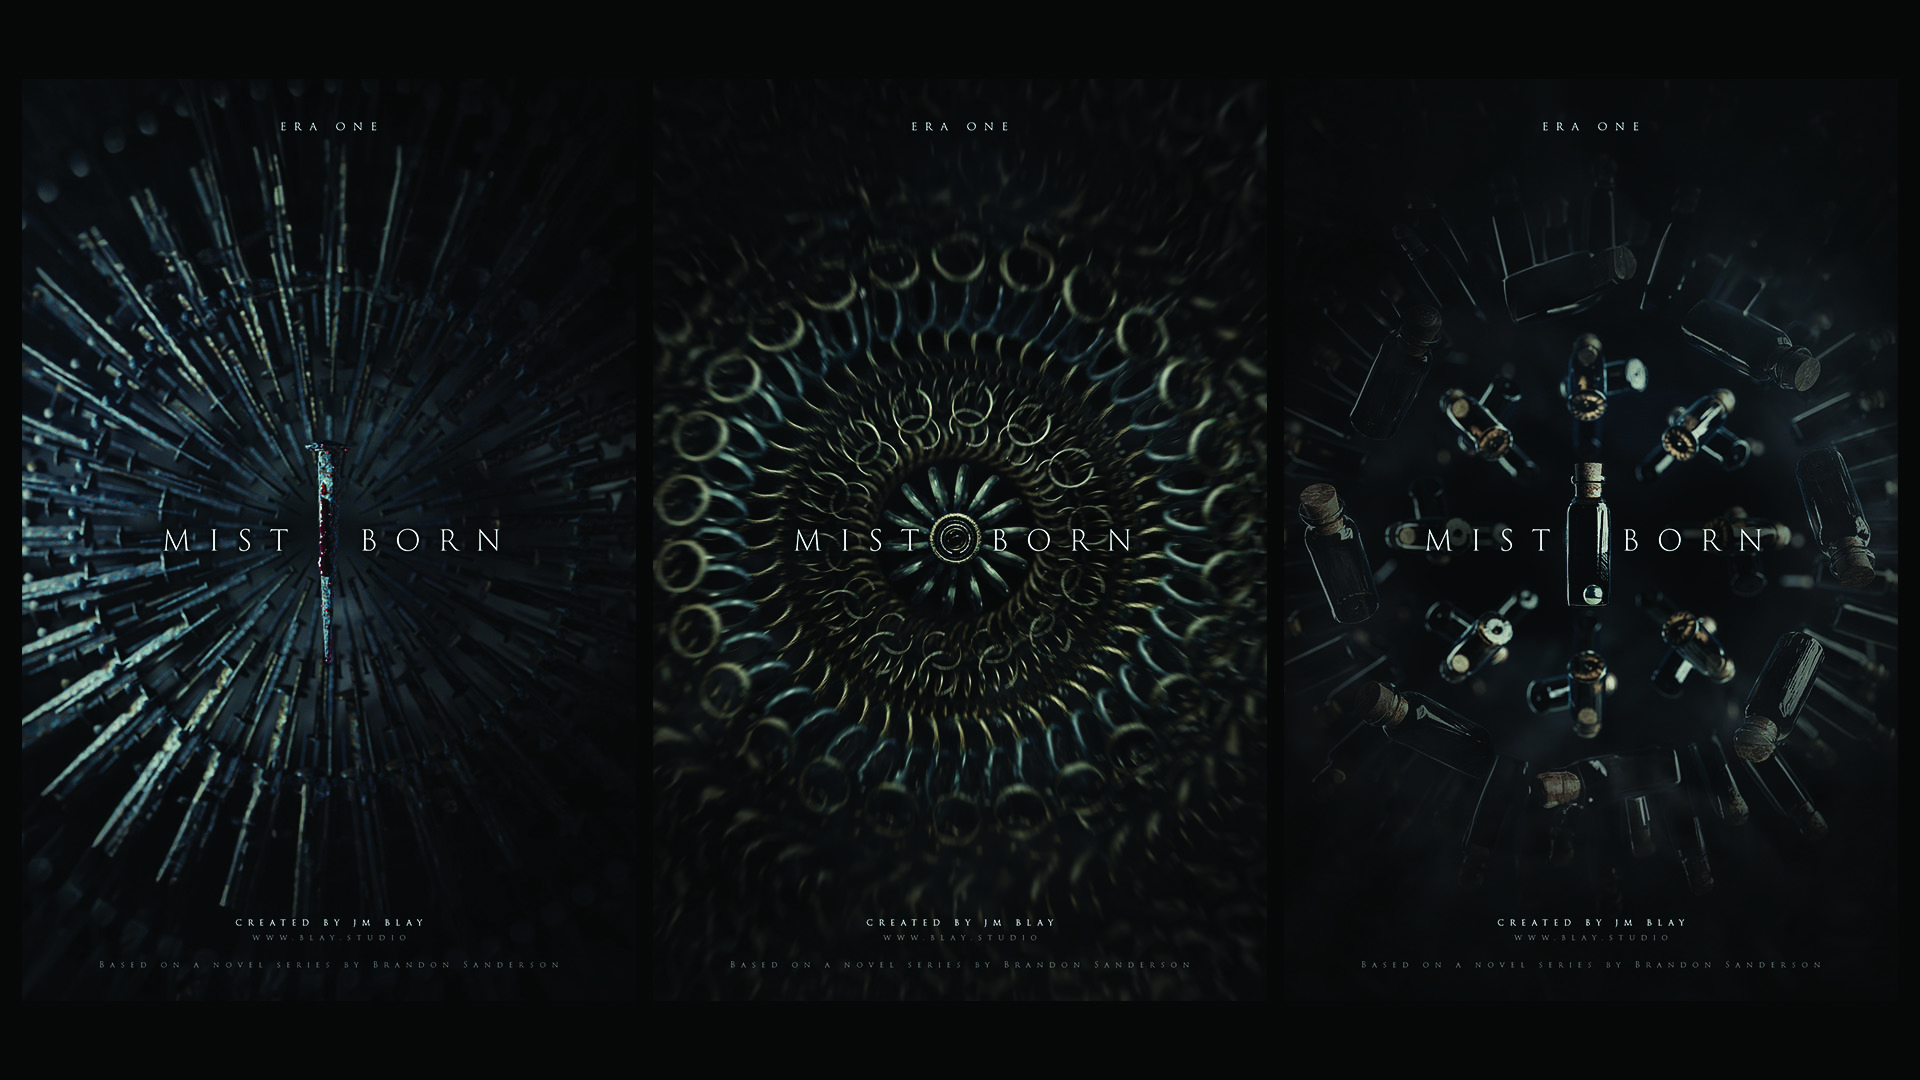
For the launch of the project campaign, I crafted three distinct posters, each representing one of the different forms of magic found within the Mistborn universe. Rendering a frame for each of these magic forms, I imported them into Photoshop.
Using Adobe’s new Firefly AI tools, I created the top and bottom sections of the posters while referencing the existing frames for an accurate match. After a few attempts, the results from the AI were remarkably good. Finally, I incorporated the text and exported the completed posters.
14. Develop the background
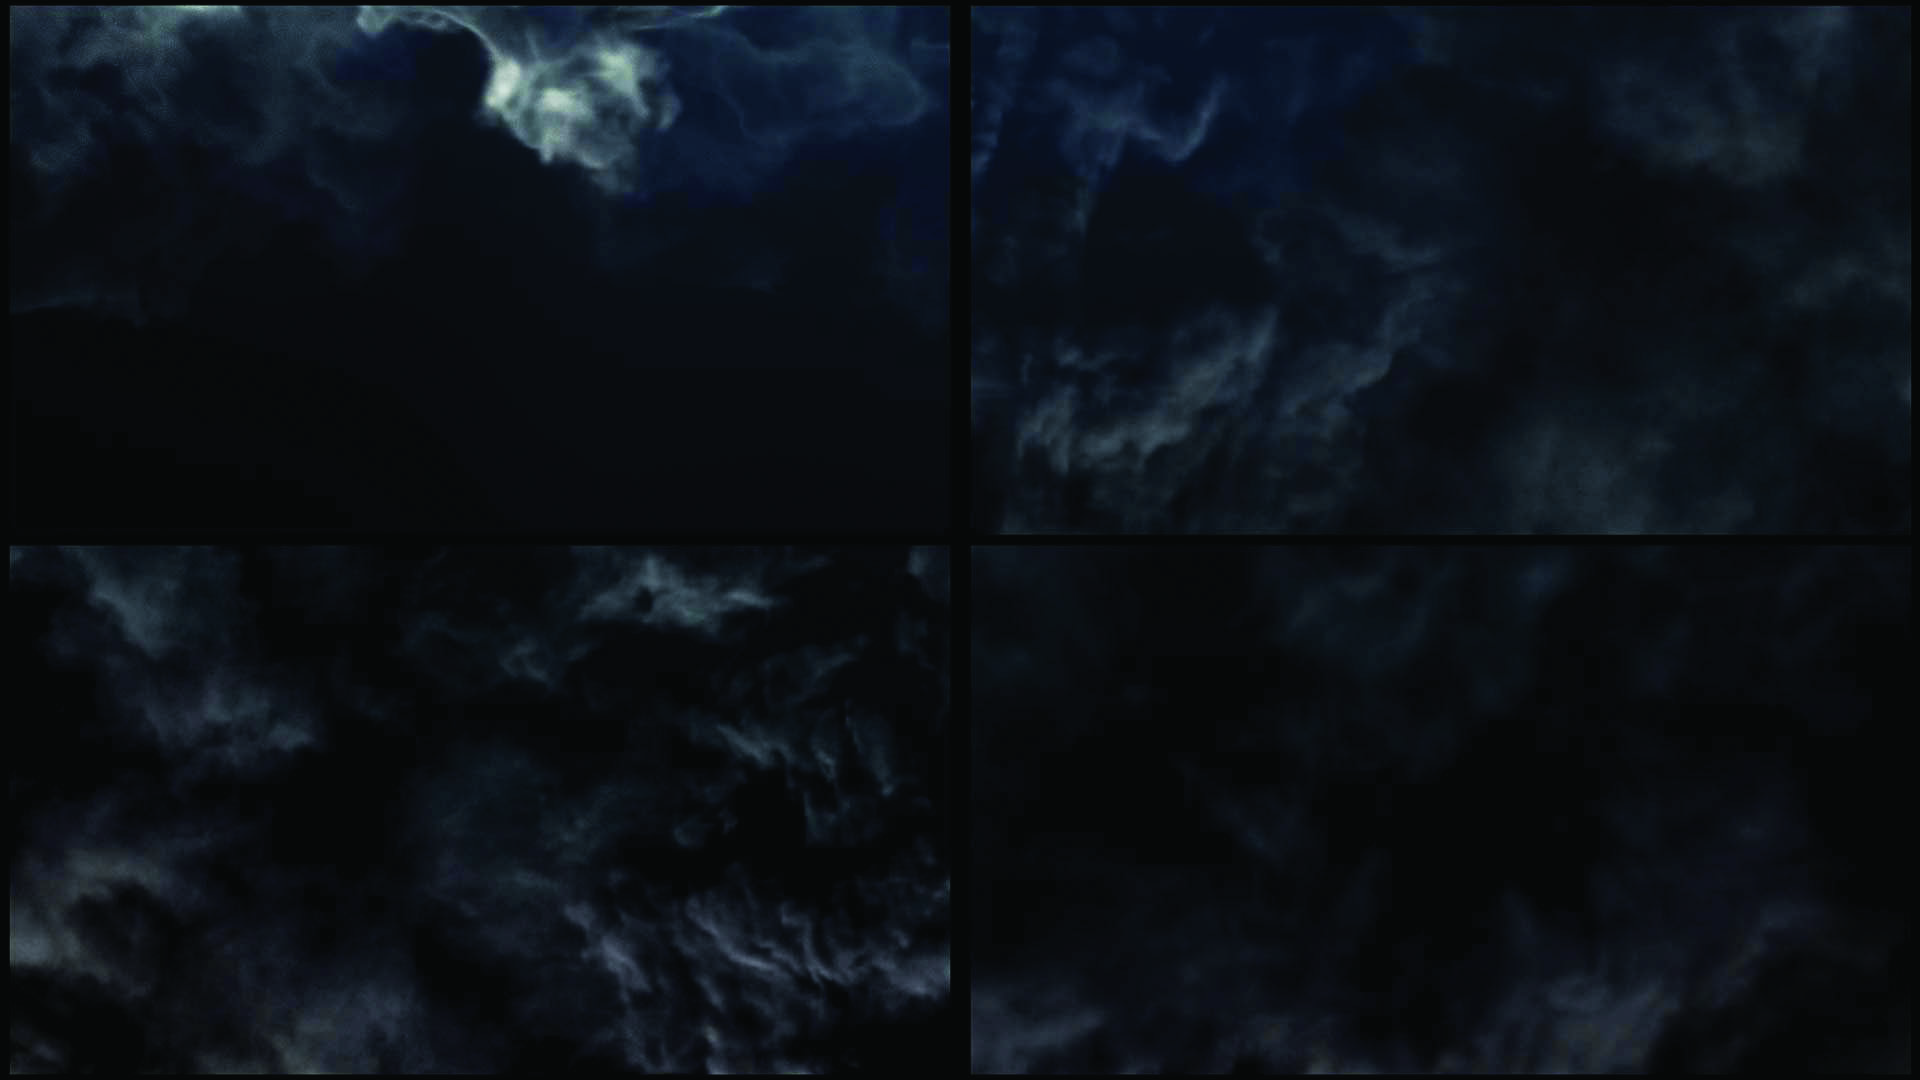
The same technique was used to create the smoke-mist backgrounds, with a distinct scene for each shot. In Cinema 4D, I developed a simulation using Pyro, adjusting parameters such as Voxel size, Density Buoyancy and Temperature Buoyancy. I exported each scene as a VDB sequence that was then imported into the unique shots for seamless integration.
15. Convert the title to mist
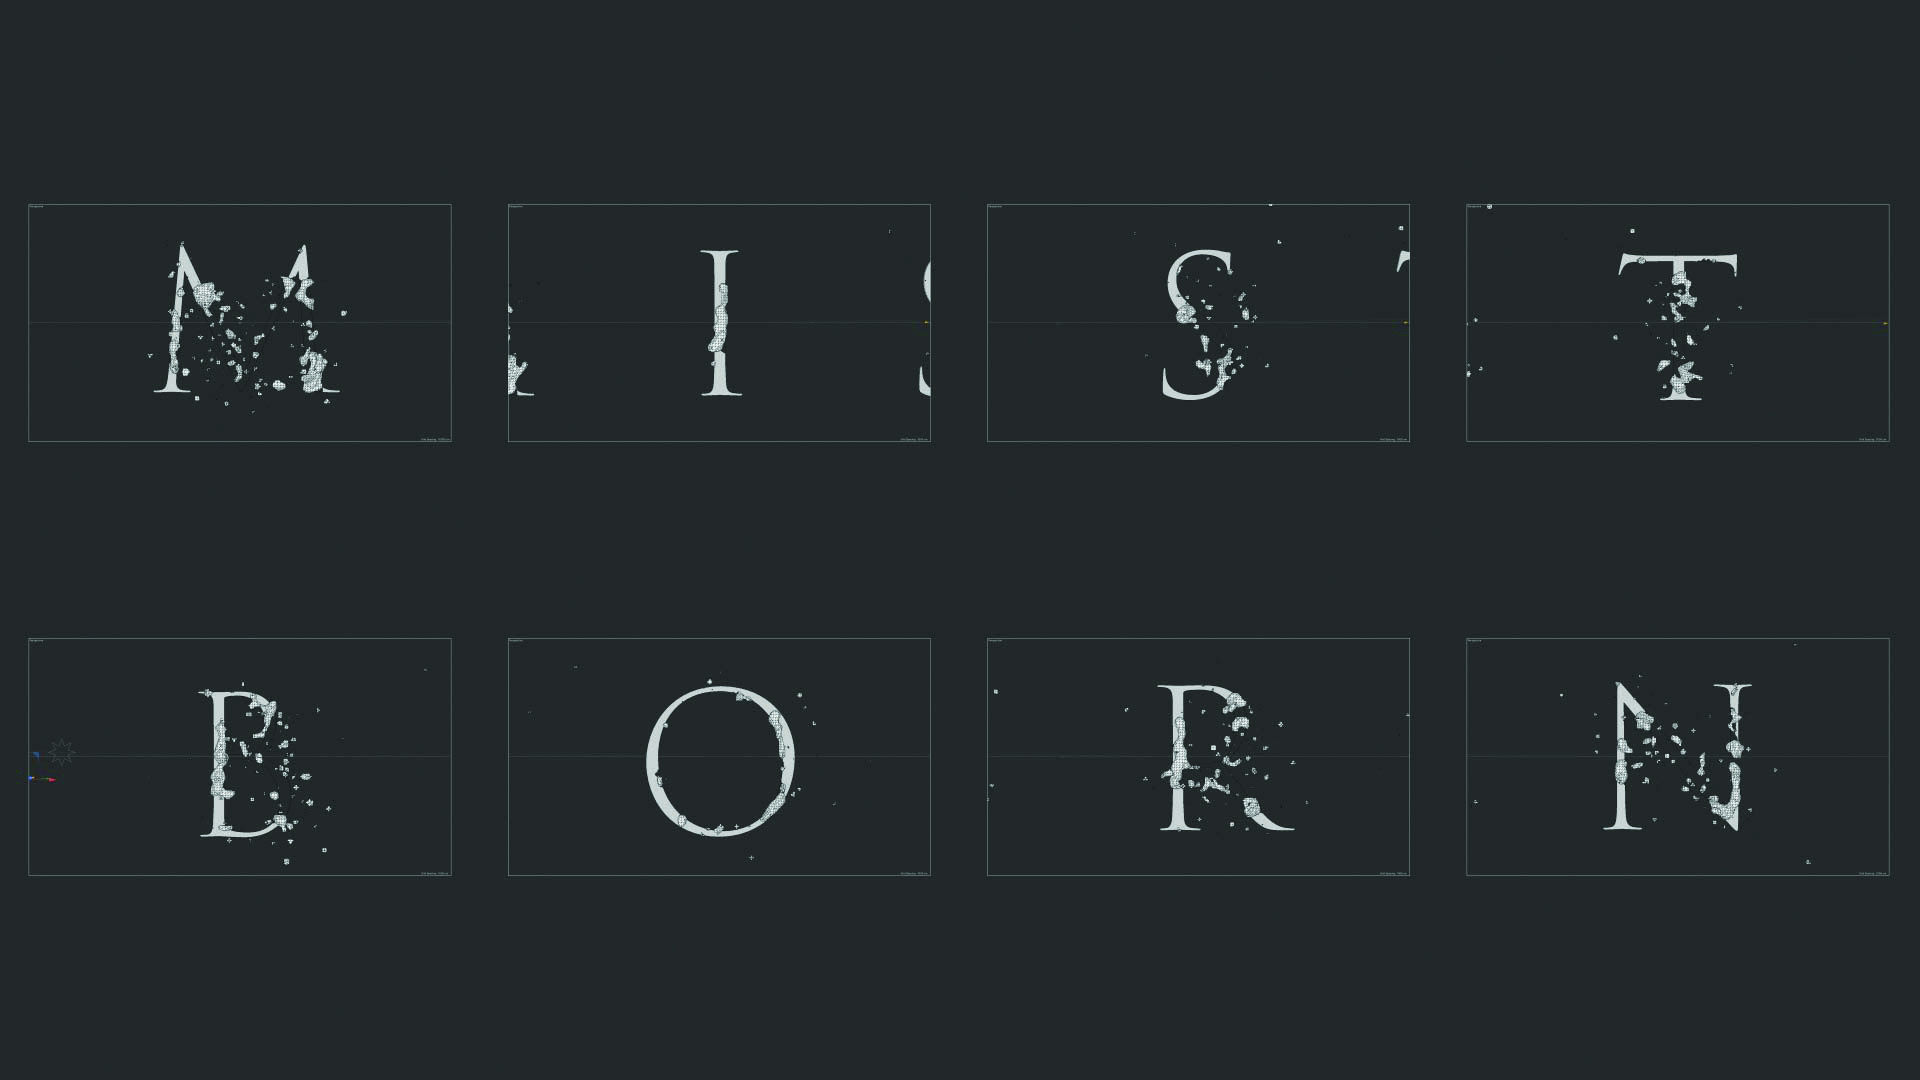
Here I used an old technique based on standard rendering in Cinema 4D, incorporating an Alpha channel with an animated 2D circular gradient overlaid with Turbulence. This material was applied to the extruded text for a disappearing effect.
I also made an X-Particles simulation, using the text as an emitter to generate particles from the texture, resulting in particles appearing on the edges. By exporting various layers from Cinema 4D to After Effects, I was able to create the illusion of the text dissolving like smoke or mist.
16. Create the flower

Using Firefly again, I crafted the flower featured beneath the book in one of the shots. The flower served as a pivotal element in the story, and drawing inspiration from the book’s description, I iterated multiple times, refining the text until it aligned with my vision.
Through careful manipulation of the text, I captured the essence of the flower as described in the narrative, ensuring a faithful representation. This iterative process allowed me to pack the scene with the symbolism and meaning inherent to the story.
17. Composite the flower
After rendering, I transitioned to color grading in After Effects. With Red Giant and various plugins, I was able to craft the desired final look. To get depth of field, I used the Frischluft plugin for After Effects, initially rendering without depth, which could be enhanced later in post-production. This process made sure each frame was filled with visual depth and richness.

Thank you for reading 5 articles this month* Join now for unlimited access
Enjoy your first month for just £1 / $1 / €1
*Read 5 free articles per month without a subscription
Join now for unlimited access
Try first month for just £1 / $1 / €1

JM Blay is a creative director and director, founder of the creative studio and production company Blay Studio. With over 20 years of experience working in the creative industry, he has worked for films, television, and advertising; as well as for music videos, digital products, and video games. During his career he has collaborated with studios like The Mill, MPC, Prologue Films, Perception, Nexus, ETC, Momoco, Spov, or Territory and for agencies like Red Bee, Huge, Imagination, or Critical Mass.
You must confirm your public display name before commenting
Please logout and then login again, you will then be prompted to enter your display name.