How to 3D sculpt an epic collectible statue using ZBrush
Learn how to create a miniature model inspired by Diablo, from concept to final render.
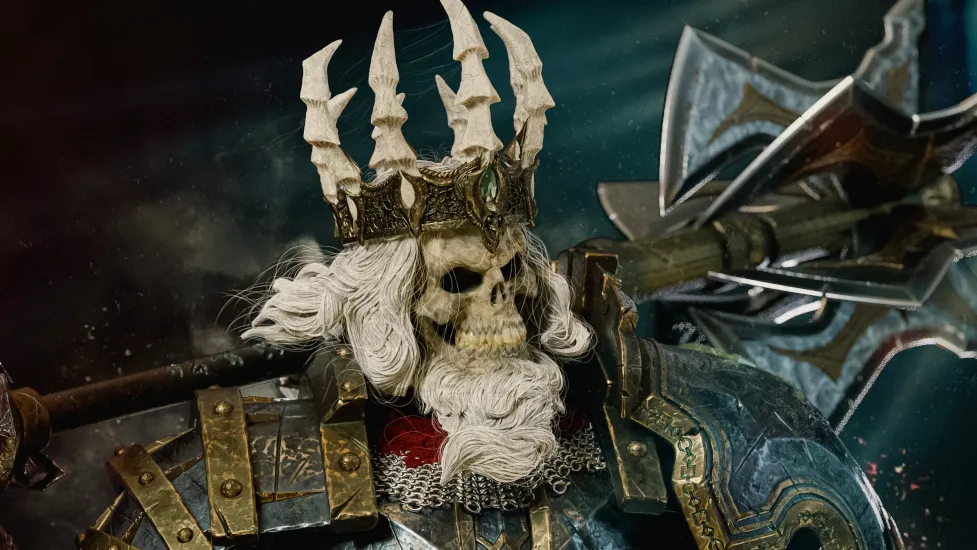
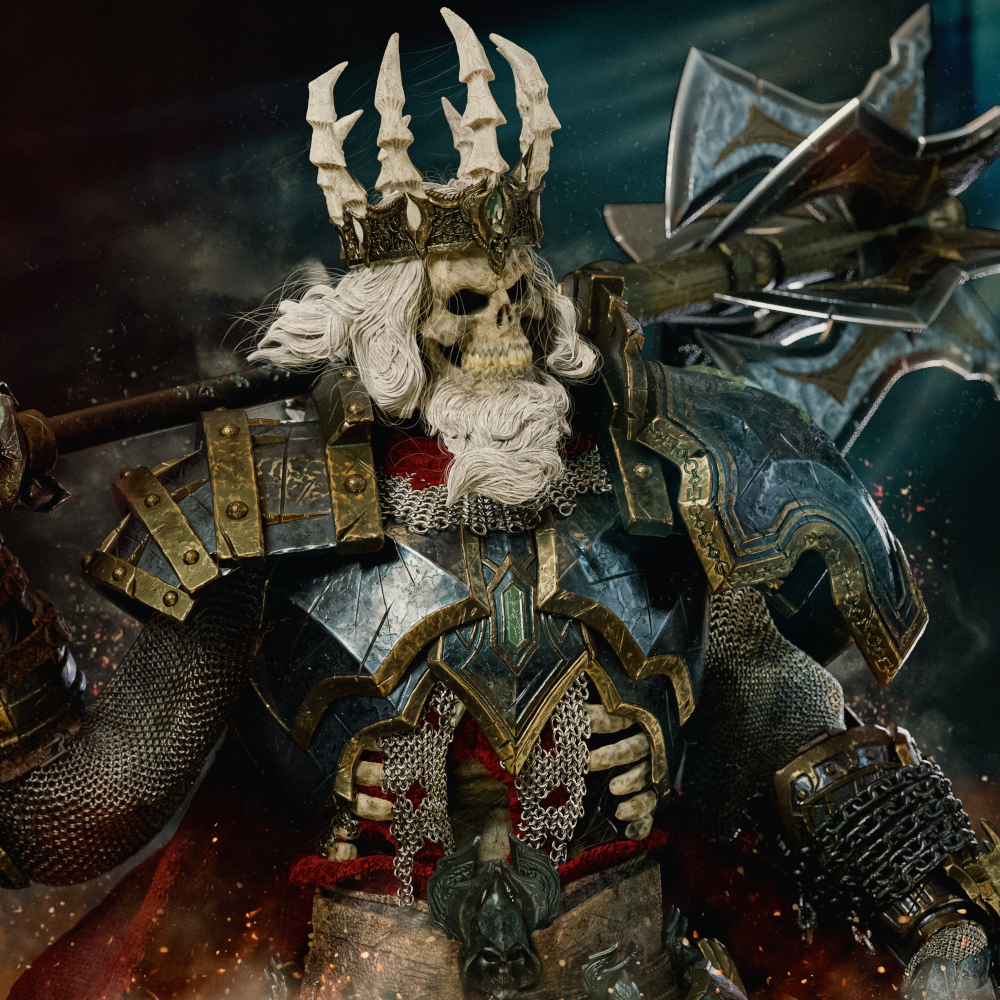
For this ZBrush tutorial I chose to base the character design on King Leoric from the Blizzard video game Diablo universe. I wanted to capture the essence of the character in a way that made sense within the games’ lore; an aim for this project was also to improve my modelling skills for the collectibles market. Each stage of the process from the mannequin to post-production proved arduous but still rewarding, which meant I learned a huge amount.
If you're new to ZBrush this tutorial will offer an overview of how to get started, if you already use ZBrush I hope you pick up some new ideas. For more, read Creative Bloq's collection of the best ZBrush tutorials. You may need to upgrade to one of the best laptops for 3D modelling too.
Planning is paramount when you’re embarking on a sculpture. Putting a well-thought strategy with a logical process into place can enhance both the final quality and your project’s efficiency. Setting objectives along the way is crucial for tracking progress, giving you more control over the timeline and allowing for any adjustments as needed.
Mannequins play a vital role in the visualising and initial planning as they facilitate swift pose testing, gesture studies, composition exploration, and so much more. The significance lies not only in defining the starting point but also in outlining the endpoint, while remaining open to alterations. This phase serves as a flexible guide throughout. (Although I gathered plenty of references first, the spectacular work of Brazilian character artist Gilberto Magno was a significant inspiration.)

Sculpting is a meticulous art that requires patience and dedication. Take your time to refine each detail and aspect of your sculpture for optimal results.
Statue blocking is another pivotal stage in the modelling process. Attention must be given to the proportions, anatomy, accessories and attire, as they all impact heavily on the final outcome. Developing each part of the model holistically ensures steady progression, while staying in control of the project.
With the blocking complete, the modelling and detailing phase begins. Detail-oriented precision is vital here for crafting a quality statue. Each element is crucial, so you’ll want to zoom in on details as you’re working. While details refine the piece, not everything requires intricate detailing, and striking a balance is essential for a cohesive model.
Painting can occur at any stage of the project. However, it’s during modelling and post detailing that it can truly make a difference, serving as a reference for the 3D printed model’s artist.
Get the Creative Bloq Newsletter
Daily design news, reviews, how-tos and more, as picked by the editors.
Skilful painting can take a model to the next level, which is why being meticulous is so important for this stage. Meanwhile, the rendering will define the model’s presentation. The keys for achieving realistic renders are material configuration and lighting. Studio techniques and camera angles also make for professional-quality image production, helping out with the presentation and any potential post-production, should it be needed. Though post-production is an optional step, it does allow for further refinement. Depending on the model, adjusting dramatic effects, improving the lighting and accentuating details can grab the viewer’s attention.
Read my step-by-step process below, some of the core ideas can be applied to using any of the best 3D modelling software, and don't forget you can now use ZBrush for iPad for mobile 3D sculpting.
01. Building a pre-blockout for your concept

In a sculpture like King Leoric here, it’s always good to have a goal in mind. After selecting good references, it’s useful to start with a mannequin, such as the one available in ZBrush, to create the initial parameters that should guide your modeling from start to finish. The pose, accessories, and the model’s environment can all be defined at this point. This phase can be called pre-blocking, where you can test out and then choose the best composition for the model.
02. Developing a full statue block out
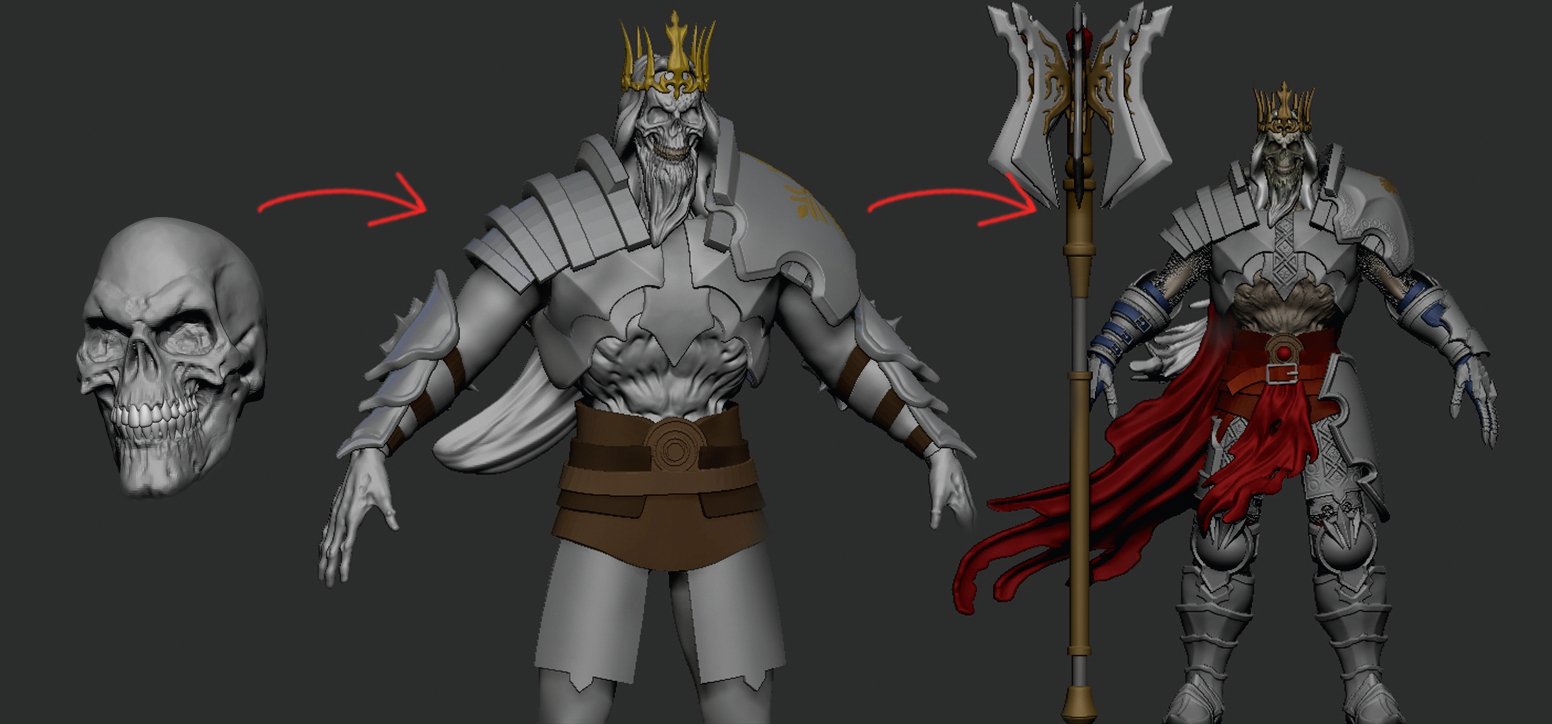
Enhance the sculpture with details like creases, textures and unique features. It’s time to get creative and explore different styles. Don’t be afraid to scrap an idea if it doesn’t work out; start afresh until you find the right language and style that capture the character’s essence. The basic structure will take shape here, but feel free to pivot even in the later stages. The key is to craft an engaging model from the outset.
03. Beginning modelling
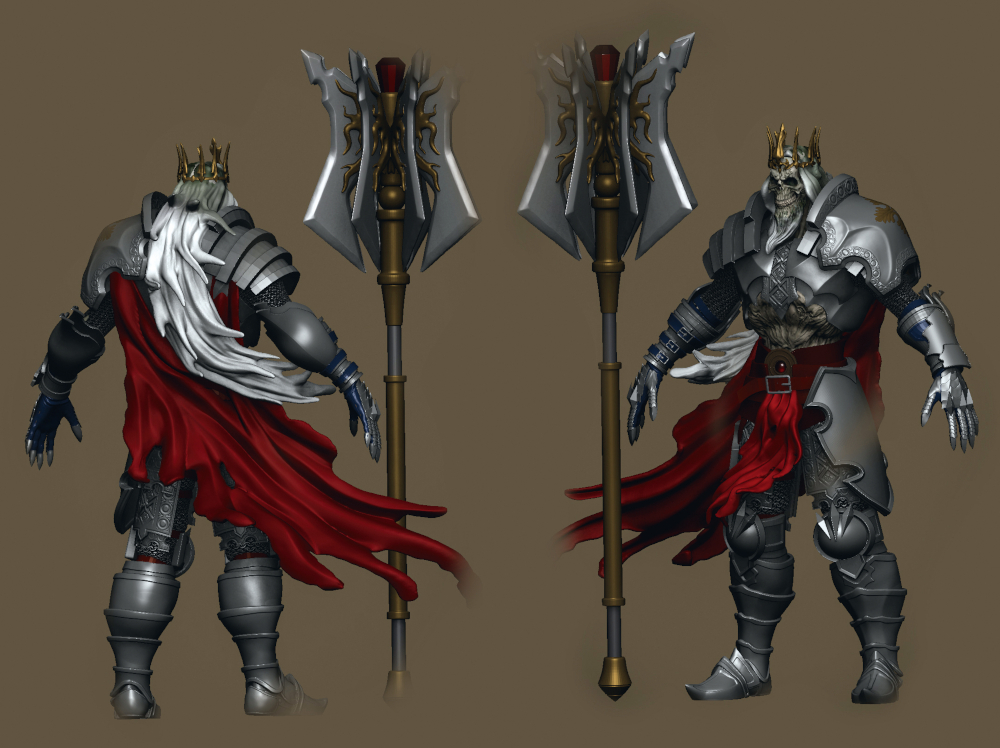
This is where we’ll refine everything done in the blockout, adding more intricate details such as textures, surface irregularities, embellishments, textures and damage. Here, the gesture of the model can also be defined and executed if it hasn’t been done from the beginning. The key is to focus on and then develop all the details as if they were the model’s focal point. Finding good references for materials at this stage will make your model believable, so search for images of metals, and learn how fabrics and their folds behave. Also make use of inflection points, where the shape changes direction, to avoid monotony in your shapes.
04. Adding textures
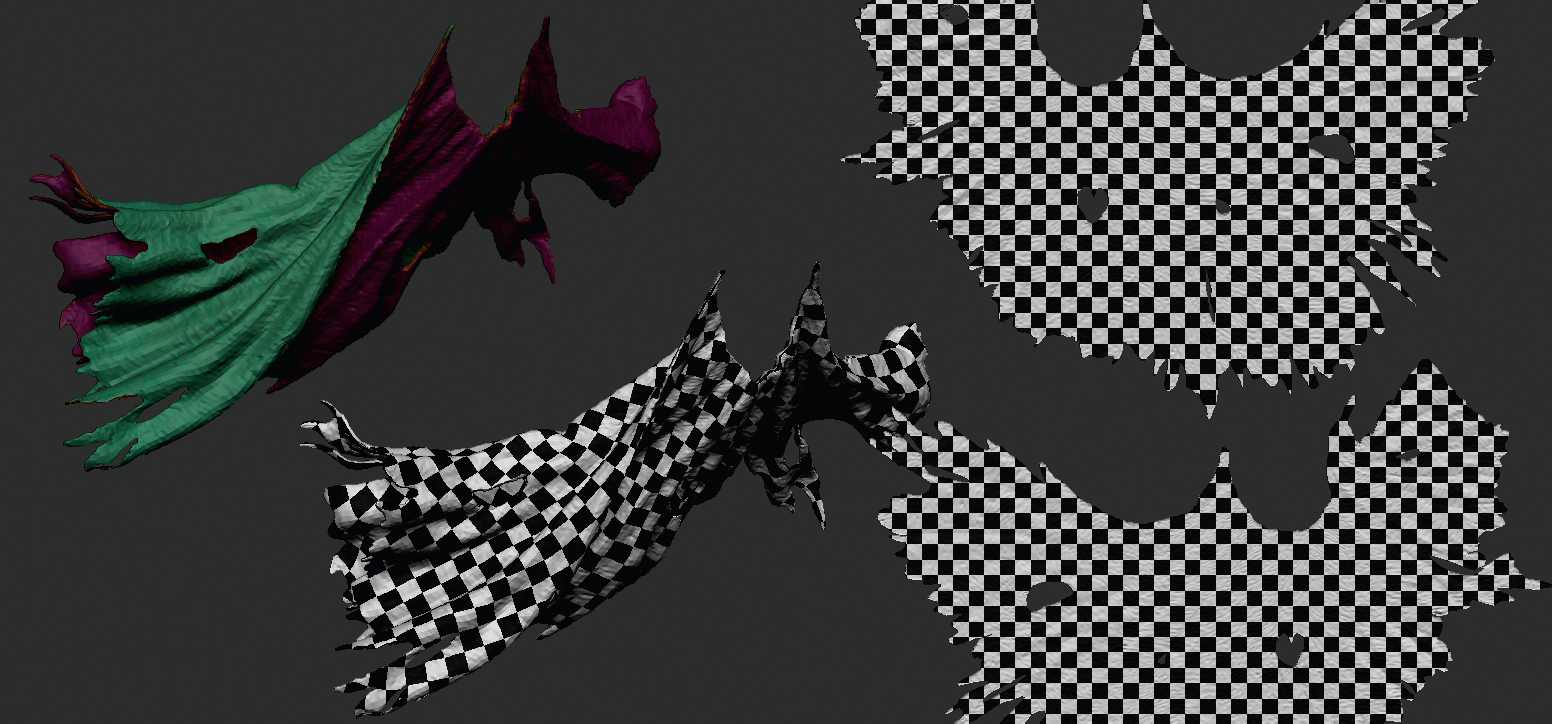
This part of the workflow might run concurrently with your modeling and can make the model heavy, so keep control of the polygon count for smoother work. Achieving good quality with your textures might require high-polygon areas, but it’s worth it for a good outcome.
Be sure to use high-quality textures, as low-quality ones can risk ruining the model. Good topology is also important for applying textures and creating good UV maps. Pay attention to the retopology to avoid texture distortion as well; ZBrush’s ZRemesher tool can help to resolve most cases for collectible statues.
05. Starting the painting process
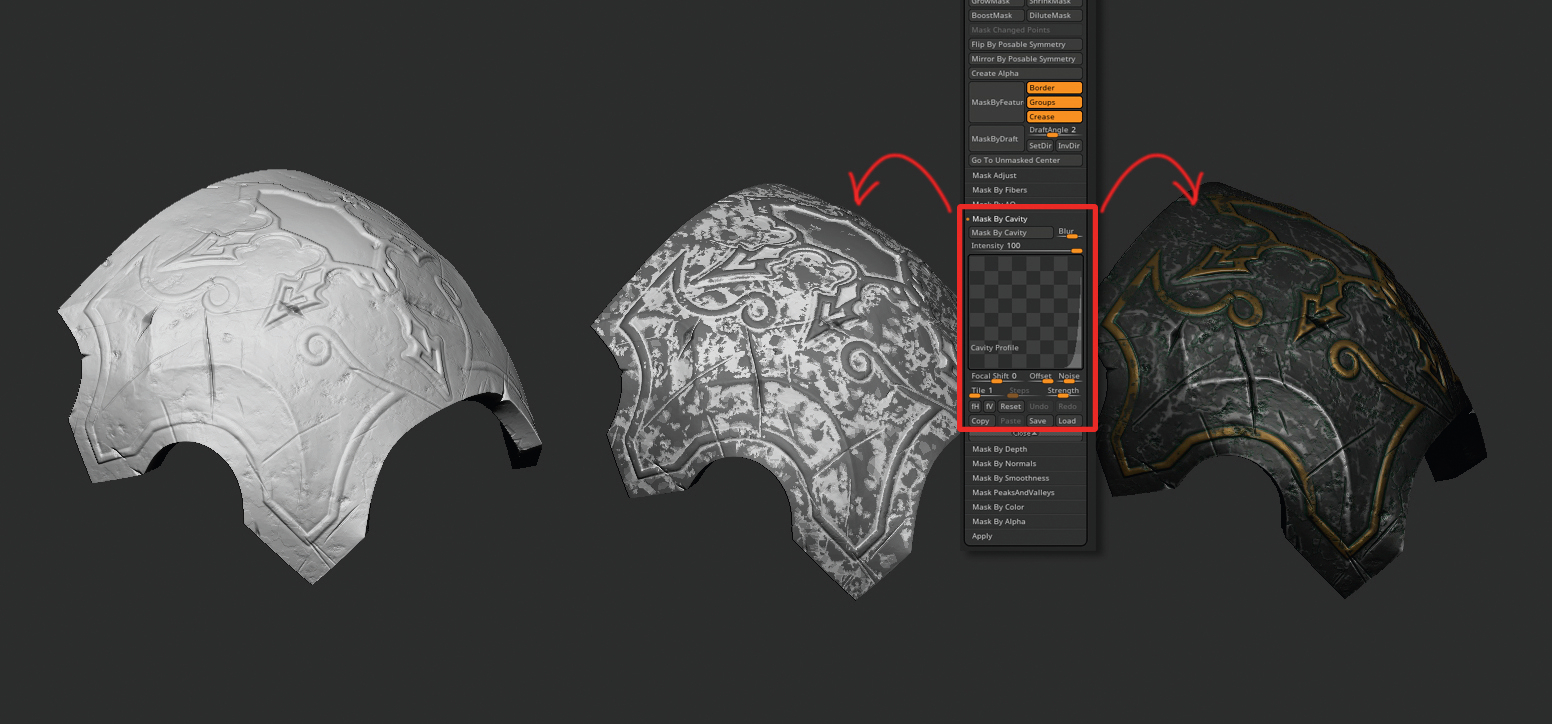
A tip here is to make good use of ZBrush’s ‘Mask By Cavity’ option. With few adjustments to its settings, you can select areas of each piece to achieve high-quality and realistic painting.
Remember that painting is part of the model’s presentation and having good references to hand will make all the difference. Be patient too, as this stage can be time-consuming but shouldn’t be neglected. Good painting will affect both the rendering and post-production stages.

06. Setting-up lighting in KeyShot
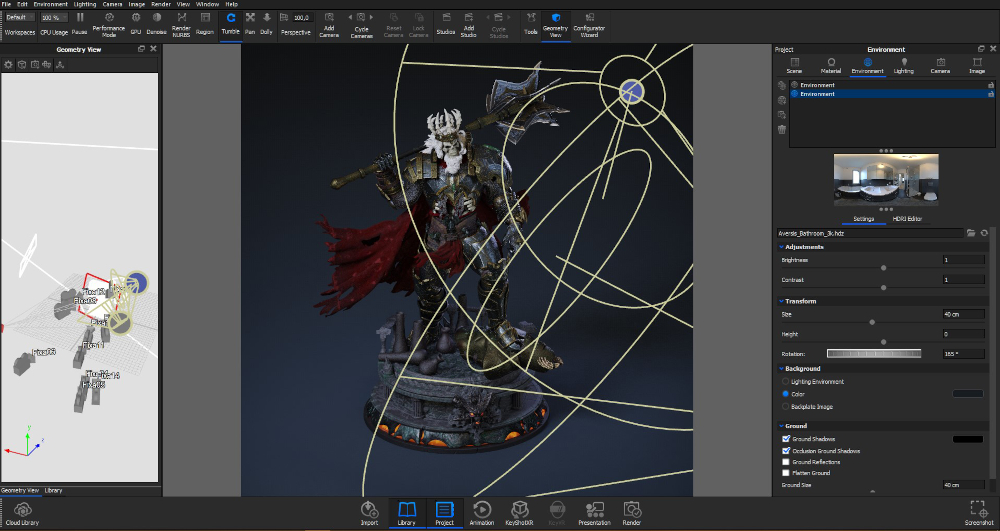
Apply a key light, a fill light, and a backlight to create depth and details, and adjust the intensity and direction for the desired effect. In a three-point lighting setup, the key light directs and casts sharp shadows, while the fill light softens shadows and adds details while also balancing dark areas. Finally, the backlight helps enhance the sense of depth by highlighting the character from the background. Choose a suitable HDRI image to generate realistic reflections to enhance the final render.
07. Bringing in materials
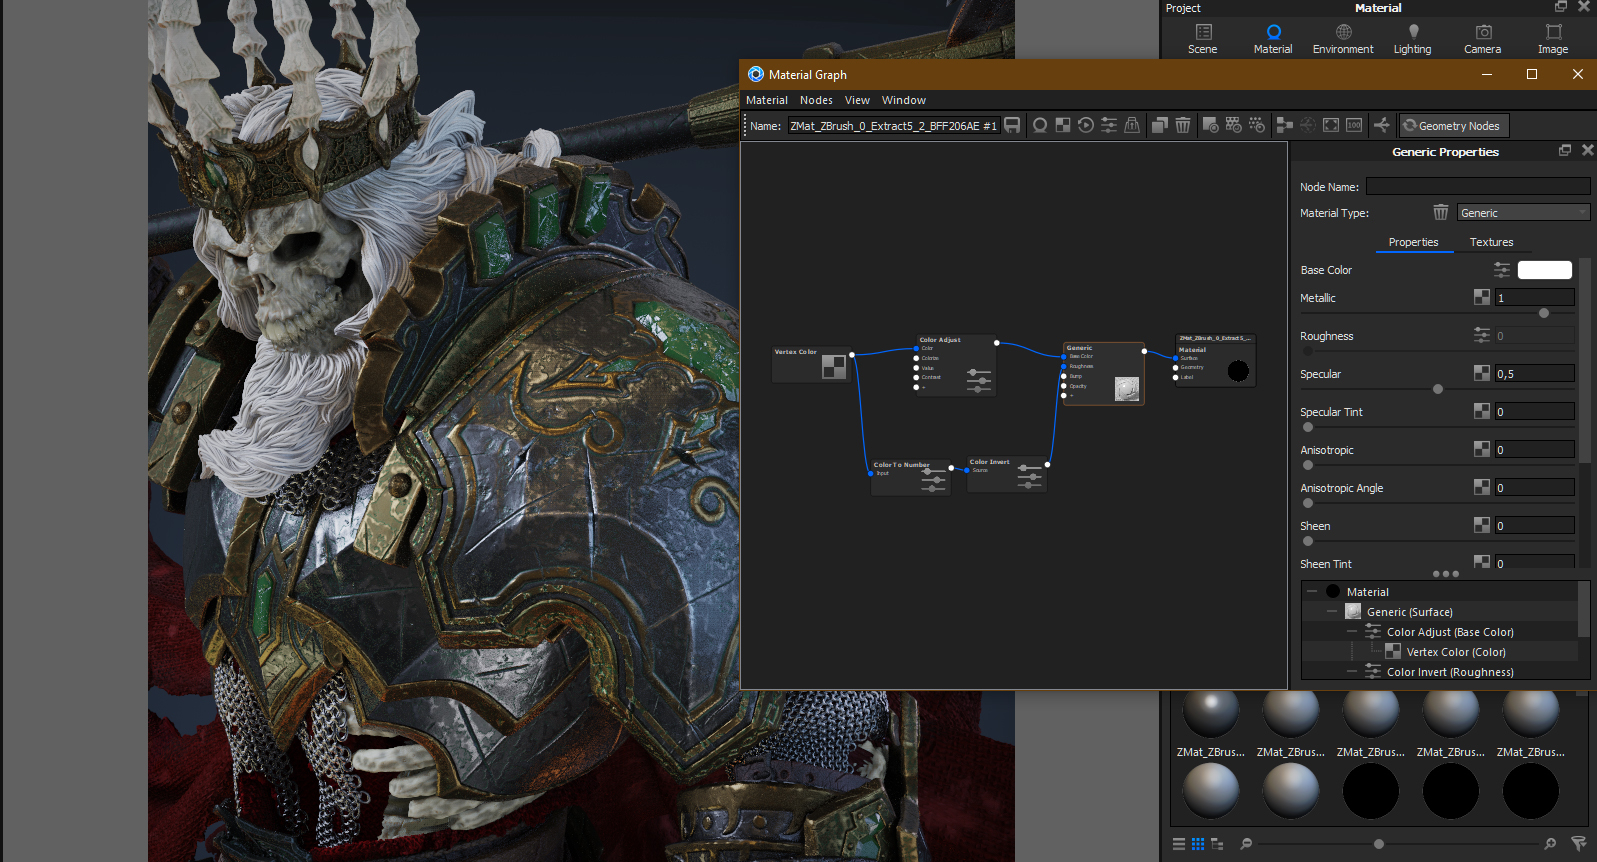
Experiment with different material settings to achieve the effect you want. Adjust textures, reflections and transparencies to bring your model to life realistically.
Test various options until you discover the perfect combination that highlights the details and conveys the desired feeling. Just like the lighting, practice and experimentation are essential to master the art of configuring materials in KeyShot.
Patience and persistence are allies in this process, enabling you to explore the software’s possibilities to the fullest.
08. Preparing your final render
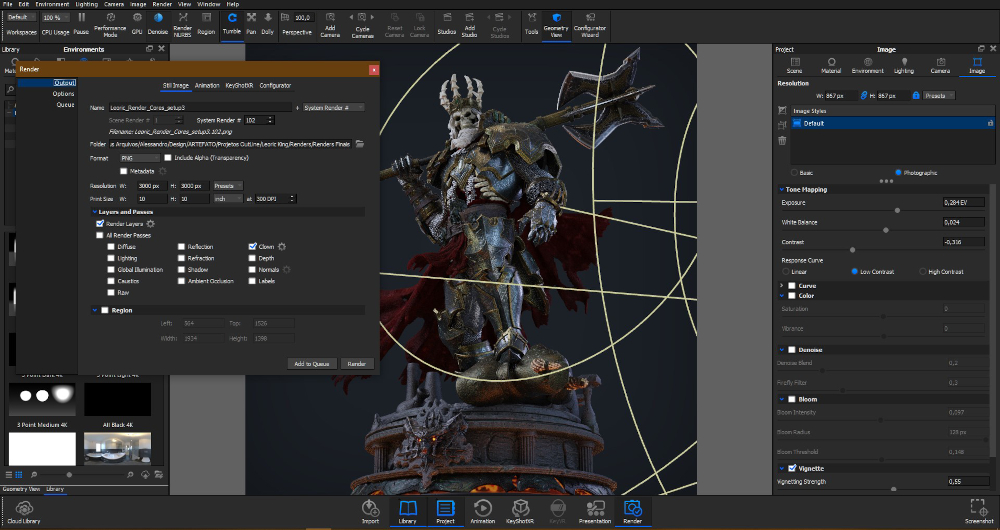
After setting up the lighting and materials in KeyShot, the final render is the next important stage. Ensure that every detail is highlighted and the atmosphere you want is conveyed. Adjust the render settings for the best visual quality possible and experiment with different camera angles to capture the model’s essence. Also remember to consider the composition and harmony of the scene. By combining technical precision with artistic vision, you’ll be able to produce a final render that effectively communicates your concept.
09. Post-production in Photoshop
The post-production is where you can unleash your creativity to enhance the final image by adjusting colours and contrast, and adding elements to highlight details. This stage is crucial for creating captivating presentation, boosting the model’s quality and visual impact. Play around with different techniques and filters to get the desired effect that makes your image stands out and leaves a lasting impression.
Inspired? Check our our list of the best 3D art for more amazing sculpts, models and renders. If you want to get into game creation, then read our guide to the best game development software.

Thank you for reading 5 articles this month* Join now for unlimited access
Enjoy your first month for just £1 / $1 / €1
*Read 5 free articles per month without a subscription
Join now for unlimited access
Try first month for just £1 / $1 / €1

Alessandro is a Brazilian 3D artist whose work focuses on collectible statues and miniatures, whether for illustration or 3D printing. He has a passion for fantasy characters and comic characters.
You must confirm your public display name before commenting
Please logout and then login again, you will then be prompted to enter your display name.