How to create realistic metallic models in Blender
Give your Blender work more realism by adding rust, roughness and specular highlights.
Metal is an extremely tricky subject to reproduce in 3D. To make it look believable we need to pay attention to many different things: details in specular highlights, rusty parts, edge scratches, roughness and glossiness variation. In this Blender tutorial, I'll show you how to easily create an old and rusty metal. We'll also cover various properties of the old metal and ways to reproduce it using material layers.
First we need to start with a pretty basic material, to which we will add details, one layer at a time. So, we'll make a dull metal base, cover it with rust, then go even further and scratch the surface until it looks terrible (which is what we want, in this case). In the final step we'll place the lamps to emphasise the material's highlights.
Metal and rust
What I find interesting is that if we think in terms of material layers, rather complex material, the CG metal, becomes easy to understand and reproduce. This practice of decomposing works well when paired with Blender material nodes. Do scratches happen to appear only on the edges? This feature can be represented by Mix shader and Dirty Vertex Colour, used as a mix factor. Rust splotches? Just use some kind of built-in procedural noise to get this effect.
Of course, mixing materials isn't the only path that we can take. Another approach would be to paint all distinctive metal features by hand straight into the texture, but here we'll stick with a procedural approach for now. It can be very fast and efficient, so it's definitely worth taking the time to learn.
To make sure we are all on the same page, let's take just a moment to download the free model of the drill from Blendswap (we still need something to texture!).
I've prepared a highpoly version of this model, as well as .blend file. They're ready to download.
With those files downloaded, here's a step-by step that will help you create realistic metalic models in Blender.
Get the Creative Bloq Newsletter
Daily design news, reviews, how-tos and more, as picked by the editors.
01. Make the basic material
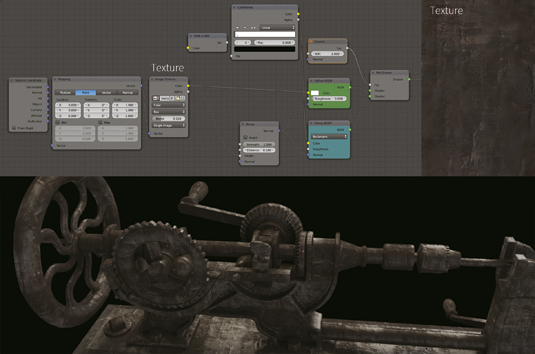
Start by making the base of our material. The first shader will be the mix between Diffuse and Glossy shaders, with a Fresnel node (2) plugged in the Mix factor input. Connect the image texture to the Diffuse BSDF Color input. Convert it to RGB using material node, tweak the contrast with the Color Ramp node and put it into the Color and Roughness slots of the Glossy shader.
02. Prepare the texture
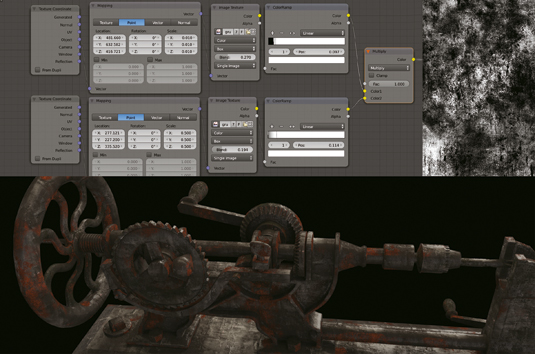
Take care in preparing your texture: You need to make sure your texture is seamless, as it's probably going to tile a few times across the model. Also I'd recommend picking a rather uniform-looking texture, because it will work best for the base layer. As we'll be adding more layers, it may look funny if the initial texture has its own prominent features.
03. Add the rust
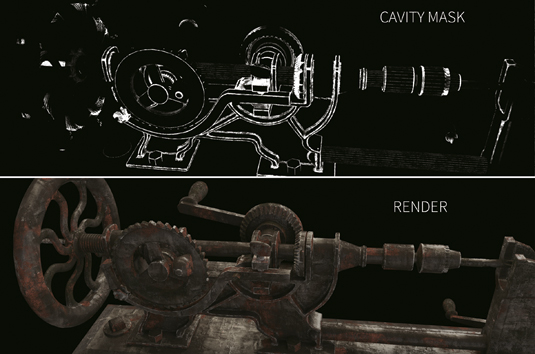
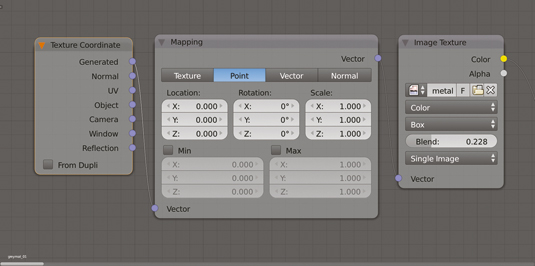
Copy the material. Add the Curves node after the Image texture and crank up the Red channel. Delete the Glossy shader and the Mix node. Now we need to mix it up. Use a black and white grunge texture, add Mapping node and try changing Scale and Position parameters to find the right values. Mix the two grunge maps with a Multiply blend type to lower the influence of rust.
04. Add the edge scratches
Now make a procedural edge map. Blender's built-in tool, Dirty Vertex Colours, could find the edges of the geometry, but let's try the FakeAO node of b°wide Node Pack. Cavity output provides a good approximation of the edges. If it creates a cavity in the wrong place, mask it out using Vertex paint and black. Mix everything with a grunge texture.
05. Place the lights
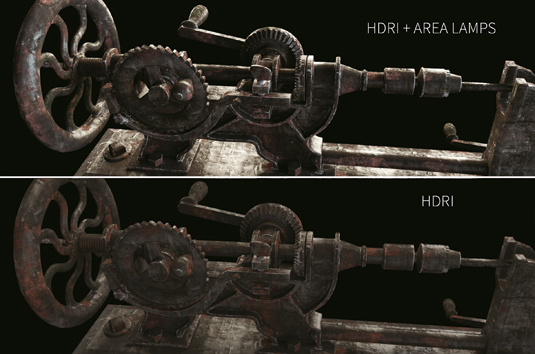
Lighting strongly influences the character of the metal material; think of it as an integral part of the material. The first thing we need is an environment. I suggest using HDRI spherical panorama to get a soft ambient lighting and at the same time the sharp, glossy highlights. Then place the area light behind the object to emphasise the reflection of our metal material.
Words: Gleb Alexandrov
Gleb Alexandrov is a 3D artist and indie game developer. He has been involved in developing games, educational projects and historical reconstructions. Follow him on Twitter at @gleb_alexandrov
Like this? Read these!
- Boost your Blender skills with 33 brilliant tutorials
- Discover what's next for Augmented Reality
- Download free textures: high resolution and ready to use now
Have you found a great Blender model or tutorial? Let us know about your experiences in the Comments

Thank you for reading 5 articles this month* Join now for unlimited access
Enjoy your first month for just £1 / $1 / €1
*Read 5 free articles per month without a subscription

Join now for unlimited access
Try first month for just £1 / $1 / €1

The Creative Bloq team is made up of a group of art and design enthusiasts, and has changed and evolved since Creative Bloq began back in 2012. The current website team consists of eight full-time members of staff: Editor Georgia Coggan, Deputy Editor Rosie Hilder, Ecommerce Editor Beren Neale, Senior News Editor Daniel Piper, Editor, Digital Art and 3D Ian Dean, Tech Reviews Editor Erlingur Einarsson, Ecommerce Writer Beth Nicholls and Staff Writer Natalie Fear, as well as a roster of freelancers from around the world. The ImagineFX magazine team also pitch in, ensuring that content from leading digital art publication ImagineFX is represented on Creative Bloq.
