10 anatomy tips for 3D artists
Anatomical knowledge is the basis of all good character design. Framestore’s Scott Eaton shares his anatomy tips to help you bring credibility to your models.

Learning anatomy is essential for a modeller, but unfortunately, there are no shortcuts to mastering it.
However, there are many common mistakes that people make, which can be easily fixed.
The tips compiled here address the problems that I see frequently in people’s work. These solutions merely represent a starting point, but the more you learn, the better your figures will be.
Constructing a realistic body is like piecing together a jigsaw puzzle. The more you understand the individual pieces, and the more accurately you are able to position them, the easier it is to put the rest of the body together.
This is a subject that you never really stop learning. It’s going to take study and practice, and lots of it. Plain, old-fashioned life drawing is a good start, as is conventional sculpting, or preferably both.
An old teacher of mine once said: “If you can’t draw it, you can’t sculpt it.” What he meant was that if you don’t have the knowledge to draw the figure (regardless of the accuracy of your linework), you won’t have the knowledge to build it in 3D either.
With these thoughts in mind, let’s move onto the tips...
01. Locate and maintain bony landmarks
When building a model, you need to locate and maintain the bony landmarks of the skeleton. Without them, the anatomy becomes very soft, and muscle groups tend to flow in strange directions.
Identify these landmarks either by painting on your mesh, identifying an edge loop, or sculpting a marker.
Once established, you can easily string muscle groups between them. Keep track of them throughout construction, though, because in production this information is vital to riggers and animators.
These places should be bound rigidly to the skeleton. A list of some of the most important places includes the inner heads of the clavicles, the acromion process, the spine of the scapula, the seventh cervical vertebra, the iliac crest, the medial and lateral epicondyles of the humerus, the olecranon, the head of the ulna, the greater trochanter, and the head of the fibula.
Look these up for yourself and become familiar with them.
02. Chest muscle spans to upper arm
The primary purpose of the chest muscle is to pull the arm across the body, so it makes sense that it must span across to the upper arm.
The mistake that people make all too often is to leave the chest muscles as a rectangular mass on the chest with no interaction with the upper arm. So, to construct an accurate, functional muscle group, you must know its origins and insertions.
The chest muscle (pectoralis major) originates from three distinct places: the inner two thirds of the clavicle, the length of the sternum, and the top of the abdomen at the level of the fifth rib. The muscle then spans across the shoulder joint and inserts onto the outside of the upper arm bone (known as the humerus).
The spanning across the joint is critical to the function of the shoulders, but also, of course, to achieving the correct appearance.
03. Correct ordering of upper arm insertions
Once you have the chest muscle spanning over to the upper arm, you have to resolve the ordering of muscles inserting there.
In the front view, three muscles insert in this area: the chest muscles (from tip 2), the deltoid, and the biceps. The correct layering of these muscles is critical to the operation.
First, you have to run the biceps along the length of the humerus (upper arm bone), then pass the chest muscles over, and finally drape the deltoid muscle over those two, inserting fully at halfway down the humerus on the outside.
The common mistakes in this area are having the biceps muscle going over the top of the chest muscles, and also inserting the deltoid too high on the arm.
These small details make a huge difference when modelling, rigging and deforming a model. Remember that the same attention should be given to back muscles inserting into the arm from behind.
04. Correct construction of the knees
Talking of attention: the knee is one place that never gets the attention it deserves, and as a result, it’s one of the first parts to be modelled poorly.
Typically, beginners underestimate the amount of bone there is, both from the upper leg (femur) and the lower leg (tibia). The result is knees that are far too small and weak to bear the weight of the body.
To build a correct knee, you should understand the construction of the joint. Three bones make up the knee joint: the lower end of the femur, the top end of the tibia, and the patella (the knee cap).
The femur ends in two rounded masses (condyles), functionally like a rolling pin, that sit on an enlarged bony plateau at the top of the tibia. The upper leg rolls forward and backwards on this plateau, with the patella settling into the space between condyles when the knee bends.
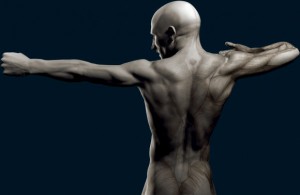
05. The scapula is key to the back muscles

The back muscles are one of the hardest parts of the body to understand. All too often, artists just ‘eyeball’ it, generally for want of knowledge about how the back is constructed and functions.
You can tell when someone has taken this approach as the result is nearly always a mess. The first step in fixing this is to familiarise yourself with the scapula and its surface landmarks. Specifically, the scapula has two areas that are always directly under the skin: the spine of the scapula and the inner border.
The spine is a bony ridge that runs from the point of the shoulder inwards and slightly downwards towards the inner border. Where they meet, the inner border traces down vertically (on a model with arms by the side – remember that the angle of the scapula changes as the arm is raised).
Why do these locations matter? Well, no fewer than six muscles important to the surface form of the upper back are located on these landmarks.
06. Interlock upper and lower arms
I frequently see models with bulging biceps/triceps and Popeye forearms, but no interchange between them. Understand that the main forearm muscles originate on the upper arm (the medial and lateral epicondyles) and the upper arm muscles insert into the forearm. Think of two clamps interlocking across the elbow when you are modelling this area.
07. Four-pack or six-pack?
A far too common mistake among beginners and experienced artists alike is poor construction of the abdominal muscles.
Very few people have abs that appear as a six-pack: instead they have a four-pack. The top two ‘packs’ are there but are typically genetically underdeveloped, and don’t create surface form.
08. The longest body muscle
Familiarise yourself with the origin, insertion and shape of the sartorius muscle, the longest in the body. It cuts elegantly across the thigh from hip to knee, forming the inner border of the quadriceps muscle.
Correct location of this muscle fixes many problems I often see in the upper leg.
09. Construct broad tendons correctly
The triceps on the arm and the quadriceps on the leg attach into their respective insertions via broad, flat common tendons. If you struggle with either of these muscles, investigate the distinct shapes of the tendons.
They vary little from person to person, so learn the shape once and reuse it.
10. Read the best anatomy books
Use only the best anatomy books for reference. Anatomy books vary considerably in quality of information and illustrations.
Using a bad one can be counter-productive. I maintain a list of the best anatomy books on my website.

Thank you for reading 5 articles this month* Join now for unlimited access
Enjoy your first month for just £1 / $1 / €1
*Read 5 free articles per month without a subscription

Join now for unlimited access
Try first month for just £1 / $1 / €1
Get the Creative Bloq Newsletter
Daily design news, reviews, how-tos and more, as picked by the editors.

The Creative Bloq team is made up of a group of art and design enthusiasts, and has changed and evolved since Creative Bloq began back in 2012. The current website team consists of eight full-time members of staff: Editor Georgia Coggan, Deputy Editor Rosie Hilder, Ecommerce Editor Beren Neale, Senior News Editor Daniel Piper, Editor, Digital Art and 3D Ian Dean, Tech Reviews Editor Erlingur Einarsson, Ecommerce Writer Beth Nicholls and Staff Writer Natalie Fear, as well as a roster of freelancers from around the world. The ImagineFX magazine team also pitch in, ensuring that content from leading digital art publication ImagineFX is represented on Creative Bloq.
