Write an app in AngularJS
The AngularJS framework greatly simplifies frontend development, making it easy and fun to write complex web apps. Brian Ford explains how to use it to build a contact manager
This article first appeared in issue 234 of .net magazine – the world's best-selling magazine for web designers and developers.
In JavaScript’s early days, you had to manipulate the DOM through a set of APIs that were inconsistent across browsers and very terse. Then jQuery came along, improved the API by enabling you to use CSS selectors, and made it easier to develop cross-browser web applications.
This was a great step forward, and developers were able to become more productive. Yet this still doesn’t solve the root issue that applications built as a series of DOM manipulations and callbacks are hard to organise and maintain.
More recently, Backbone.js took the stage, offering great utilities and helpful suggestions about how to organise application code. This undoubtedly helped web developers building larger applications regain some of their sanity. But as much as Backbone.js is a great step in the right direction, it doesn’t go far enough in terms of making developers more productive. While the application is more organised, you still spend a lot of time writing imperative code to manage the state between views and models.
AngularJS is different from other frameworks in that it facilitates writing your code declaratively, avoiding tedious DOM manipulation and event listeners. For most cases, rather than writing a lot of code to traverse the DOM, you just want to keep some combination of elements and attributes synchronised with an object in your application’s business logic. To do this, AngularJS provides a handful of ‘directives’ to help write applications much more rapidly.
Granted, there will be cases when you want to be able to listen to, or even do, some custom manipulation. AngularJS enables you to write directives that act as an interface between imperative listeners and DOM API calls, and the declarative data binding that you want to use to write the business logic of your application.
The main features of AngularJS
AngularJS adds new functionality to the web browser, enabling developers to set up data binding by defining a few custom attributes in the HTML. You define logic and publish models to a scope in a controller:
myApp.controller(function ($scope)
  { $scope.name = 'Bob';
});
And then you can add double curly braces and bind the contents of the paragraph in the template to name in the $scope:
<p>{{name}}</p>This isn’t very interesting, so let’s look at a more complicated case. Assuming we’ve defined an array of users on the scope variable, as done above, we can write this in the template, using ng-repeat, another AngularJS construct:
<ul>
  <li ng-repeat="user in users">
    <input ng-model="user.name"> {{user.name}}
  </li>
</ul>
And add some data in the controller:
Get the Creative Bloq Newsletter
Daily design news, reviews, how-tos and more, as picked by the editors.
myApp.controller(‘AppCtrl’, function ($scope) {
  $scope.users = [{ name: ‘John’ }, { name: ‘Bob’ }];
});
When you change the user model by modifying the input field, the rest of the HTML will automatically be updated to show this change, as you can see here:

The data binding goes both ways, so you can manipulate the updated data in the controller, sending it your backend, as well as make changes to the data in your controller, and have these automatically reflected in your application’s view. This type of data binding makes AngularJS an especially good match for CRUD (create, retrieve, update, delete) applications that communicate asynchronously with a JSON or XML backend.

Building a contact manager
In this article, we're going to use AngularJS to build a simple application to manage a set of contact details, including data for names, phone numbers and addresses. To begin with, we need to set up a few files. Create an index.html with the following contents:
<!doctype html>
<html lang="en" ng-app="contactManager">
<head>
  <meta charset="utf-8">
  <title>Contact Manager</title>
</head>
<body ng-controller="AppCtrl">
  <h1>AngularJS Contact Manager</h1>
  <!-- App template goes here -->
  <script src="https://ajax.googleapis.com/ajax/libs/angularjs/1.0.1/angular.min.js"></script>
  <script src="app.js">
  </script><script src="controllers.js"></script>
</body>
</html>
… and an app.js with these contents:
var contactManager = angular.module(‘contactManager’, []);Let’s start writing our controllers. Open controllers.js from the supporting download for this tutorial. This controller will be the top-level controller for our application, and will hold the contacts list data:
contactManager.controller('AppCtrl',
  function AppCtrl ($scope) {
    $scope.contacts = [{
      name: 'Brian Ford',
      phone: '555-555-5555',
      address: [
        '1600 Amphitheatre Parkway',
        'Mountain View, CA 94043'
      ]
    }];
  });
Just as in the prior example, our data is stored as a simple JavaScript object. AngularJS doesn’t require you to extend any special classes, or stick to one particular inheritance pattern, so you’re free to use whatever patterns you like – from decorating plain JavaScript objects, to using a utility library such as Underscore.js’s .extend helper, to using ES5’s Object.create. This keeps the business logic clean, and makes code far easier to test.
Next, let’s build a simple frontend that displays a list of users. This won’t be too different from the example above. Add this code to the body of a new file. This will become partials/index.html, as described later in the article:
<p ng-show="contacts.length == 0">There are no contacts here!</p>
<ul>
  <li ng-repeat="(id, contact) in contacts">
    <a href="#/info/{{id}}">{{contact.name}}</a>
    [<a href="#/remove/{{id}}">remove</a>]
  </li>
</ul>
<a href="#/add">Add new item</a>
This will iterate through each item in contacts, which is attached to the scope via the controller. The application should look like this:
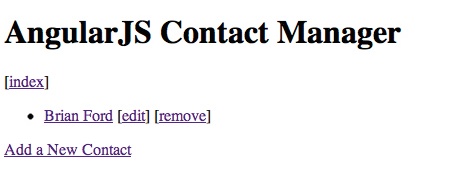
If you look at the source, you’ll note that there’s also a paragraph there that will notify users when there are no items in the list. This makes use of the ng-show directive, which accepts a statement that it will evaluate, showing and hiding the content depending on the expression’s truthfulness. There are also a bunch of broken links.
Let’s add some typical CRUD features to our application. To do this, we need to have different ‘pages’ for each of the different actions in our contact manager application. We can use ng-view and configure routes to do this.
To start, let’s move the code we just added to the application into a new file. Make a new folder, partials, and inside of it, partials/index.html. This will store the view for the index of contacts for our application. Next, we need to configure client-side routing. Open app.js from the download, and edit it accordingly:
var contactManager = angular.module('contactManager', [])
  .config(function($routeProvider) {
    $routeProvider.when('/index', {
      templateUrl: 'partials/index.html'
    })
    .when('/info/:id', {
      templateUrl: 'partials/info.html',
      controller: 'InfoCtrl'
    })
    .when('/add', {
      templateUrl: 'partials/add.html',
      controller: 'AddCtrl'
    })
    .when('/edit/:id', {
      templateUrl: 'partials/edit.html',
      controller: 'EditCtrl'
    })
    .when('/remove/:id', {
      templateUrl: 'partials/remove.html',
      controller: 'RemoveCtrl'
    })
    .otherwise({
      redirectTo: '/index'
    });
  });
Now, the application is configured to use the view corresponding to the URL, parsing out an ID where needed, and redirecting to /index otherwise. The index route doesn’t need any special functionality, so there’s no need to write a controller for it. Each of the other routes will need some business logic.

Adding to controllers.js, we can write the code to handle viewing, adding, editing, and removing contacts from the user’s list. Let’s start by writing a controller called InfoCtrl. By convention, AngularJS controller names are CamelCase and end with Ctrl.
contactManager.controller('InfoCtrl',
  function InfoCtrl($scope, $routeParams) {
    $scope.contact = $scope.contacts[$routeParams.id];
  });
This controller simply aliases the contact based on the parameter passed through by the routing configuration.
In AngularJS, scopes work lexically based on where the corresponding controller appears in the HTML template. InfoCtrl will appear inside of AppCtrl, so the contacts array defined in AppCtrl will also be available in InfoCtrl, and in partials/info.html:
<p>Name: {{contact.name}}</p>
<p>Phone Number: {{contact.phone}}</p>
<p ng-repeat="line in contact.address">{{line}}</p>
Let’s write the controller for adding contacts. This is really simple: based on the ID passed through the route parameter, it aliases a $scope.contact variable so that the HTML template can display the desired user.
contactManager.controller('AddCtrl',
  function AddCtrl($scope, $location) {
    $scope.contact = {};
    $scope.add = function () {
      $scope.contacts.push($scope.contact);
      $location.url('/');
    };
  });
And now partials/add.html. Adding and editing a user will be basically the same view – a form with each of the different types of contact fields. By planning ahead, we can create a partial inside the views for Add and Edit, and simply populate the form depending on the view.
This makes use of ng-include, which takes an expression. Because we want a static string, we need to wrap the value in quotes.
<h2>Add a new Contact</h2>
<form ng-submit="add()" ng-include="'partials/form.html'"></form>
We’ll also create partials/form.html:
<div>
  <label>Name</label>: <input ng-model="contact.name">
</div>
<div>
  <label>Phone Number</label>: <input ng-model="contact.phone">
</div>
<div>
  <label>Address 1</label>: <input ng-model="contact.address.0">
</div>
<div>
  <label>Address 2</label>: <input ng-model="contact.address.1">
</div>
<input type="submit" value="Submit">
So when partials/add.html includes this, the Submit button will trigger the add method attached to the scope. After adding the new user, the add method will redirect a user back to the index page, as shown here:
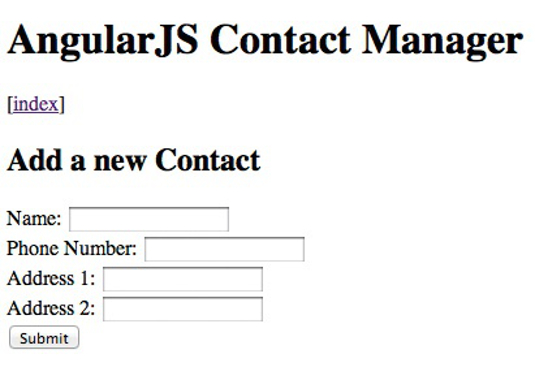
This controller initialises the contact scope variable to an empty object, then exposes a method on the scope for use by the template.
contactManager.controller('EditCtrl',
  function EditCtrl($scope, $routeParams, $location)) {
    $scope.contact = $scope.contacts[$routeParams.id];
    $scope.edit = function () {
      $scope.contacts[$routeParams.id] = $scope.contact;
      $location.url('/');
    };
  });
Next, add the following code to partials/edit.html:
<h2>Edit {{contact.name}}</h2>
<form ng-submit="edit()" ng-include="'partials/form.html'"></form>
Again, the template is nearly the same as partials/add.html. The main difference is the value of ng-submit.
This controller initialises the contact scope variable to an empty object, then exposes a method on the scope for use by the template.
contactManager.controller('RemoveCtrl',
  function RemoveCtrl($scope, $routeParams, $location) {
    $scope.contact = $scope.contacts[$routeParams.id];
    $scope.remove = function () {
      $scope.contacts.splice($routeParams.id, 1);
      $location.url('/');
    };
    $scope.back = function () {
      $location.url('/');
    };
  });
And in partials/remove.html, we’ll create this confirmation dialog:
<p>Are you sure that you want to remove {{contact.name}}?</p>
<button ng-click="remove()">Yes</button>
<button ng-click="back()">No</button>
With that, the application is complete. There are many obvious improvements that you could make to it – for instance, you could use the filters provided by AngularJS to sort the list of contacts.
Conclusion
This is a very simple application, so we're only scratching the surface of what AngularJS can do. It has many other incredibly useful features. AngularJS has a powerful dependency injection system that enables virtually any aspect of the framework to be tweaked, customised, or completely overhauled to suit your application’s needs.
Because AngularJS controllers are just JavaScript functions, it’s easy to mock out the various parameters passed into them. Furthermore, AngularJS uses HTML attributes and tag names, so it makes it easy for designers to move and rearrange interactive components. This separation of concerns improves the way designers and developers collaborate on application frontends.
Thanks to Google's AngularJS team for their peer review of this article.

Thank you for reading 5 articles this month* Join now for unlimited access
Enjoy your first month for just £1 / $1 / €1
*Read 5 free articles per month without a subscription

Join now for unlimited access
Try first month for just £1 / $1 / €1

The Creative Bloq team is made up of a group of art and design enthusiasts, and has changed and evolved since Creative Bloq began back in 2012. The current website team consists of eight full-time members of staff: Editor Georgia Coggan, Deputy Editor Rosie Hilder, Ecommerce Editor Beren Neale, Senior News Editor Daniel Piper, Editor, Digital Art and 3D Ian Dean, Tech Reviews Editor Erlingur Einarsson, Ecommerce Writer Beth Nicholls and Staff Writer Natalie Fear, as well as a roster of freelancers from around the world. The ImagineFX magazine team also pitch in, ensuring that content from leading digital art publication ImagineFX is represented on Creative Bloq.
