How to prepare your images for web use
Nathan Segal explains how to use Adobe Extract within Photoshop and Creative Cloud.
Not all that long ago, exporting images from a PSD file was a complex and tedious task which could take a dozen or more steps to create a single asset. That began to change when Adobe introduced Edge Reflow CC and the Generator plug-in which allowed designers to change layers into images and export them to Edge Reflow complete with CSS and HTML information.
Now you can use Photoshop to convert layers into images using Extract, which saves images to a folder and allows you to use them in your projects. Adobe Extract can be used with Creative Cloud, Photoshop and Dreamweaver.
One major aspect of Extract is you no longer have to make use of the 'Save for Web' dialog box. Instead, you can create variations of all the images you want to use within the Extract Assets dialog box and ready all of them for export at the touch of a button.
Another aspect of Extract is the results can be freely shared with colleagues working within the Creative Cloud.
Adobe gives you access to a video and the various assets you will need, including cheat sheets for Photoshop and Dreamweaver.
Step 01
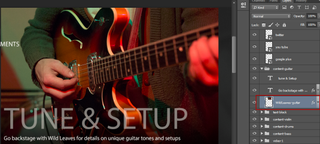
To get started, open the playOn.psd file and select an image layer in one of the folders.
Step 02
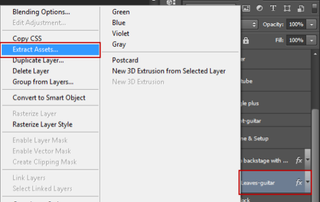
Right-click on it and in the popup list, select Extract Assets.
Get the Creative Bloq Newsletter
Daily design news, reviews, how-tos and more, as picked by the editors.
Step 03
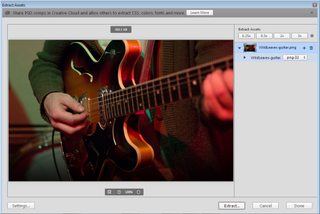
This adds the layer to the Extract Assets dialog box. Here you can preview the image and create different file formats. By default, the layer is set to the PNG format.
Step 04

To create a new file format for the asset, click on the “+” button next to the layer name. This brings up a drop-down menu which allows you to change the file format to PNG-8, PNG-24, PNG-32, GIF, JPG, or SVG.
Step 05

As an example, if you choose the JPEG format, you see the format and you can also adjust the quality setting. This is the only file option which allows you to do so. All the other formats change the file to the default setting, which cannot be changed.
Note that in the dialog box, each image has the default sizing settings of 0.25x, 0.5x, 2x and 3x. Clicking on any of these buttons will create an image at that particular size when extracted. In addition, there’s an icon to the right of these settings, as well as a Settings button at the bottom left of the dialog box. When you click on either one, these open the Settings dialog box.
Step 06
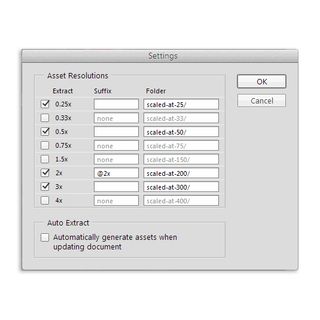
As you can see, all the size options previously selected appear here. As you can also see, this dialog box offers more precise control over image sizing. You also have the option of enabling the Auto Extract section at the bottom, which will automatically generate assets when updating the document.
Once you’ve chosen the resolution options you want, click on OK. This will return you to the Extract Assets dialog box.
To extract the images, click on the Extract button. This brings up a dialog box with the message 'To Extract these assets, Photoshop will alter the document’s layer names'.
Step 07
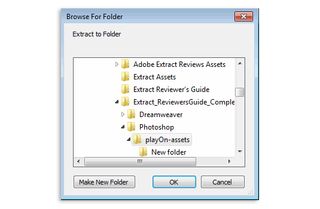
When you click on OK, Photoshop brings up the Browse for Folder dialog box. Here, you can choose which folder you want to use for the images or you can create a new one.
Photoshop will take a few moments to generate the image assets.
Step 08
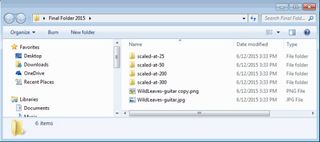
When you open the folder, you will see individual folders for each of the resolution sizes you chose and in each folder you will see sized images of the different file formats you chose for each resolution setting.
Using Extract with Creative Cloud
To do this, you need to have Creative Cloud on your computer.
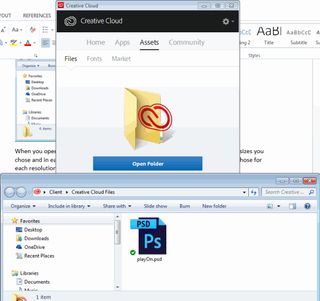
Once you do, sign into Creative Cloud click on Open Folder and copy the playOn.psd file into this directory and let the program sync it to the cloud.
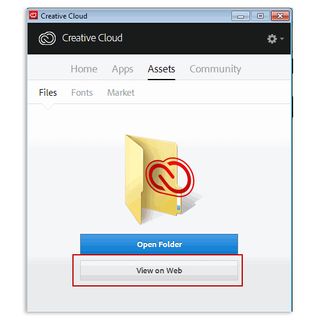
Next, click on the View on Web button in Creative Cloud.
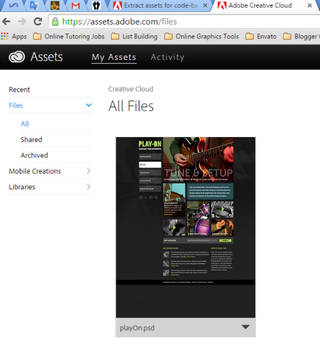
This brings up Creative Cloud in the browser.
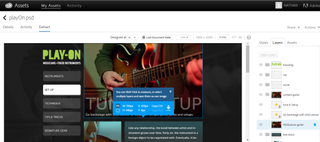
When you click on the image it opens into the Extract tab. On the far right of the image are three tabs, which are Styles, Layers, and Assets. Clicking on the Layers tab gives you access to all the layers in the PSD file. When you click on any layer, it will bring up the blue section you see above. If you’re on an image you can copy the CSS for that. If you’re on some text, you can copy the CSS and text and download all layers and save them as one image.
For Best Results
When using a Photoshop file for the purpose extracting the assets here are some important steps to observe:
- Use numeric entry for precise sizing and positioning of image elements.
- Group all similar layers within individual folders.
- Realize you can only work with one layer at a time within the Extract Assets dialog box.
- Bear in mind that this process will only convert layers to images. It will not include CSS or HTML information. If this is what you want, you’ll need to make use of the Creative Cloud process described above.
Words: Nathan Segal
Nathan Segal has been working as a Technical Writer for 16 years. You can learn more about his work at NathanSegal.org.
Like this? Read these!
- Adobe updates Creative Cloud in milestone 2015 release
- Photoshop tips, tricks and fixes to try today
- The best photo editors

Thank you for reading 5 articles this month* Join now for unlimited access
Enjoy your first month for just £1 / $1 / €1
*Read 5 free articles per month without a subscription

Join now for unlimited access
Try first month for just £1 / $1 / €1
The Creative Bloq team is made up of a group of design fans, and has changed and evolved since Creative Bloq began back in 2012. The current website team consists of eight full-time members of staff: Editor Georgia Coggan, Deputy Editor Rosie Hilder, Ecommerce Editor Beren Neale, Senior News Editor Daniel Piper, Editor, Digital Art and 3D Ian Dean, Tech Reviews Editor Erlingur Einarsson and Ecommerce Writer Beth Nicholls and Staff Writer Natalie Fear, as well as a roster of freelancers from around the world. The 3D World and ImagineFX magazine teams also pitch in, ensuring that content from 3D World and ImagineFX is represented on Creative Bloq.
Related articles
-

-

-

-

