How to develop a game with Phaser
Follow Anton Mills as he guides you through the fundamentals of browser-based game development with the Phaser framework.
Now is a hugely exciting time for developers creating games for internet browsers, and over the past 12 months Phaser has gone from strength to strength. This game framework provides a friendly and intuitive ecosystem for game development and also leverages the excellent Pixi.js for outstanding Canvas and WebGL-rendering performance.
Getting started
You'll need Yeoman set up on your machine, so if you don't have it (and why the heck not?) follow the instructions on its website. With Yeoman up an running, start by installing a Yeoman project template for game development – this will save a lot of repetition when creating games.
To install the Yeoman project template generator, open a new terminal window and type the following (remember to prefix with sudo if you're on Mac):
npm install -g yo generator-phaser-officialThe first thing we need to do is to create and compile a project to test everything. Create a new folder for your game and cd to it in your current terminal directory, then type:
yo phaser-officialYeoman will ask you for the answers to few questions while creating the template: the game name (we've used 'netmag-phaser'), the version of Phaser you want to use (2.0.0), and your game's width (900) and height (480). When Yeoman has finished creating the project, check everything has been set up correctly by running grunt from the command line.
Your browser will open and the default game this project contains will start running. Have a play!
Structure and states
Looking into the project's structure, there are a few key folders we will be working with, including:
- /assets – the folder containing the image assets
- /game – the game's JavaScript files
- /game/state – the game's states
- /dist – the compiled game for hosting online
You will spend the majority of your time inside the game and states directories; these are the core project files. Each game is made up of several 'states' – you can think of these as different stages of a game. In our game we will use just four states: Preload, Menu, Play and Gameover. You can see these JavaScript files in the game/states folder.
Each state is made up of a common layout. If you look at the template states you will notice the most common methods are Preload, Create and Update:
- Preload – offers a place to situate an asset or data preloading before the state is created
- Create – is where we instantiate objects, place graphics and set the state so it is ready to play
- Update – can be thought of as the state's main tick. This method is invoked at 60 times a second and contains the core of our game's logic
Now is a good time to download or clone the contents of this tutorial's GitHub repository. Inside, there are a number of folders for different stages in the game, including one entitled Assets, which contains the imagery for this game. Start by copying the entire contents of this folder to the /assets folder in your game.
Identifiers
Jumping into the Preload.js state lets you set each of the copied assets to preload before our game starts.
Add the following to the preload.js preload() method:
this.load.image('menu', 'assets/menu.jpg');
this.load.image('background', 'assets/background.jpg');
this.load.image('player', 'assets/player.png');
this.load.image('creature_1', 'assets/creature_1.png');
this.load.image('creature_2', 'assets/creature_2.png');
this.load.image('creature_3', 'assets/creature_3.png');
this.load.image('gameover', 'assets/gameover.jpg');
The load.image method takes two parameters. The first is a string-based identifier we will use to reference the image if we need to create instances of it once it's loaded, and the second parameter is the path to the image.
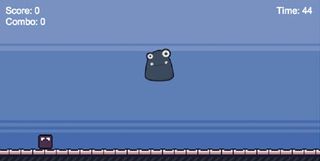
Next up is the game's main menu scene. Open up the Menu.js state, remove the entire contents of the create() method and replace it with the following:
this.title = this.game.add.sprite(0, 0, 'menu');Remember those identifiers we gave our assets at Preload? We simply have to use game.add.sprite(), give it a horizontal and vertical position of 0 and then use the menu identifier we specified in the Preload state for the main menu image.
Test your progress by running Grunt from terminal to see the results load up in the browser. Your game should boot up to a new menu with graphics.
Mechanics
In this section we will look at the game mechanics, but to save lots of typing I've created the basic game class. Simply copy the Play.js from the folder entitled 3-Play in the accompanying source code and overwrite your current Play.js in /game/states.
Inspecting the code, there are a few key lines of the framework to point out. Lines 10, 13 and 14 create a rectangle that is used as a boundary to keep objects within it. These lines also enable Phaser's built-in Arcade physics system.
Lines 17 to 21 create our player. We load the image the same way as before, but this time on line 20 we set the anchor. This essentially means the object's x and y position can be offset – so we position the player by its centre point (horizontally) and not its top left point.
We add the player to the physics system by using game.physics.arcade.enable() and setting the player's body to collide with the boundary. At this stage the player will react to gravity, and collide with the floor.
Lines 24 to 32 create an array of enemies using the same method as above. There are a few extra properties we create on each enemy that are used in their jumping functionality. This sets an intensity for their jump height and a delay between each jump. The logic for jumping is in the Statesupdate() method.
Lines 39 through to 54 create the variables for score and time. They also use another of Phaser's functionality for rendering text. Using game.add.text() you can create a string of text on-screen while specifying fonts, fills and alignment. Phaser has great text-based functionality – we're only scratching the surface in this tutorial.
Update method
Now we can move on to the update() method, which is where the main game's logic resides. Lines 59 and 60 create shortcuts to the framework's input system. The cursors variable allows us to check if keys are down, using cursors.right.isDown(), for example.
We use this in lines 66 to 73 by listening to which keys are down, and if the player is not colliding with the boundary object we previously looked at. We can do this by using player.body.onFloor(). If this returns false then the player is in the air, and we give the player a velocity change using player.body.velocity.x. We don't have to use actual x-y values, we just give a velocity to x-y and leave Phaser's physics system to handle the rest. Our player can now move around while jumping.
At line 83 there is an example of how we update a Phaser text field. We simply use setText() and the text content we want to render. It will use the existing text style properties we instantiated it with.
An example of how to test for collisions between two sprites (not a physics-based collision) is to use the Phaser.Rectangle.intersectsmethod(), as per line 113. We pass it two sprites.bounds() and it will return a true or false, based on if they are colliding or not. If the collision returns false, it hides the enemy until the enemy timer creates a new one.
Game over
The rest is mostly just standard JavaScript, but there is one final part of Phaser to highlight – the game. state.start() method on line 129. Once this is invoked it ends the current state and moves to any state we specify as a string – in this situation, when the timer hits 0 we jump to the Gameover state.
In the Gameover.js, clear the contents of the create() method. Similarly to the Menu state, we will create a background image, but this time adding a dynamic text field to show the user's score.
Enter the following in the create() method:
this.gameoverbg = this.game.add.sprite(0, 0, 'gameover');
this.score_text = this.game.add.text(this.game.world.centerX, 325, this.game.score, { font: '32px Arial', fill: '#ffffff', align: 'center'});
this.score_text.anchor.setTo(0.5, 0.5);
Now save the Gameover.js file and run Grunt again. This time you should get the full menu screen, the game and a much improved Gameover screen.
Hopefully this has given you a taster for game development with Phaser. It's a great framework that will help you create some fantastic games.
Like this? Read these!
- How to create a basic game environment
- How to build an app: try these great tutorials
- Free graphic design software available to you right now!

Thank you for reading 5 articles this month* Join now for unlimited access
Enjoy your first month for just £1 / $1 / €1
*Read 5 free articles per month without a subscription

Join now for unlimited access
Try first month for just £1 / $1 / €1
Get the Creative Bloq Newsletter
Daily design news, reviews, how-tos and more, as picked by the editors.
The Creative Bloq team is made up of a group of design fans, and has changed and evolved since Creative Bloq began back in 2012. The current website team consists of eight full-time members of staff: Editor Georgia Coggan, Deputy Editor Rosie Hilder, Ecommerce Editor Beren Neale, Senior News Editor Daniel Piper, Editor, Digital Art and 3D Ian Dean, Tech Reviews Editor Erlingur Einarsson and Ecommerce Writer Beth Nicholls and Staff Writer Natalie Fear, as well as a roster of freelancers from around the world. The 3D World and ImagineFX magazine teams also pitch in, ensuring that content from 3D World and ImagineFX is represented on Creative Bloq.
