Tips and tricks for organic modelling
Improve your creatures and characters with expert advice on creating organic models from Glen Southern.
Over the last 20 years, 3D modelling has come a long way. I say 20 years because for a lot of people their awareness of 3D modelling was first sparked when they saw animated 3D creatures in films such as Jurassic Park.
Modelling 3D creatures and characters is now a recognised career and spans many different sectors, including games, film, broadcast TV, web, print, advertising, marketing, medical and so on. As with most things these days, there are many ways to get any given job done, and just knowing one tool isn’t always enough.
Organic 3D modelling can use subdivision surfaces, voxels, DynaMesh, retopology tools, normal maps and a whole list of other features and tools. Understanding where to use each one and for what task can be confusing until you understand what they can do for you, so read on for my collection of tips and tricks.
01. Brush up on your drawing skills
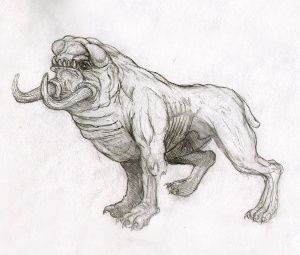
A lot of character and creature modellers are also accomplished 2D artists. It’s a logical progression from concept sketch to 3D model, so it makes sense to try to work out your intended subject’s anatomy on paper first. Most concept artists have to do turnaround images that show a character from several angles or perspectives. If you’re asked to model a dog and you don’t understand how the bones in a dog’s (or any quadruped’s) leg fit together, then the whole model will be unconvincing. Take your time learning how bones fit together in nature. Understand how muscles attach to the bones and how they move and slide together.
02. Enrol in a life drawing or anatomy class
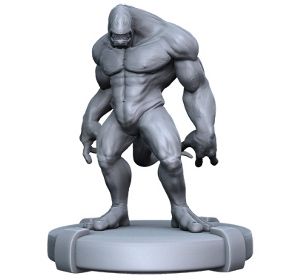
If you’ve realised how important good anatomy skills are to the organic modeller, the next step is to get some experience. Start with a Google search for reference material and maybe a few books with good diagrams of anatomy. Begin to look at each muscle group and understand how that works and interacts with the next. To go one step further and really push your skills, you can enrol in life drawing classes. Once you’ve trained your eye and you’re getting familiar with anatomy, you’ll notice an immediate improvement in your modelling and sculpting. Most universities run regular life classes and a lot of large studios arrange classes for their artists.
03. Consider form and volume
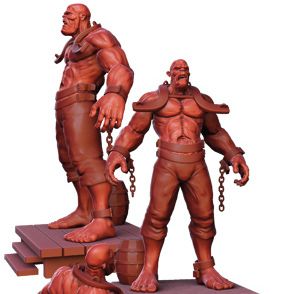
Two big mistakes modellers make are adding too much detail too quickly and not getting the form and volume correct on certain parts of the subject. Whether you’re box modelling or sculpting in 3D, one of the first things you need to achieve is the overall shape of the character you’re making. If you nail the silhouette (form), then invariably the volume will be right. For example, if you were to model an arm, which is roughly speaking two cylinders, there would be much more bulk in the biceps area and the forearm than there is in the wrist area. The overall shape needs to be accurate from all angles. If you start to model details in the hands at this stage it becomes harder to focus on the overall form.
04. Edge loops and topology
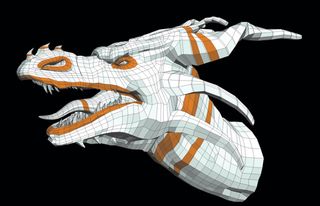
Once you’re actually modelling your desired character, there are a few technical rules that you may need to learn. When using subdivision modelling to create a model it’s essential that you have good edge flow in certain areas of the mesh. This flow often mirrors real-world anatomy, so this is where your newfound skills come in handy. An edge loop is basically a continuous ring of polygons that follows a specific path around a model. For example, the muscle ring around an eye that makes the eye open and close or the line of polygons that run under the chest, defining the pectoral muscles. Important loops are the shoulder area, the mouth, the hip and so on. This matters most if you’re planning to rig the model for animation. A poorly made model is hard to rig and deforms badly when you’re animating it.
05. Subdivision modelling and HyperNURBS
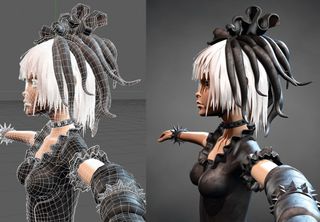
Subdivision modelling is a modelling technique that smooths out a mesh by dividing and rounding the polygons based on a set of algorithms. Each polygon is divided into four and rounded off. The higher the subdivision level, the rounder and smoother the mesh looks. Most 3D programs enable you to subdivide your mesh and then return it to the normal level, and that helps you keep the polygon count down while refining the look and form of the model. There are many ways to subdivide a mesh but often the underlying maths is the same. For example, ZBrush uses the same method as Cinema 4D, which calls it HyperNURB Tags.
06. Quads, triangles and ngons
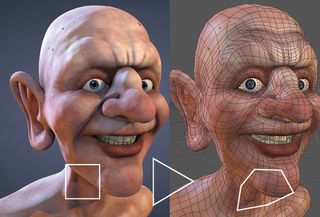
Generally speaking, try to model in quads. Quads (quadrangles – four-sided polygons) are predictable and subdivide in a clean way, leaving less chance for bad artefacts at render time. You can use triangles for certain modelling jobs and game engines generally convert a mesh to triangles at render time anyway. However, if you get into the habit of using quads you’re also modelling in triangles when each quad is split in half (a mesh with 1,000 quads can be converted to a mesh with exactly 2,000 triangles at the click of a button). The one to avoid if possible is the ngon (a polygon with more than four sides) – these can cause problems in some programs and lead to issues if they’re subdivided. They’re used in lots of modelling situations, but as a character modeller the ngon is not your friend. Avoid them!
07. Box modelling or point-by-point?
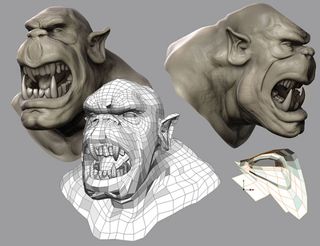
As an organic modeller, you’ll need to learn as many techniques as you can. Modelling with polygons can mean box modelling or point-by-point (or edge) modelling. The trick is to become proficient at both methods. Box modelling is so named because you start with a basic primitive shape (a box), and refine the shape by adding splits and cuts. Point-by-point or edge modelling is where you add more geometry onto existing polygons by extruding or stringing together points. Learn both methods, and learn how to do them well. When modelling a head you may like to box-model the overall shape, but then refine an area such as the ear by extruding polygons to suit.
08. ZBrush’s DynaMesh

A relative newcomer to the digital sculpting world is DynaMesh, a modelling process found in ZBrush. ZBrush uses subdivision modelling at its core: when you pull out part of a model, sometimes the underlying polygons become stretched or elongated. DynaMesh solves this by remeshing the model on the fly. This is revolutionary – you no longer need to consider what’s happening to the polygons in your model as ZBrush is taking care of it in the background. You can sculpt almost anything and focus purely on form and silhouette. This method doesn’t respect the rules about edge flow and good topology, though, so that’s where retopologising comes in handy.
09. Retopology tools
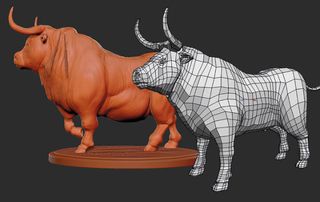
If you made a model with no regard for the underlying topology it would be impossible to rig or animate that mesh. To solve this issue, programs such as Maya, modo, ZBrush, 3D-Coat, TopoGun and many more now have tools to enable you to create a new base mesh with edge loops and edge flow to suit your needs. This goes back to the rules about modelling for animation and creating good loops around areas that will deform the most. Retopologising means effectively rebuilding a well-constructed low-polygon model over the top of a highly detailed sculpt, and comes at the end of the modelling process rather than the beginning.
10. Use normal maps
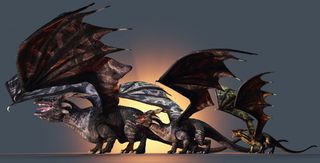
Even with the more powerful CPUs and GPUs of today, there’s still a limit to how many polygons can be moved around without lag or stuttering. To get a high level of detail into games with only limited polygons, you can use normal maps – and they’re not limited to games. If your mesh has UV co-ordinates you can extract a normal map and apply it to the low-poly mesh, giving an approximation of the detail seen in the high-poly mesh.
11. Voxel-based modelling programs
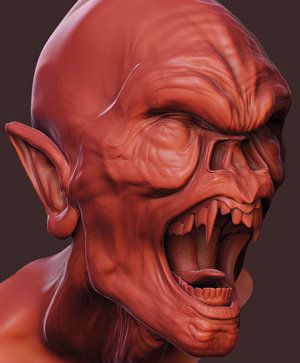
Some voxel-based modelling programs, such as 3D-Coat and Sculptris, enable you to sculpt volume by adding triangles. This can be a great way to build up complex organic forms and structures, and you don’t have to focus on topology or edge flow. The end result can be retopologised for animation in the same way as any other mesh. Voxel-based modelling is sometimes overlooked, but it can be a great addition to your organic modelling toolbox and is well worth the time spent learning how to integrate it.
About the author
Glen Southern is a freelance 3D artist with over 15 years of experience in film, TV and game. He’s the owner of SouthernGFX creative services

Thank you for reading 5 articles this month* Join now for unlimited access
Enjoy your first month for just £1 / $1 / €1
*Read 5 free articles per month without a subscription

Join now for unlimited access
Try first month for just £1 / $1 / €1
Get the Creative Bloq Newsletter
Daily design news, reviews, how-tos and more, as picked by the editors.
The Creative Bloq team is made up of a group of design fans, and has changed and evolved since Creative Bloq began back in 2012. The current website team consists of eight full-time members of staff: Editor Georgia Coggan, Deputy Editor Rosie Hilder, Ecommerce Editor Beren Neale, Senior News Editor Daniel Piper, Editor, Digital Art and 3D Ian Dean, Tech Reviews Editor Erlingur Einarsson and Ecommerce Writer Beth Nicholls and Staff Writer Natalie Fear, as well as a roster of freelancers from around the world. The 3D World and ImagineFX magazine teams also pitch in, ensuring that content from 3D World and ImagineFX is represented on Creative Bloq.
Related articles
-

-
-

-

