Make your own pop art portrait
Discover how to create an Andy Warhol-style multi-image pop art picture to inject some colour into your dull portraits.
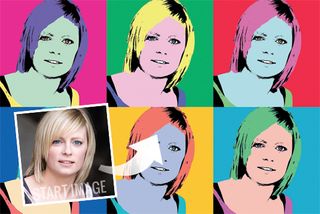
Here we’ll convert a bland portrait into a pop art masterpiece. It’s a brilliant way to get creative and enliven your forgettable shots. For this tutorial, we'll be using Photoshop filters, selection tools, Adjustment Layers and Layer Masks, and the Hue/Saturation command.
- Pop Art: 8 artists every designer should know
You may have noticed that our start image isn’t that sharp! This is an added bonus of pop art images: you can use images that would otherwise have been discarded.
01. Make it mono
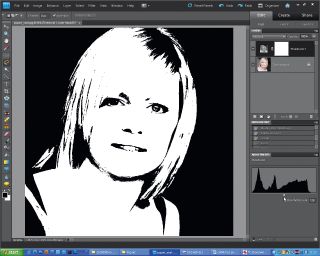
First open up your portrait in Photoshop. Go to 'Layer > New Adjustment Layer > Threshold', and set Threshold to about 128. To bring out more detail in the eyes and mouth, select the ‘Background’ layer, go to 'Layer > Duplicate Layer'. From 'Filter > Sketch > Stamp', set Light/Dark Balance to 26 and Smoothness to 1. Now use the Lasso tool to draw around the eyes and mouth, holding down Shift to add to your selection each time.
02. Brighten your background
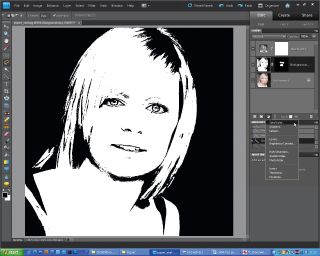
Click Add Layer Mask to create a mask out of your selection. Now to change the background colour from black to green. Highlight the top ‘Threshold 1’ layer and use the Quick Selection tool to select the background either side of the figure. Hold Alt to subtract from your selection in order to tidy it up. Click the half-moon icon on the Layers palette, and select a Solid Colour Adjustment Layer.
03. Clean up edge detail
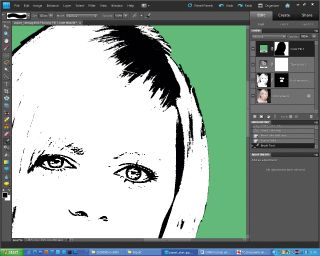
Choose a green from the Colour palette. To tidy the edges, use the Brush tool (press B) to paint over your Layer Mask to reveal detail beneath. Press D to change the default foreground/background colour to white/black, press X to set foreground colour to black, then paint round the edges of the hair if needed. Click X to toggle between a white/black brush if you need to paint the green background back in.
04. Make the hair stand out
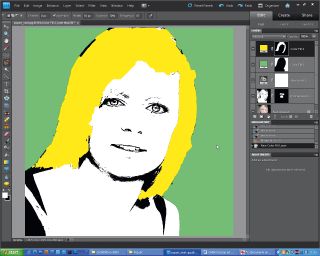
To turn the hair bright yellow, first grab the Magnetic Lasso tool. Start at the bottom-left of the hair and draw carefully around the outside edge. Use your creative judgement when it comes to the inside strands and fringe! Keep drawing until you reach your start point again, and click when two small circles appear to complete the selection. Again create a Solid Colour Adjustment Layer, pick a yellow, and click OK.
05. Blend and brush
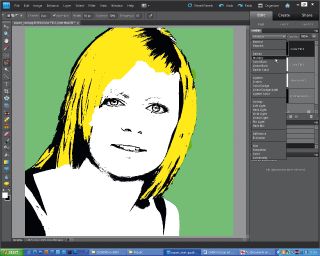
Use the drop-down menu in the Layers palette to set the Blending Mode to Multiply, revealing the hair outlines underneath. Reduce Opacity from 100% with the slider to lessen the colour’s impact. Don’t worry if your selection isn’t neat – pop art should look a little uneven! You can tidy it up with a white/black brush over the Layer Mask to add/remove the yellow.
Get the Creative Bloq Newsletter
Daily design news, reviews, how-tos and more, as picked by the editors.
06. Adjust skin tones
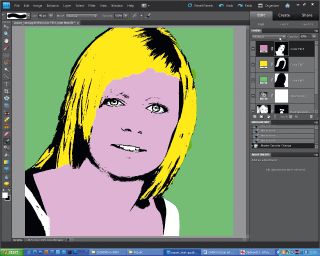
Use the Quick Selection tool to select the face, neck and chest. Ensure ‘Sample All Layers’ is ticked. Press Alt to remove areas such as shoulder straps from your selection. Then repeat as before; create a Solid Colour Adjustment Layer, choose a pink, set Blending Mode to Multiply, adjust Opacity if necessary. Use a 30-pixel white/black brush to paint over the Layer Mask and clean up any unwanted white bits.
07. Change eye colour
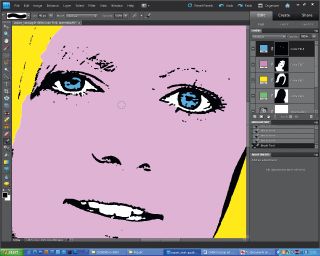
To turn the eyes blue, zoom right in (ctrl and +) and use the Lasso tool to draw around the iris of each eye. Then repeat the steps above to turn them blue, dropping Opacity down for more realistic look, and again use Brush tool on a Layer Mask to tidy up any spilt ink! Do the same for the shoulder straps; we chose a purply-blue colour here.
08. Increase canvas size
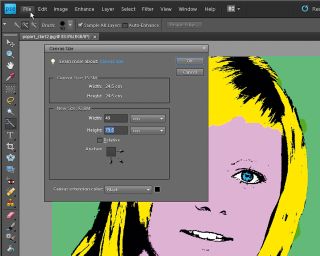
To create more versions, first go to 'Layer > Flatten Image', then 'File > Save As', and rename your file (we've used 'popart2.jpg'). Go to 'Image > Resize > Canvas Size'. To extend the canvas, untick the Relative box, click the top-left arrow to anchor the image, and change to width 49cm and height 73.5cm for a portrait image. Finally, set the Canvas Extension Colour to black.
09. Mix it up
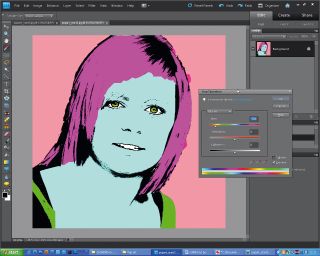
Save this new image with a new version name ('popart3.jpg'). Reopen 'popart2.jpg', and press Ctrl+U to open Hue/Saturation. Simply move the Hue slider left or right to create a different coloured pop art image. Then use the Move tool to drag-and-drop your new pop art picture on to the blank canvas space on 'popart3.psd'.
10. Put it all together
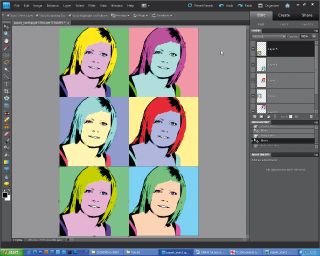
Go back to 'popart2.jpg', open Hue/Saturation and repeat the above process until you have four or six vibrant images on the 'popart3.psd' image. Move the images around on the canvas (highlighting the correct layer) so the images are in the best order and with no similar colours next to each other. Go to 'Layer > Flatten', and save it as a single-layered JPG.
Related articles:

Thank you for reading 5 articles this month* Join now for unlimited access
Enjoy your first month for just £1 / $1 / €1
*Read 5 free articles per month without a subscription

Join now for unlimited access
Try first month for just £1 / $1 / €1
The Creative Bloq team is made up of a group of design fans, and has changed and evolved since Creative Bloq began back in 2012. The current website team consists of eight full-time members of staff: Editor Georgia Coggan, Deputy Editor Rosie Hilder, Ecommerce Editor Beren Neale, Senior News Editor Daniel Piper, Editor, Digital Art and 3D Ian Dean, Tech Reviews Editor Erlingur Einarsson and Ecommerce Writer Beth Nicholls and Staff Writer Natalie Fear, as well as a roster of freelancers from around the world. The 3D World and ImagineFX magazine teams also pitch in, ensuring that content from 3D World and ImagineFX is represented on Creative Bloq.
