Get the toy camera look with Photoshop
Combine a number of different simple but effective techniques to imitate the retro, lo-fi toy camera look, using simulated light leakage and a vignette in Photoshop.
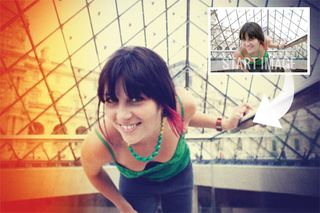
The 'toy camera' look is all the rage at the moment. It's difficult to find a photography blog that doesn’t contain some sort of nod to the cameras of yesteryear, and there are iPhone apps aplenty dedicated to recreating that lo-fi retro feel. So in this Photoshop project we’ve assembled a selection of different techniques, all dedicated to recreating the look of cheap and cheerful plastic cameras, such as those made by Holga, Diana, Lomo, and Lubitel.
Each camera has its own distinctive look, but there are some common characteristics that you can emulate using techniques and tools in Photoshop. These include a light leak in the back of the camera, producing an orangey-yellow patch coming in from the edge, or a strip of red/orange next to a strip of yellow; we'll show you how to recreate these with Levels, along with a colour cast that’s often different in the shadows and highlights. You’ll also want to suggest that the light leak is coming in from a corner or edge of the frame, and the Gradient tool on a Layer Mask is perfect for this.
Another typical feature is a corner vignette, so we'll show you how to add this using Correct Camera Distortion. Softness can be added to the image with blur, and you can simulate some film grain with noise. You’ll find all of these skills present and correct in this tutorial, and you’ll put each of your effects on a different layer. This enables you to reduce each of them with the layer opacity, or switch them off entirely.
The guide below shows how to get the look using Photoshop Elements 6 or above, but you can use Photoshop CS up to and including Photoshop CS6 too.
Click here to download start image
01. Add some red
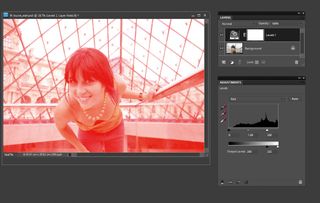
Open up the image louvre_start.jpg. We’re going to start by applying the light leak effect. Add a Levels Adjustment Layer using the button at the bottom of the Layers palette. Select Red from the drop-down menu, instead of the default RGB; push the top white slider to 200, and the black slider on the bottom to 200.
02. Add some yellow
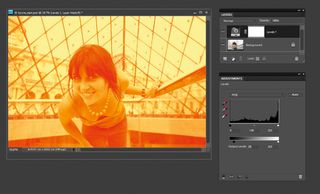
Next select Blue from the drop-down menu; move the black slider on the top to 100, and the white slider on the bottom to 150 to add yellow. The area containing the light leak is normally a little faded, too, and you can apply this fade effect with the same Levels layer. Select RGB from the drop-down and move the black slider on the bottom to 20.
03. Set up the Gradient tool
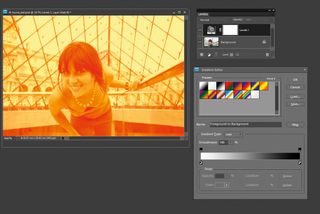
Use the Gradient tool to suggest the light leak comes from a corner or edge of the frame. Press G to access it, then pick the first icon in the Options bar (Linear Gradient) and click the Gradient Picker drop-down. A new options box appears; click the swatch Foreground to Background and press Enter, then press D to reset the colour palette to white and black.
Get the Creative Bloq Newsletter
Daily design news, reviews, how-tos and more, as picked by the editors.
04. Draw the gradient
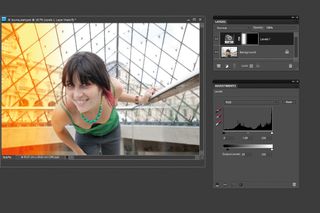
With the Levels Layer Mask active, click halfway between the left edge and the nearest eye, drag right to the nearest eye, then release. To come in from a corner instead, click from the equivalent halfway point between the bottom-left corner and nearest eye, and drag at 45 degrees up to the eye. You can reduce the strength of the light leak by dropping layer opacity, or increase it by duplicating the layer with Ctrl+J.
05. Add a vignette
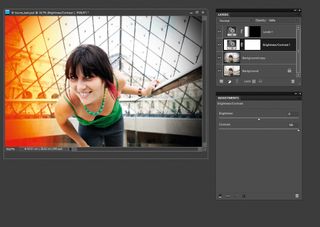
Next you’re going to add a vignette. Select the ‘Background’ layer and duplicate it with Ctrl+J, then go to Filter>CorrectCameraDistortion and drag the Amount slider in the Vignette section down to -100. Click OK and then repeat once more to make the effect stronger still. Add a Brightness/Contrast Adjustment Layer next and push Contrast to max. Now add a Levels Adjustment Layer on top for some colour work.
06. Colour, blur and noise
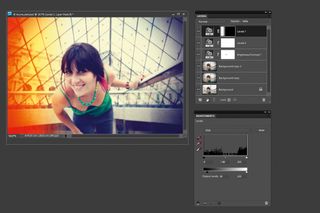
Select the Blue channel in the Levels drop-down, move the bottom black output slider to 60 and the white output slider to 215. Duplicate the vignette layer with Ctrl+J, then go to Filter>Blur>GaussianBlur and add 2-5 pixels Radius to simulate softness. Finish by adding a little noise with Filter>Noise>AddNoise; try 5 to 10% of Gaussian Monochromatic noise.
This tutorial first appeared in Portrait Photography Made Easy - a bookazine from the makers of PhotoPlus.
Now read:
- 30 free Photoshop brushes every creative must have!
- 101 Photoshop tutorials
- 20 best Photoshop plugins

Thank you for reading 5 articles this month* Join now for unlimited access
Enjoy your first month for just £1 / $1 / €1
*Read 5 free articles per month without a subscription

Join now for unlimited access
Try first month for just £1 / $1 / €1
The Creative Bloq team is made up of a group of design fans, and has changed and evolved since Creative Bloq began back in 2012. The current website team consists of eight full-time members of staff: Editor Georgia Coggan, Deputy Editor Rosie Hilder, Ecommerce Editor Beren Neale, Senior News Editor Daniel Piper, Editor, Digital Art and 3D Ian Dean, Tech Reviews Editor Erlingur Einarsson and Ecommerce Writer Beth Nicholls and Staff Writer Natalie Fear, as well as a roster of freelancers from around the world. The 3D World and ImagineFX magazine teams also pitch in, ensuring that content from 3D World and ImagineFX is represented on Creative Bloq.
