Get started with Django
Jamie Curle introduces Django and demonstrates how to use it to make a basic blog engine.
Sign up to Creative Bloq's daily newsletter, which brings you the latest news and inspiration from the worlds of art, design and technology.
You are now subscribed
Your newsletter sign-up was successful
Want to add more newsletters?

Five times a week
CreativeBloq
Sign up to Creative Bloq's daily newsletter, which brings you the latest news and inspiration from the worlds of art, design and technology.

Once a week
By Design
Sign up to Creative Bloq's daily newsletter, which brings you the latest news and inspiration from the worlds of art, design and technology.

Once a week
State of the Art
Sign up to Creative Bloq's daily newsletter, which brings you the latest news and inspiration from the worlds of art, design and technology.

Seasonal (around events)
Brand Impact Awards
Sign up to Creative Bloq's daily newsletter, which brings you the latest news and inspiration from the worlds of art, design and technology.
- Knowledge needed: Basic command line skills, basic python, basic HTML
- Requires: Python, text editor, command line
- Project Time: 1-2 hours
Django is a web framework for Python and in this tutorial you’re going to use Django to build a basic blog engine. Along the way you’ll pick up the smell of a typical Django workflow and get to sample a little taste of the “Pythonic Way”.
As you go through this tutorial, it’s really important that you read and type the code out by hand. Do not copy and paste code or you’ll miss critical learning experiences.
This tutorial is split up into the following parts:
- Requirements
- Starting the project
- Starting the blog app
- Writing the blog models
- Creating the database
- Connecting the django admin to the blog app
- Writing the URLS, views and templates for the blog app
- Adding some style
- Suggestions for taking it further
01. Requirements
Python
Open a command prompt window and type in python and press return. If you find yourself in a Python shell (like below), then you’re in luck. If you don’t then you’ll either need to install Python and/or configure your PATH.

You're going to be writing a fair bit of Python code so if you've never written any Python before you may want to be aware of the fact that indentation is significant in Python. Rather than use braces {} or parenthesis (), Python uses indentation to format code. The common convention is to use four spaces per level of indentation, but, if you're anything like me you'll find pressing the space bar four times a huge waste of time. Instead I'd encourage you to enable soft tabs in your text editor. The complete coding style guide for Python can be found under PEP8.
Django
Sign up to Creative Bloq's daily newsletter, which brings you the latest news and inspiration from the worlds of art, design and technology.
The “pro” way to install Django is to use virtualenv and virtualenvwrapper to create separate virtual Python environments for each of your Django projects. However, if you’re just interested in cracking on and trying things out, then don’t feel that you have to know this extra layer of complexity right now.
However, if you do it, make sure that you can run this line of code without any errors.
python -c 'import django'
02. Starting the project
In a stroke of diamond-tipped genius, Django comes with a command line tool called django-admin.py, which you’re going to use to start your project. Crack open a command prompt and enter the following:
django-admin.py startproject netmag
cd netmag
python manage.py runserver
In the above commands, you’ve started your project, changed into your project directory (which we’ll call the project root from now on) and you’ve started the Django development server. Open a browser and go to http://127.0.0.1:8000/ to see the fruits of your labour.
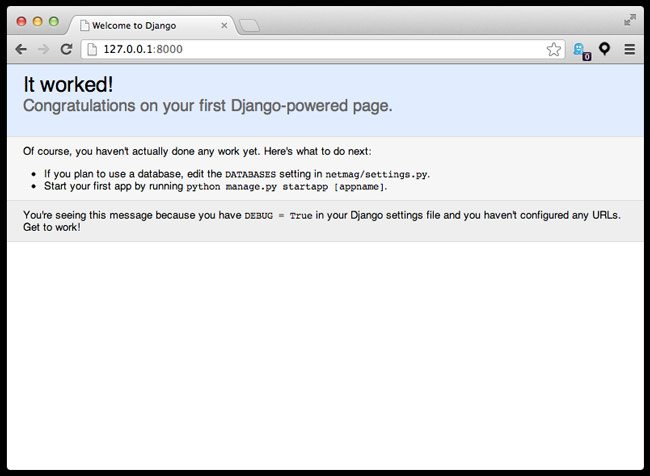
For the rest of this project I want you to keep two command prompt windows/tabs open. One for running the development server (which you’re already doing) and one for entering various commands as you go along. These two command prompts will be your best friends through this tutorial so put them somewhere you can see them.
Open up your project in your text editor and have a look at each of the files that Django has created. The important files to note are:
- netmag/netmag/settings.py: configures your Django project
- netmag/netmag/urls.py: maps URLs to view functions
- netmag/manage.py: python jiggery-pokery and is a wrapper for django-admin.py
Good work, here’s what you've done so far:
- Created your Django project
- You’re running the Django development server in one command prompt window and you have another open for tackling the commands you encounter as you progress
- Checked out your welcome page in a browser
- Opened your Django project in your text editor
- Given yourself a brief overview of the important files in your project
When you’re happy that you’ve done the above, move onto the next section.
03. Starting the blog app
In this part of the tutorial you’re going to create the blog app for your Django project and edit the settings.py file to add it to your INSTALLED_APPS.
In your command prompt window run the following command:
django-admin.py startapp blog
If all goes according to plan, you’ll now have a directory structure like below. If yours isn’t, then move the blog directory so it’s sitting inside the project root.
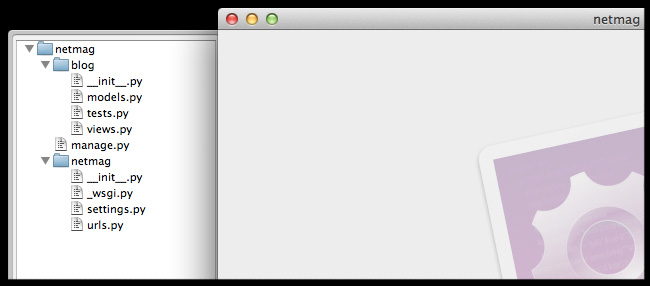
Here’s what Django has created for you:
- blog/__init__.py: an empty, but special python file.
- models.py: where you’ll define your blog model.
- views.py: where you’ll define all of the view functions
- tests.py: Like bacon, testing is good for you, but we’ll leave that for another day.
We’ll wrap up this section of the tutorial with a final task. In settings.py there is a tuple called INSTALLED_APPS and this is what Django uses to know what apps are installed on a project. You need to open up settings.py and edit it so that your blog app is listed in the tuple. It’s good form to put local apps at the end of the tuple. Edit the settings.py so that INSTALLED_APPS matches what’s below:
INSTALLED_APPS = (
'django.contrib.auth',
'django.contrib.contenttypes',
'django.contrib.sessions',
'django.contrib.sites',
'django.contrib.messages',
'django.contrib.staticfiles',
# Uncomment the next line to enable the admin:
'django.contrib.admin',
# Uncomment the next line to enable admin documentation:
# 'django.contrib.admindocs',
‘blog’,
)
You’ve now created your blog app and added it to your INSTALLED_APPS. It’s time to write some models.
04. Writing the blog models
When using Django, you don’t write a lot of (if any) SQL. Instead you write models. In this section of the tutorial that’s exactly what you’re going to do.
Models are used to generate database tables and they have a rather nifty object relational mapping (ORM) API for getting things in and out of the database. It’s a really nice way of working.
Open up the models.py file from your blog app and edit it so that it matches what’s below:
from django.db import models
from django.core.urlresolvers import reverse
class Post(models.Model):
title = models.CharField(max_length=255)
slug = models.SlugField(unique=True, max_length=255)
description = models.CharField(max_length=255)
content = models.TextField()
published = models.BooleanField(default=True)
created = models.DateTimeField(auto_now_add=True)
class Meta:
ordering = ['-created']
def __unicode__(self):
return u'%s' % self.title
def get_absolute_url(self):
return reverse('blog.views.post', args=[self.slug])
High five! You’ve just created your blog model. You’ve given it various properties using a combination of fields. Take a few minutes and follow the links to the Django documentation for each of the below fields and work out what each of the arguments you’ve given the fields do.
- title and description are both model.CharFields
- slug is a models.SlugField
- content is a models.TextField
- published is a models.BooleanField
- created is a models.DateTimeField
We’ve also given our model class a couple of methods. The first one __unicode__ is used when Django displays the object to humans. Technically, this method returns a unicode object, but because you’re just whetting your Django (and possibly Python) whistle, I’ll not put you off by getting into unicode right now. You can save that bundle of joy for a rainy day when the only other viable alternative is gnawing a human-sized hole through a brick wall. For now, know that Django natively supports unicode data.
The second method get_absolute_url is used when we need to link to a specific blog post.
Finally, you may notice the inner Meta class on the model. This is where you're telling the model class how it should be ordered. In this case, you're having the Post objects ordered by the created date. The - tells Django to return the objects in a descending order.
Here’s what you’ve done in this section of the tutorial:
- Created a blog model
- Read a little bit more about each of the model fields
- Learned about what each of the methods do
- Avoided the pain of learning about unicode
Did someone say something about a database?
05. Creating the database
The database is the foundation of most web apps and the Django app is no exception. In this section of the tutorial you’re going to configure the database settings and then use a Django management command to sync the database to the models.
Django projects are configured using settings.py so open this file up your text editor and locate the DATABASES dictionary, which should be kicking around on or near line 12. Edit it so that it matches the below code.
Change the DATABASES dictionary so that it looks like below:
DATABASES = {
'default': {
'ENGINE': 'django.db.backends.sqlite3',
'NAME': 'netmag.db',
}
}
You’ve configfured Django to use the sqlite database backend and told Django to call the database netmag.db. I’ve chosen this backend for you because it requires minimal configuration and is ideal for a tutorial project like this. However, if this project was going to be pushed live, then a better choice would have been PostgreSQL or MySQL, but that’s another song for another day.
Now that the database settings are configured you can create your database. Because you’re doing this for the first time you’ll be prompted to create a superuser account that you’ll used in the next section. Make sure you remember what you enter and, don’t worry, this information isn't transmitted anywhere.
Head to your command prompt and enter the following command:
python manage.py syncdb
Look in your project root you’ll notice that there is a new file called netmag.db. This is your database and is where all of your blog posts will be stored - so don’t delete it!
Go to your browser and refresh the page; nothing has really changed. It’s still the same blank screen. In the next section you’ll fix that by hooking up the admin. But first take some credit for what you’ve done:
- configured your database settings.
- ran syncdb for the first time to create the database
- created a superuser login that you’ll shortly use to login to the admin
Now let’s get this party started.
06. Connecting the Django admin to the blog app
Django comes with an application called The Admin and it's a fantastic tool.
In this part of the tutorial you’re going to enable the admin app, sync the database again and hook up the admin to your blog app.
07. Enable the admin
Go back to your settings.py and back to the INSTALLED_APPS dictionary. Edit it so that it matches the code below:
INSTALLED_APPS = (
'django.contrib.auth',
'django.contrib.contenttypes',
'django.contrib.sessions',
'django.contrib.sites',
'django.contrib.messages',
'django.contrib.staticfiles',
'django.contrib.admin',
'blog',
)
Go back to the command prompt window that's running the development server and make sure there are no errors in it. If there aren't any errors then refresh your browser window to check for errors elsewhere in the project.
Checking for errors often and regularly is good practice until you start developing using a Test Driven Development (TDD) approach. For now, remember to check the development server and refresh the browser to check for errors.
If there are no errors, then move on.
Next up open urls.py and edit that so that it matches the code below:
from django.conf.urls import patterns, include, url
from django.contrib import admin
admin.autodiscover()
urlpatterns = patterns('',
url(r'^admin/', include(admin.site.urls)),
)
Again, go back and check your development server and browser for errors. If there are no errors then you’re ready to sync the database again. You need to do this again because the last time you ran the syncdb command your project wasn’t configured to use the admin app. Now it is, so run syncdb again and, if you pay attention, you’ll see it create the new tables.
python manage.py syncdb
Now, if you go back to your browser and point it at http://127.0.0.1:8000/admin/, you’ll be greeted by the screen below:
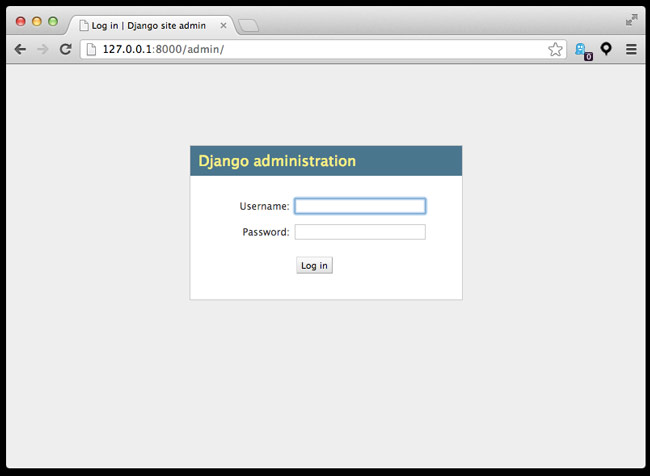
Go ahead and login using the details you created in the last step and have a look around. You’ll notice that your blog app is missing. Don’t worry because that’s what you’re going to do now.
08. Connecting your blog app
Inside your blog directory create a new file called admin.py and enter the following code into it:
from django.contrib import admin
from blog.models import Post
admin.site.register(Post)
This is the bare minimum that you have to do to attach an app to the admin. If you restart your development server and refresh the admin in the browser you should now see your blog app:
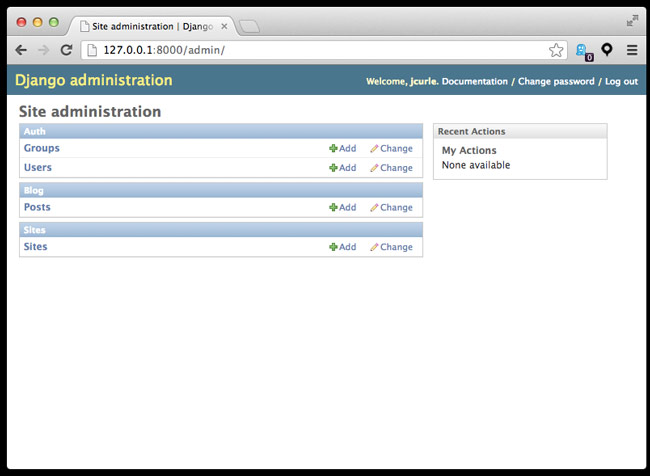
Now that you have your blog app in your admin, go ahead and create a few blog posts, remembering to use HTML to format the content of your post. Take a few minutes to do that because you’re going to need a few posts to work with in the next parts of the tutorial.
Welcome back.
You’ve done the bare minimum job on implementing the blog into the admin. Now, you’re going to pimp the admin out by adding a custom PostAdmin class to improve the UX a little bit. Edit the admin.py file so that it matches the code below:
from django.contrib import admin
from blog.models import Post
class PostAdmin(admin.ModelAdmin):
# fields display on change list
list_display = ['title', 'description']
# fields to filter the change list with
list_filter = ['published', 'created']
# fields to search in change list
search_fields = ['title', 'description', 'content']
# enable the date drill down on change list
date_hierarchy = 'created'
# enable the save buttons on top on change form
save_on_top = True
# prepopulate the slug from the title - big timesaver!
prepopulated_fields = {"slug": ("title",)}
admin.site.register(Post, PostAdmin)
Go back to your browser and refresh your page. You’ll notice that your blog app is looking a lot more battle-ready.
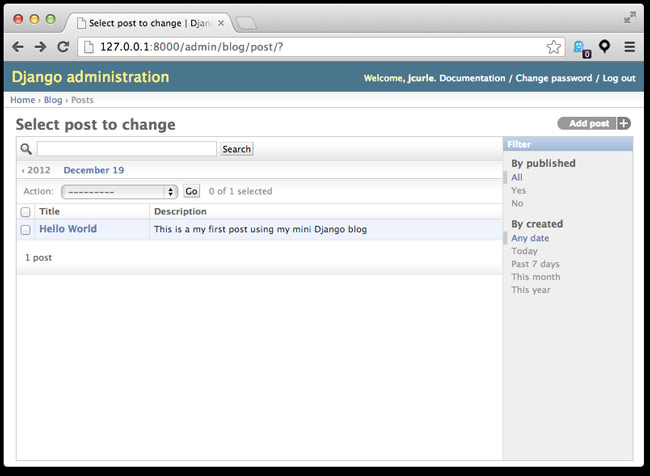
The official Django documention for the admin is a great resource for discovering more about what you can do with a custom admin class if you want to take it further and explore.
So you’ve done a lot to get to this point. Here’s what you can take credit for:
- editing settings.INSTALLED_APPS to include django.contrib.admin
- editing netmags.urls to include the urlpatterns for the admin
- starting to check the development server and browser frequently to detect errors
- running syncdb to create the database tables for the admin
- logging into the admin and explored a little
- creating a few blog posts
- writing a custom admin class to pimp out the UX of the blog app in the admin
So you can do all of the CRUD (create, update, delete) actions with your blog posts. But, right now, there’s no public views. That’s what you’re going to do next.
09. Writing the URLS, views and templates for the blog app
Now you’re going to write edit the URLconfs to contain some urlpatterns. Django uses the urlpatterns contained within URLconfs to map HTTP requests to view functions that return HTTP responses.
There are three steps to this:
- Write the urlpatterns into netmag/urls.py (a.k.a “root URLconf”).
- Write the view functions into blog/views.py
- Create the templates for the views
10. Write the urlpatterns
Open up your netmag/urls.py (a.k.a “root URLconf”) in your text editor and edit it so that it matches what's below:
from django.conf.urls import patterns, include, url
from django.contrib import admin
admin.autodiscover()
urlpatterns = patterns('',
url(r'^admin/', include(admin.site.urls)),
url(r'^$', 'blog.views.index'),
url(r'^(?P<slug>[\w\-]+)/$', 'blog.views.post'),
)
If you’re wondering what all of the ^(?P<slug>[\w\-]+)/$ voodoo is then you’re not alone — they’re regular expressions (or regex). Don’t worry if you don’t understand regular expressions in full or even more than a little. Any regex knowledge goes a long way in Django world and you’ll slowly absorb all of the knowledge required to be a regex warrior.
It's important that the ^admin/ regex comes before the ^(?P<slug>[\w\-]+)/$ because, in regex world, the latter will also match the former and this will cause the URL for admin to be passed to the blog.views.post view function. And that isn't what you want.
If you go back to http://127.0.0.1/, you’ll get a nice error message ViewDoesNotExist. You’re getting this error because you’ve mapped some urlpatterns to view functions that don’t yet exist. Let’s fix that.
11. Write the view functions
Open up blog/views.py and edit them so that they match the code below:
from django.shortcuts import render, get_object_or_404
from blog.models import Post
def index(request):
# get the blog posts that are published
posts = Post.objects.filter(published=True)
# now return the rendered template
return render(request, 'blog/index.html', {'posts': posts})
def post(request, slug):
# get the Post object
post = get_object_or_404(Post, slug=slug)
# now return the rendered template
return render(request, 'blog/post.html', {'post': post})
Now if you go back to your browser and refresh the page, you’ll still have an error, but this time it’s a TemplateDoesNotExist error. You’re getting this because the templates you’ve referenced in your view functions don’t exist. Let’s fix that.
12. Create the templates
You’re on the home stretch here and you have to do three things to get rid of the TemplateDoesNotExist error.
Firstly, create the following directories:
- netmag/netmag/templates
- netmag/netmag/templates/blog
Next, you need to configure Django to find your templates. Open up settings.py in your text editor and find the TEMPLATE_DIRS tuple.
You only need tell Django where to find your netmag/netmag/templates directory so edit the TEMPLATE_DIRS tuple so that it has the full absolute path to your netmag/netmag/templates directory. The comma after the end of the string is important:
TEMPLATE_DIRS = (
‘/path/to/your/netmag/netmag/templates',
)
Finally you need to create three templates. First up is base.html and it’s the template that all other templates will inherit from. Create templates/base.html and enter the following code into it:
<!DOCTYPE html>
<html>
<head>
<meta charset="utf-8">
<title>
{% block title %}{% endblock %}
</title>
</head>
<body>
<div class="content">
{% block content %}
{% endblock %}
</div>
</body>
</html>
Now we need to create two more templates; one for each of the blog views functions. Create templates/blog/index.html and enter the following code into it:
{% extends 'base.html' %}
{% block title %} Blog Archive {% endblock %}
{% block content %}
<h1> My Blog Archive </h1>
{% for post in posts %}
<div class="post">
<h2>
<a href="{{post.get_absolute_url}}">
{{post.title}}
</a>
</h2>
<p>{{post.description}}</p>
<p>
Posted on
<time datetime="{{post.created|date:"c"}}">
{{post.created|date}}
</time>
</p>
</div>
{% endfor %}
{% endblock %}
Finally, create templates/blog/post.html and enter the following code into it:
{% extends 'base.html' %}
{% block title %}{{post.title}}{% endblock %}
{% block content %}
<article>
<header>
<h1> {{post.title}} </h1>
<p>
Posted on
<time datetime="{{post.created|date:"c"}}">
{{post.created|date}}
</time>
</p>
</header>
<p class="description">
{{post.description}}
</p>
{{post.content|safe}}
</article>
{% endblock %}
There are some ‘non’ HTML things going on in the above templates.
- {% tag %} is a template tag.
- {{variable}} is a template variable
- {{variable|filter}} is a template variable that's being passed through a template filter
The documentation for the Django template language is a great guide to the templating language, so take a few minutes to skim over it and familiarise yourself with some of the terms.
Enough theory. Go back to your browser window and refresh the page and you’ll be greeted by the fruits of your labour.
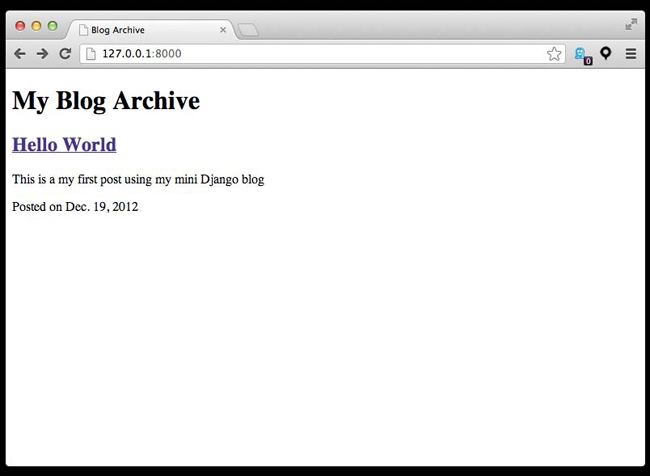
Double high fives, my friend. You’ve done a lot in this section of the tutorial. You can now add the following to your list of achievements:
- Edited urls.py to include urlpatterns that map URLs to view functions.
- Written the view functions for the corresponding URLs
- Created the directories for your templates
- Configured Django to find your templates
- Created the base.html template
- Created templates for each of your view functions
- Gave yourself a brief overview of the Django template documentation
However, to paraphrase Lt. Columbo, there’s just one thing that bothers me: your blog is naked. Let’s quickly fix that.
13. Adding some style
Even a little smattering of style goes a long way so in this section of the tutorial you’re going to add a stylesheet to base.html.
Please note: the method you’re about to use is fine for development, but please don’t use it in production. Serving static media with Django is a waste of resources and is much better handled by the web server. You can find out more about serving static files with Django from the documentation.
Create the netmag/netmag/static/ directory and inside it create a file called style.css with the following CSS:
body{
background-color: #fdfdfd;
color: #2e2e2e;
margin: 0;
padding: 0;
font-size: 14px;
line-height: 28px;
font-family: 'Helvetica Neue', Helvetica, Arial, sans-serif;
}
div.content{
border: 1px solid #fbfbfb;
background-color: #fff;
max-width: 640px;
width: 96%;
padding: 2%;
margin: 28px auto;
}
Now add the following line into the head section of base.html:
<link rel="stylesheet" type="text/css" href="{{STATIC_URL}}style.css">
Before you go jumping to your browser and refresh the page, pause. Just as you had to configure the templates, you need to configure some staticfiles settings so that Django knows where to find your static files and the URL to use to serve them.
Open it up and amend the STATIC_URL string as as follows:
STATIC_URL = '/static/'
Next, amend the STATICFILES_DIRS to contain your absolute path to your static directory.
STATICFILES_DIRS = (
‘/your/path/to/netmag/netmag/static/',
)
Now go and hop over to your browser and refresh the page.
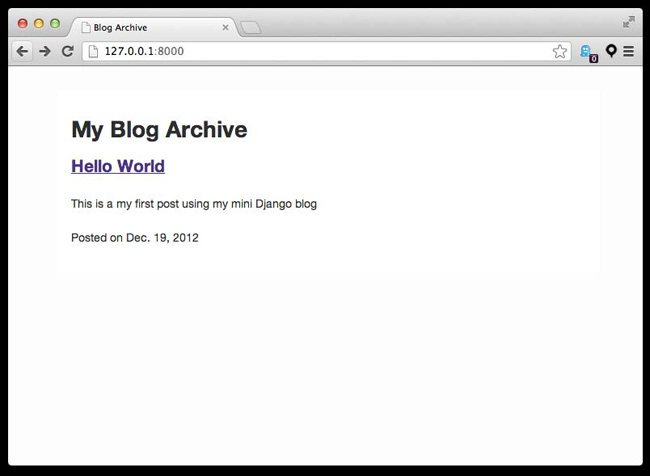
Congratulations. Here’s what you’ve done in all of the tutorial:
- Created a project using django-admin.py
- Created your blog app using django-admin.py
- Authored a model for your blog app
- Configured and created the database and other settings
- Connected your app to the Django admin app and wrote a custom admin class for it
- Wrote urlpatterns, views functions, templates for your blog app and configured the templates in your settings
- Configured the staticfiles app and used it to serve some CSS to stop your blog from being naked
14. Suggestions for taking it further
What you’ve followed here is the basic Django workflow of create app, write models, connect admin and write the views. However, for the sake of brevity, this tutorial hasn't covered testing your app, which should become a central part of your workflow if you get serious about Django. So, if you’re looking to take this further you should look at writing tests for your app.
As you learn more Django and Python you may also want to make sure that your code is adhering to the pep8 style guide for Python. Writing code that is compliant with the official coding style guide from the start is a fantastic way to begin your Django career.
You may also find that the admin form you use to enter your blog posts is a little constrained. Django has a massive and vibrant eco-system of plugins (which are referred to as “reusable apps” in Django terms). If you want another challenge try installing django-writingfield, which turns that cramped text area into a delicious fullscreen writing experience for Django. (disclaimer: I authored this reusable app, but it is very nice, even if I do say so myself)
While on the subject of writing blog posts, you may want to implement the django.contrib.markup app for your blog so you can write your blog posts and render them using the built-in support for Markdown or Textile.
If you’re really wanting to learn more about Django then you should look at using Heroku to host your Django blog and using your blog to help you learn more about Django and also to document your learning journey. If you’re just starting out with Django then you’re in an enviable position to start blogging from the perspective of a new “Djangonaut”.
Finally, do the official Django tutorial because it gives you a nice guided tour of Django that will help reinforce everything you’ve learned today and much, much more.
Jamie Curle is a designer, developer and teacher on a quest to be a well rounded human being. He's been designing and developing websites since the early 2000's and is now embarking on his new teaching venture - Obscure Metaphor.
Liked this? Read these!
- How to build an app
- Free graffiti font selection
- Illustrator tutorials: amazing ideas to try today!
- The ultimate guide to designing the best logos
- The best free web fonts for designers
- Useful and inspiring flyer templates
- The best 3D movies of 2013
- Discover what's next for Augmented Reality

The Creative Bloq team is made up of a group of art and design enthusiasts, and has changed and evolved since Creative Bloq began back in 2012. The current website team consists of eight full-time members of staff: Editor Georgia Coggan, Deputy Editor Rosie Hilder, Ecommerce Editor Beren Neale, Senior News Editor Daniel Piper, Editor, Digital Art and 3D Ian Dean, Tech Reviews Editor Erlingur Einarsson, Ecommerce Writer Beth Nicholls and Staff Writer Natalie Fear, as well as a roster of freelancers from around the world. The ImagineFX magazine team also pitch in, ensuring that content from leading digital art publication ImagineFX is represented on Creative Bloq.
