Create a game environment in Unreal Engine 4
Discover the secrets for constructing, texturing and lighting an effective real-time environment.
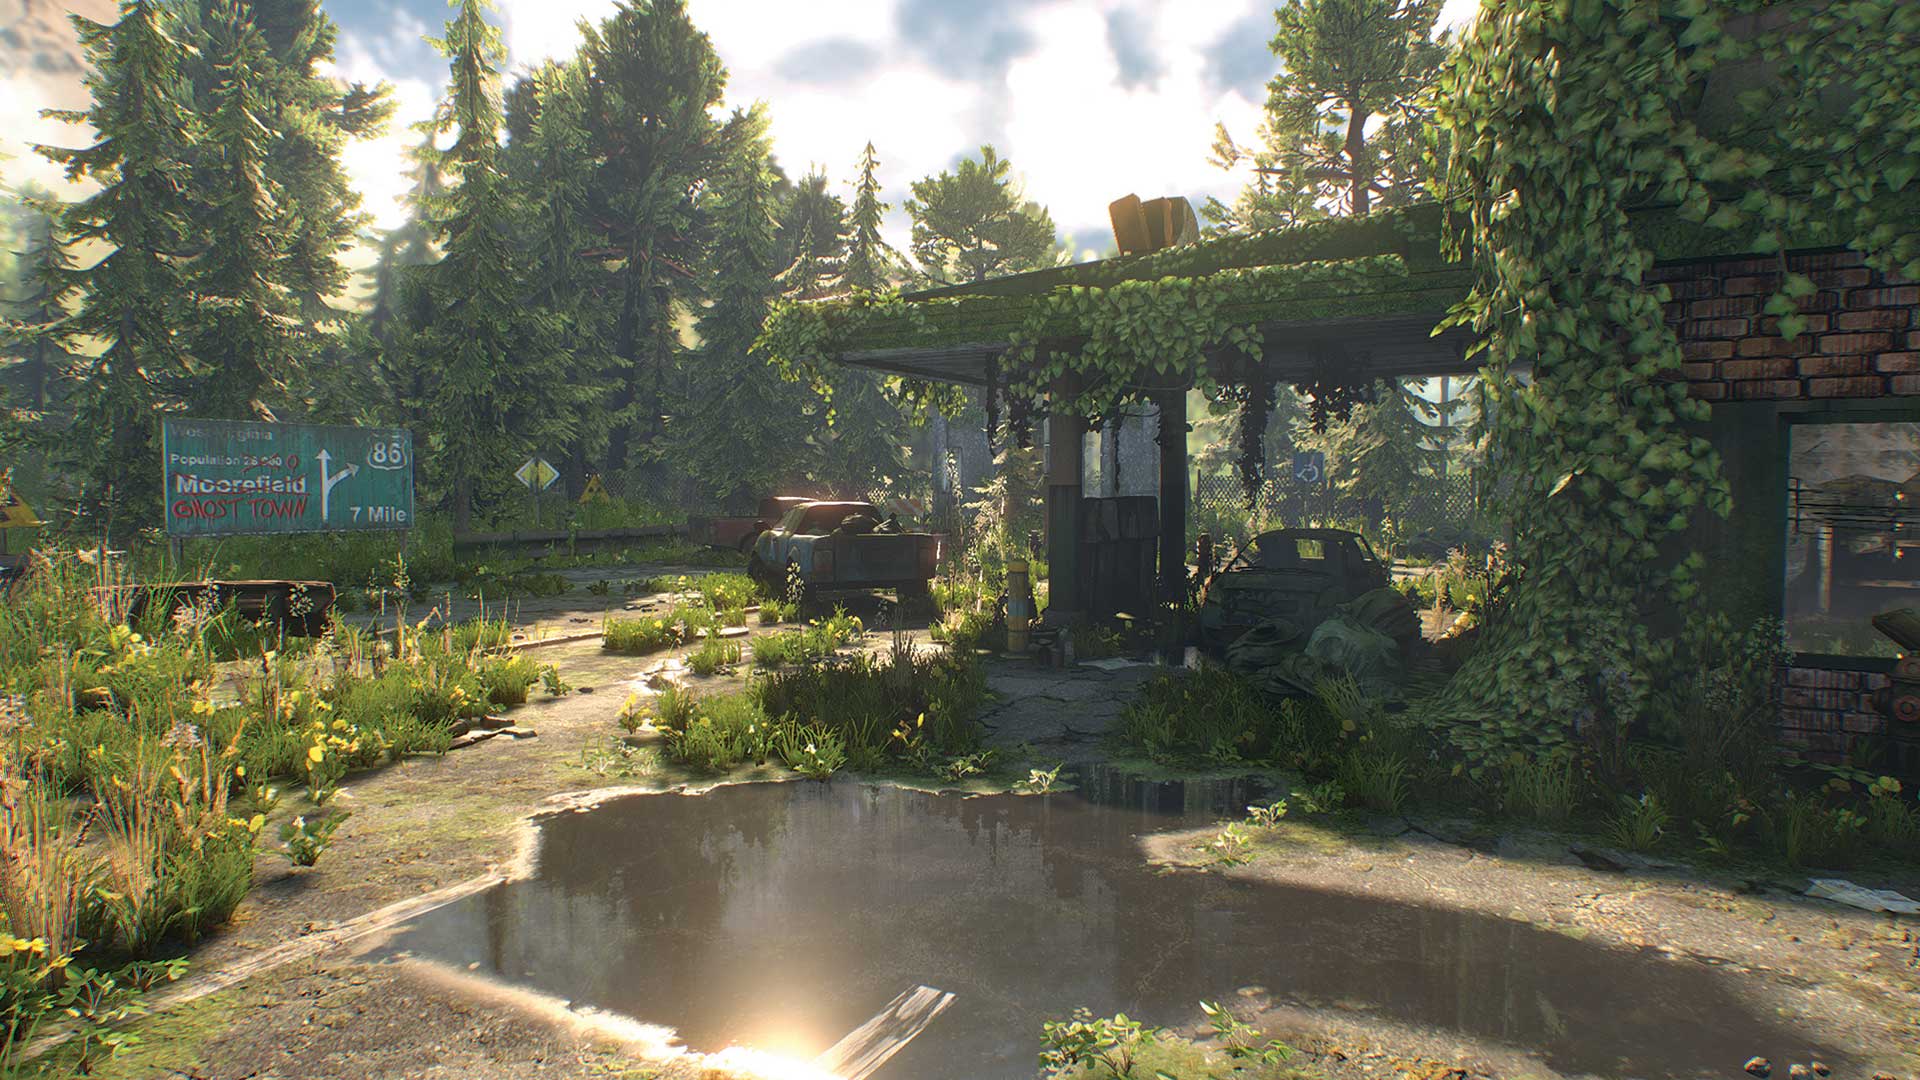
Using my Unreal Engine 4 project The Last Stop as an example, I want to show you some important steps to follow when creating real-time environments for video game production. These techniques and my workflow can also be used to create VR scenes.
In the following steps I'll show you how to start with an idea and a concept and then briefly cover the core steps of my 3D art process, such as modelling and texturing. There are some things to keep in mind with real-time engines and I'll share some tips about lighting and materials, too.
I'll also be sharing some of my insights into blocking out your scene, organising files and handling texturing, both real-time using Substance Designer and in Photoshop CC – and why I like to use both for different reasons. Everyone has their own way of working in engines such as Unreal Engine 4, and many of these techniques can be applied to other apps.
For more details and settings, download my high-resolution step-by-step screens.
Download the assets for this tutorial here
01. Get the story
When starting a project like this it's a good idea to sit down and think out a story behind it. This will help later on when doing different assets and adding personal touches to the scene. In my case, I want to have a scene that shows what happens when people have left and nature starts to grow unchecked. When thinking of the backstory I usually try to decide what year it is and where this scene could be located. This way it's easier to decide what types of buildings will be needed and what kinds of details to add.
02. Blockout

Once your backstory is figured out, it's time for the blockout. This is a simple 3D concept of the area and assets you want to make. There is no right or wrong way to do these, but it's important to keep scaling and proportions correct.
Get the Creative Bloq Newsletter
Daily design news, reviews, how-tos and more, as picked by the editors.
I use 3ds Max 2014 and basic 3D primitives such as boxes and cylinders for placeholder models. Because primitives are easy to make, it's a good idea to do different versions of the scene to see what works the best. You can also import different objects into the scene – such as cars, trees or characters – to get a better idea of the scale.
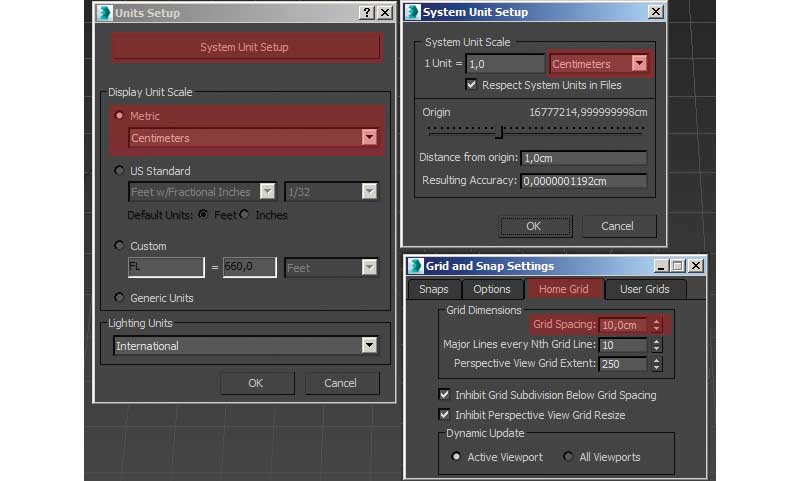
It's a good idea to use a grid when you're doing blockouts that have buildings or mechanical objects because this will ensure that everything snaps nicely together in the game editor.
Here is how you can make sure that 3ds Max has the same grid settings that Unreal Engine 4 uses:
- Go to Customize and select Unit Setup.
- There, select System Unit Setup and select Centimeters from the menu.
- Select Metric and Centimeters as a display unit.
- Go to Tools, Grids and Snaps and select Grid and Snap Settings.
- In that window, select Home Grid and use Grid Spacing of 10.0cm.
- You can change the two values under that to make the grid bigger or smaller.
03. Organise the objects
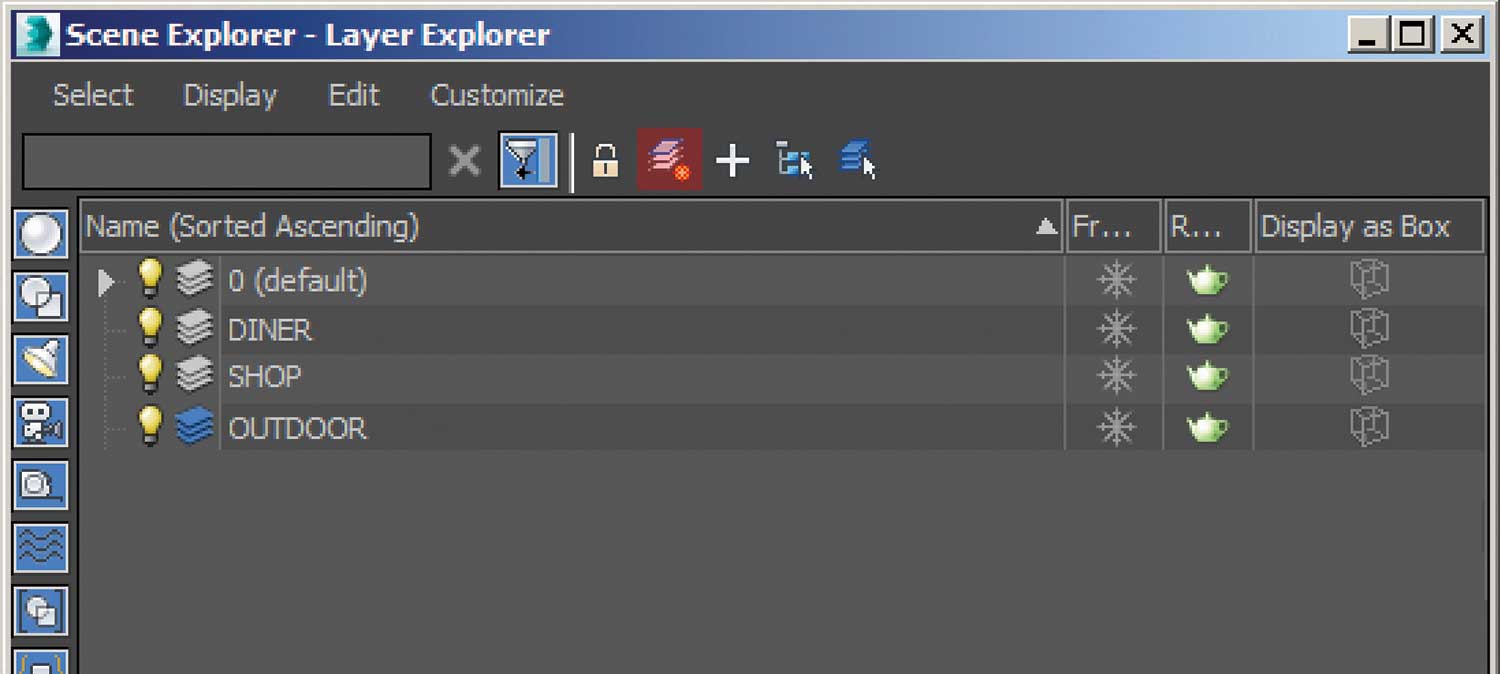
Now that my blockout is done, it's time to start organising the objects. To help organise your scene you can create layers in 3ds Max Scene Explorer (found in Tools>Manage Scene Explorer). The nice thing about these layers is that you can hide part of the scene if necessary.
- Brilliant Photoshop tutorials
04. Modelling
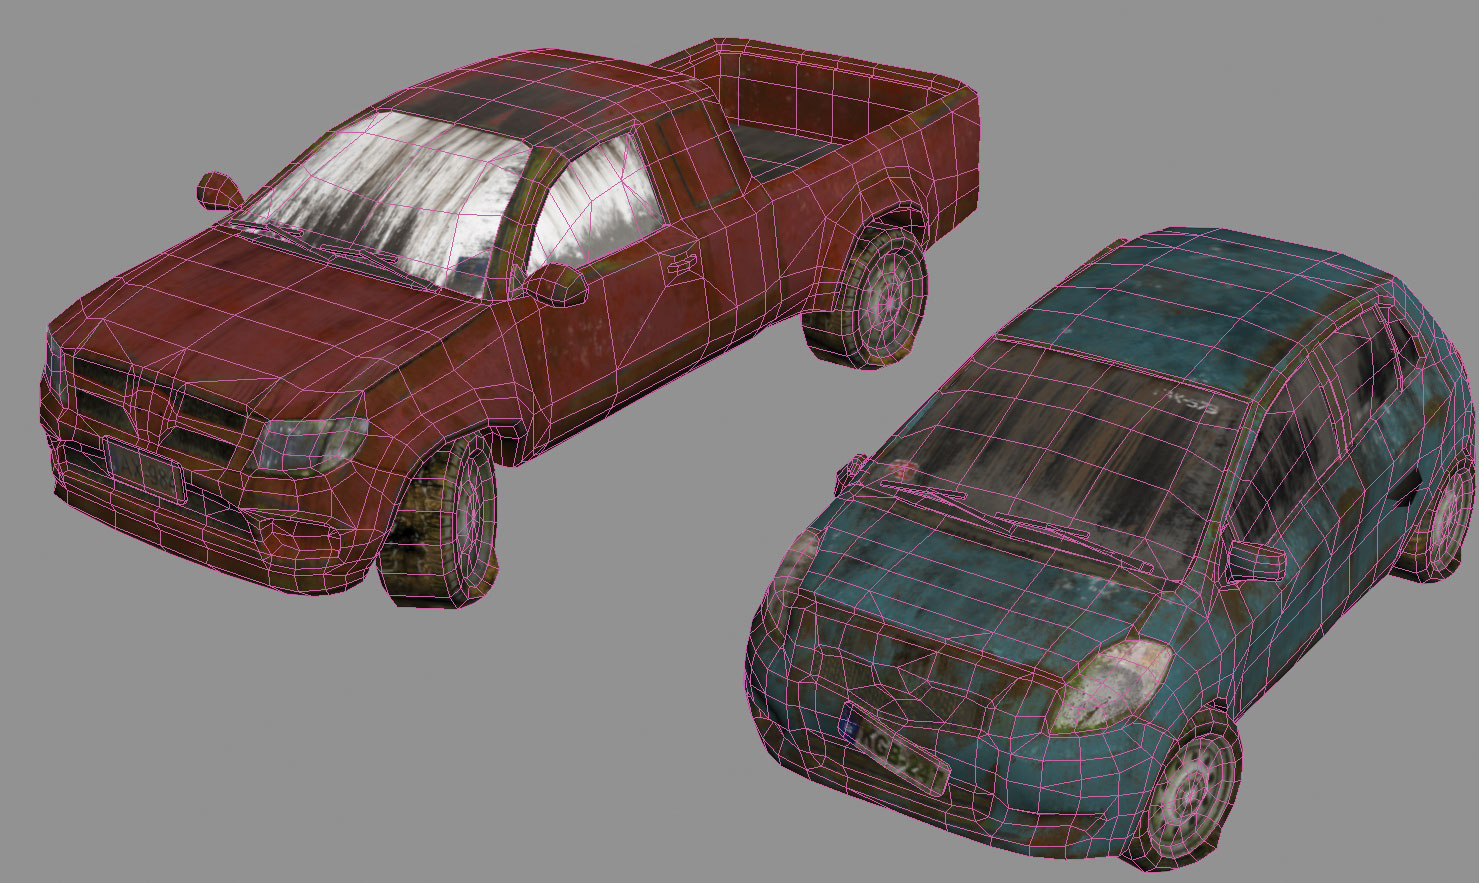
Modelling is easy thanks to the blockout. All I need to do is pick a placeholder model and replace it with my final model.
My workflow is pretty standard for modelling but here are the most important stages to consider:
- Isolate the blockout placeholder model.
- Start to model the high-poly model and keep the dimensions inside the placeholder model. This way it will work well with the blockout dimensions.
- Keep good topology if possible – this will make it easier to create low-poly from high-poly and avoid visual errors.
- Use ZBrush for final details and organic shapes.
- When your high-poly is done, make the low-poly using the high-poly as a base or use retopology tools like 3ds Max's Graphite Modelling tools.
- Make good, well-placed UVs for the low-poly and make sure smoothing groups are assigned right.
- Explode the model into smaller parts for baking, if necessary, and then triangulate it.
- Bake maps as normal, height and AO maps.
- Give the low-poly model a suitable name – such as ‘Diner_Sofa' – and export it into Unreal Engine 4.
05. Real-time texturing
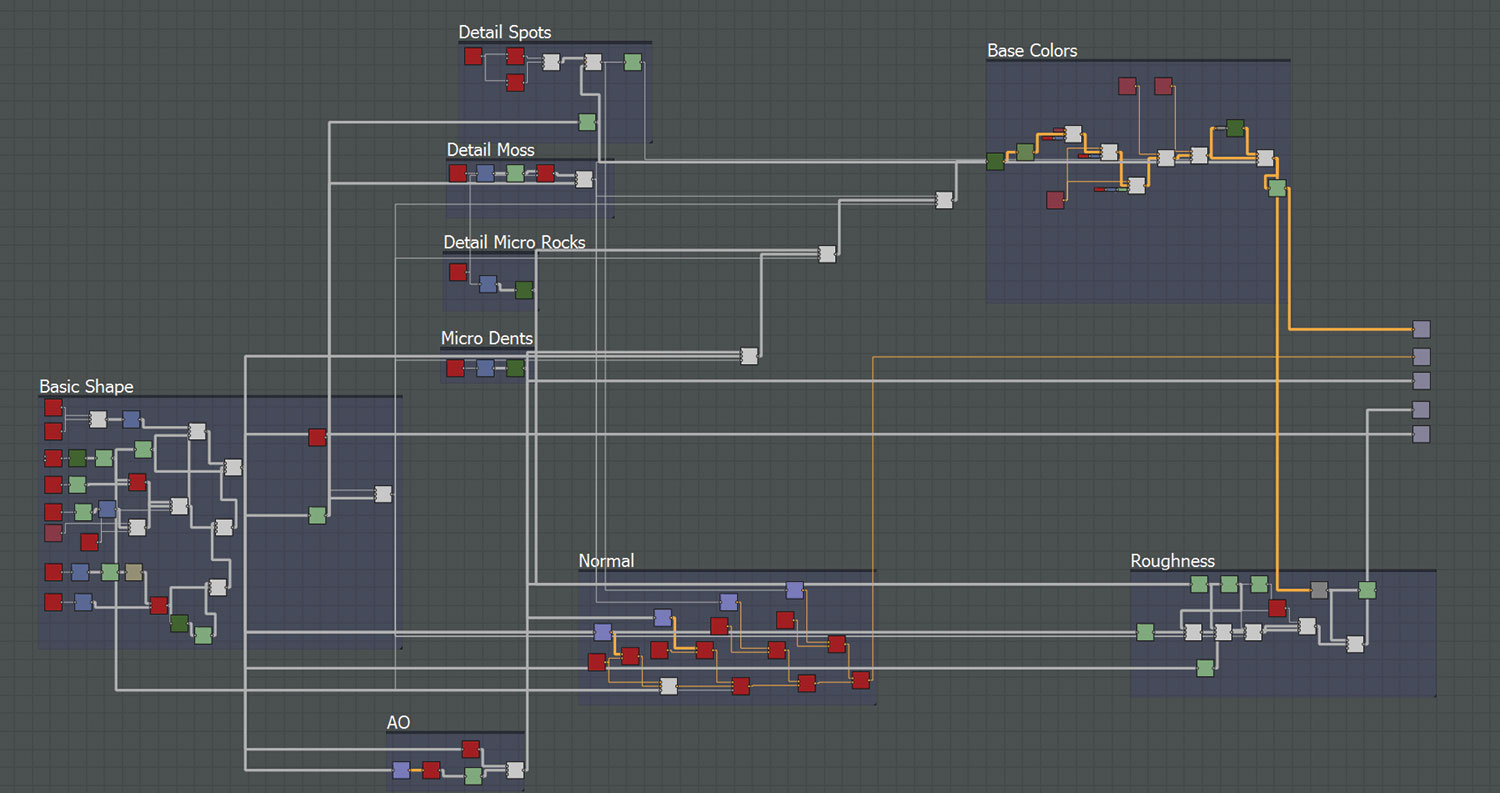
Since game engines are now supporting Physically-Based Rendering (PBR), it's a good idea to find a fast and workable workflow for texturing. I find that Substance Designer is perfect for my needs and helped a lot with tiling textures.
When tiling textures in Substance Designer, my workflow goes like this:
- Figure out the big shapes first and focus only on height information.
- Slowly start to add smaller details to the heightmap and test how it tiles.
- Avoid making tiling too noticeable and make sure your heightmap holds all the information you need. Use levels to balance it if needed.
- Once the heightmap looks good, generate normal and AO maps, and use gradients to generate a base colour map.
- The final thing is to generate a roughness map. Use everything you already have and find the right feel for the materials. Avoid using 100 per cent black or white!
I also bake different maps from high-poly models to help with texturing objects such as cars, props, etc. I use xNormal for baking normal, AO and heightmaps, and Substance Designer for position and curvature maps. Substance Designer is a powerful tool for props because you use the same Substance graph for all of them. This way all the props have a consistent look and are very fast to make.
06. Texturing with Photoshop
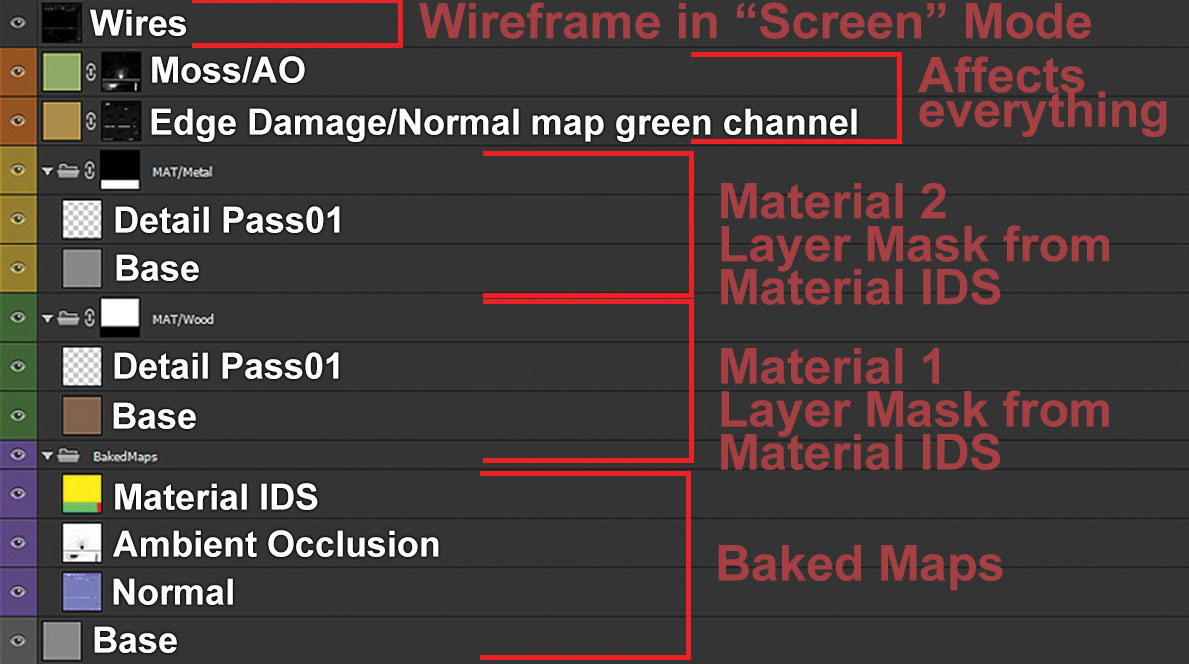
I use Photoshop for some minor textures too because it's a very fast way to texture models, but it needs more attention because of the PBR workflow.
Here is my basic Photoshop workflow for texturing:
- Add baked maps into the document – this document will be the base colour texture.
- Render your UV wireframe, add that on top of everything, and lock it so you have a better idea where different UV islands are.
- Make base colours for different materials and give those layers suitable names.
- Use AO and normal map channels as a mask to add details. Normal map red and green channels make good masks with Photoshop filters and level tweaks. This works well for adding edge damage or a sun bleached look. Use these as layer masks.
- Start adding detail passes with hand painting or with photo source textures.
- Name everything and group layers so it's easier to find the right layers and keep this workflow consistent with all of the textures you're making.
- Duplicate content to a new document and make Roughness/Smoothness, Metal/Specular maps. Progress should now be easier because you have all of the information, so just delete or add details and play with levels, invert channels, etc.
- Keep testing textures as you go with a PBR renderer like Marmoset Toolbag 2.
07. Using the Material Editor
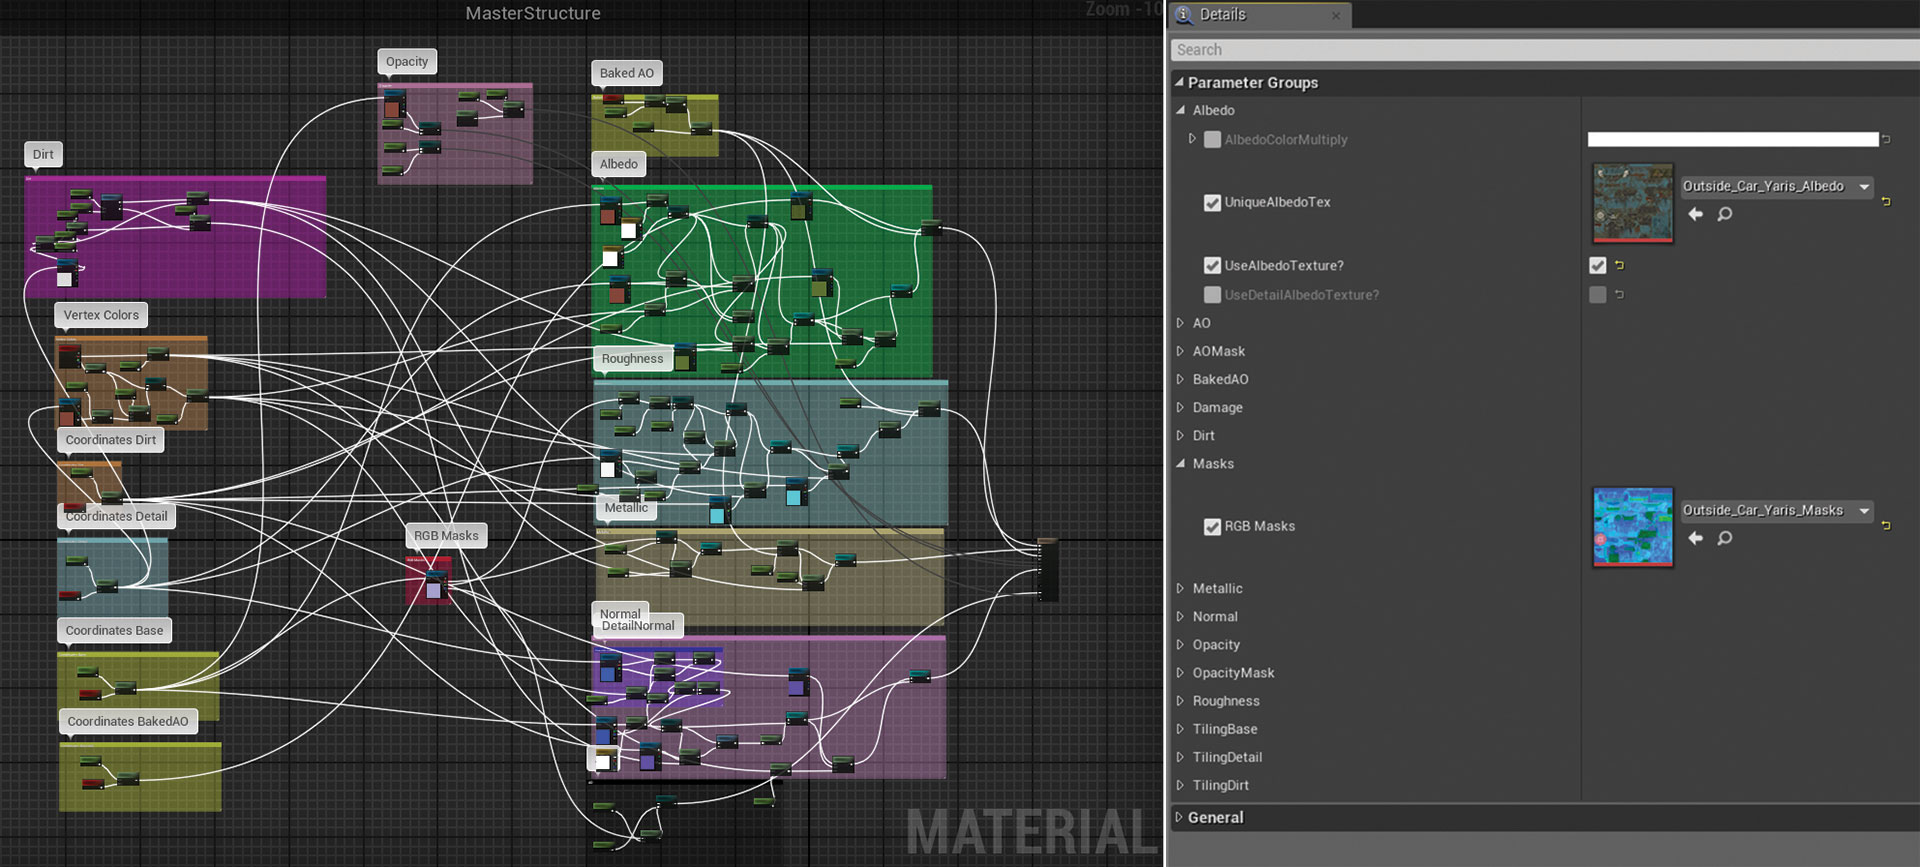
Creating good textures is one thing, but blending them in-engine is another. Unreal Engine 4 has a very good material editor, which enables you to do pretty much anything you need for games and more. Real-time applications also have some limitations, so be aware that very complex materials will cost you a lot to render.
I create a few master materials that have a lot of functions and switches to help speed up the process. Then it's easy to create material instances out of the master materials and select which of the features to use.
To help you work faster when creating materials, here are some things to keep in mind:
- Try to keep all the materials you're using as simple as possible because there is a limit what you can do in real-time.
- Name nodes and add comments so it's easier to see what different nodes are doing.
- When blending textures, make sure that you blend changes to all of the outputs like Base Color, Roughness and Metallic to get good results, and clamp values so blending works right and there aren't any visual artifacts.
- Use Static Switch nodes so you can turn different features on or off in your material instances. This way you can save performance in materials if you don't need some expensive feature to be enabled in every material instance.
- Check Shader Complexity to make sure materials aren't too heavy. You can find this in viewport View Mode under Optimizations.
08. Foliage
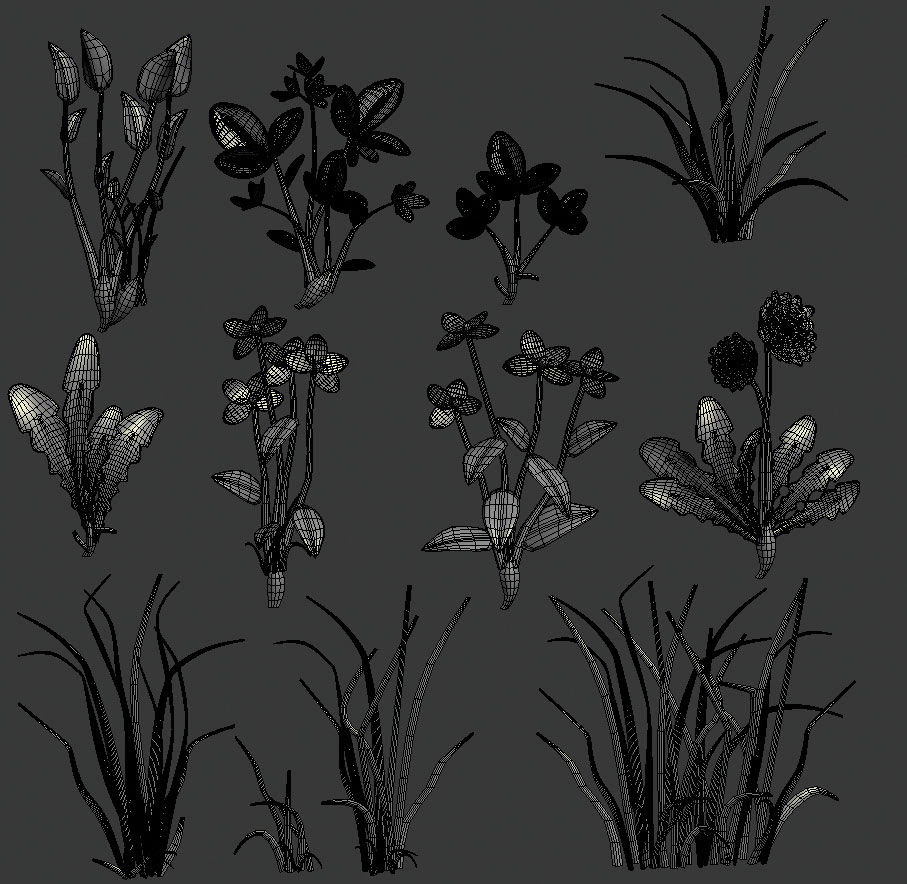
My project has a lot of foliage and I want to have a solid workflow for making the plants and grass. I end up modelling everything in 3ds Max. This way I can bake high-quality normal, base colours and AO maps. I pack them into texture atlases, so this way I can combine different grass types into one model and save on performance at the same time.
09. Building the level in Unreal Engine 4
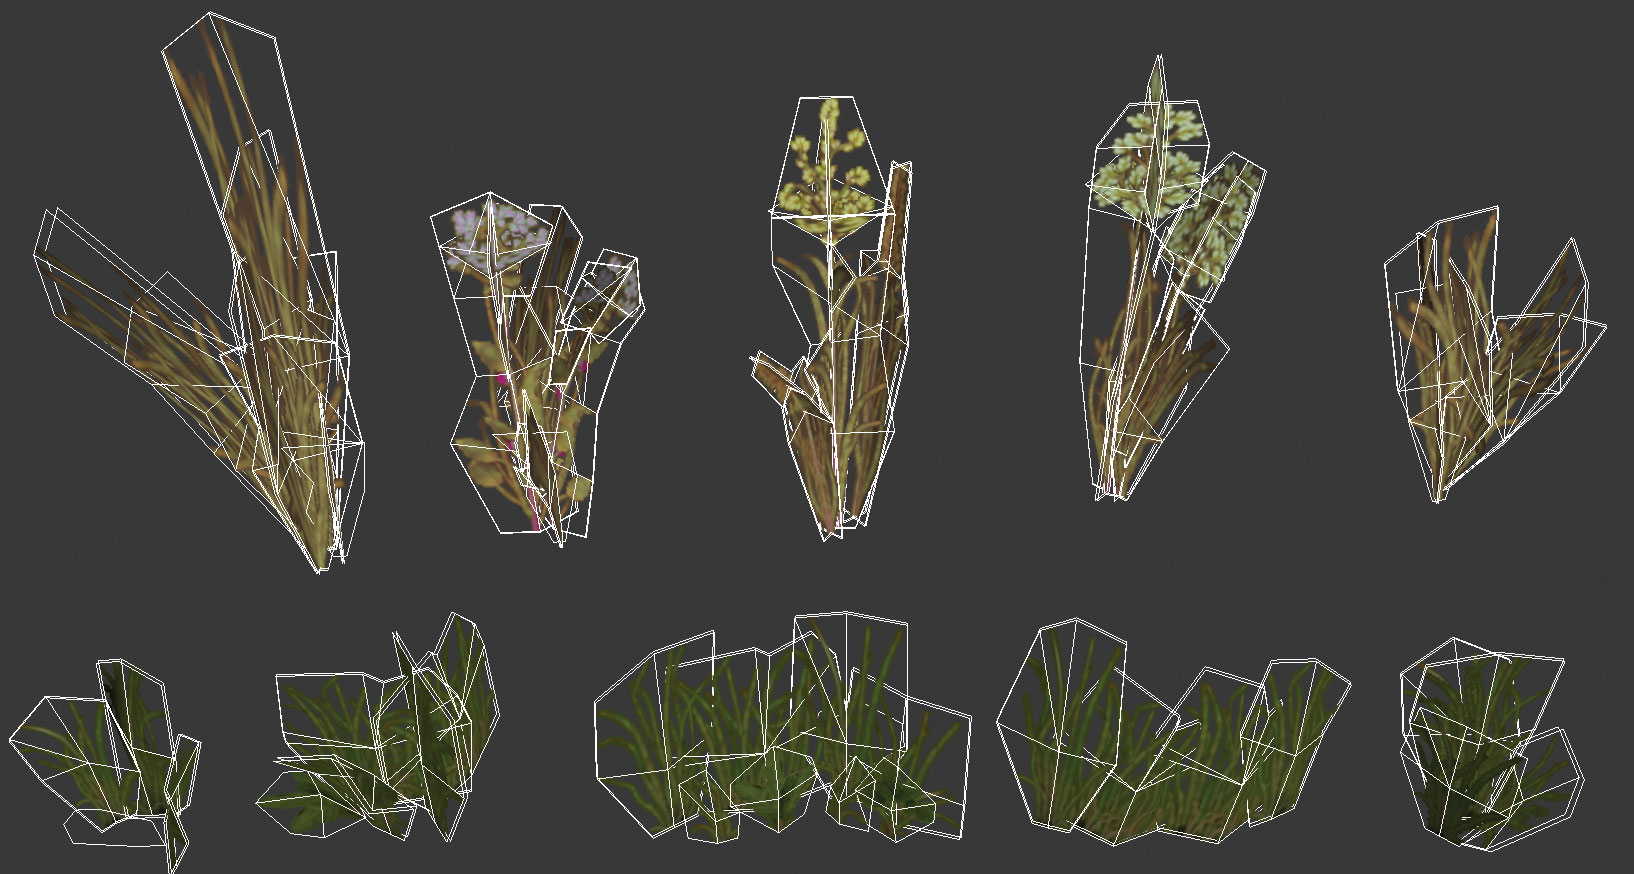
My workflow for this project is to export every model from 3ds Max to Unreal Engine 4 in .fbx format and use Unreal Engine's built-in tools for adding the foliage to the scene.
Here is how I do it:
- Make sure you have pivot point in the right place with your models.
- Reset the scale and rotation of the object. In Max I used Reset Xform for this.
- Export the model in .fbx format into the correct folder in your UE4 project.
- In Unreal Engine 4, make blueprints for objects that you use more than once to make it easier to modify different parameters later on.
- Add textures to materials and assign them into the correct models and blueprints.
- Add foliage into the scene with the Unreal Engine Paint tool.
10. Stay organised
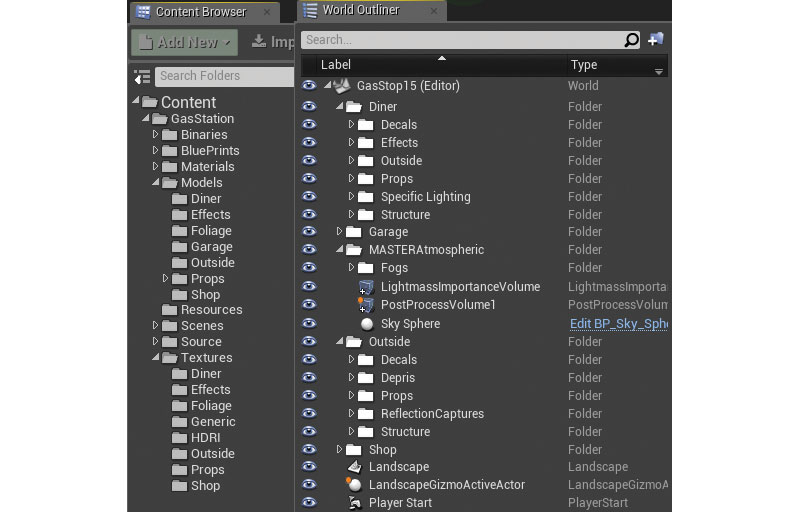
In Unreal Engine 4, I create folders to help keep things organised. I use the same kind of folder structure for models, textures and materials, so it's easy to find the right material for the right model. I also make sure that UE4's World Outliner is organised too. I make different folders – such as DINER, SHOP, OUTSIDE – and inside of these folders I add sub-folders: STRUCTURE, PROPS, EFFECTS. This helps a lot because the scene will end up having a lot of props and assets.
11. Terrain creation
For the terrain, I use the procedural terrain generator, World Machine, by exporting the heightmap and using it in Unreal Engine's Landscape tool. I also add foliage on top of this and make small adjustments to make it fit better into the scene.
12. Light the environment
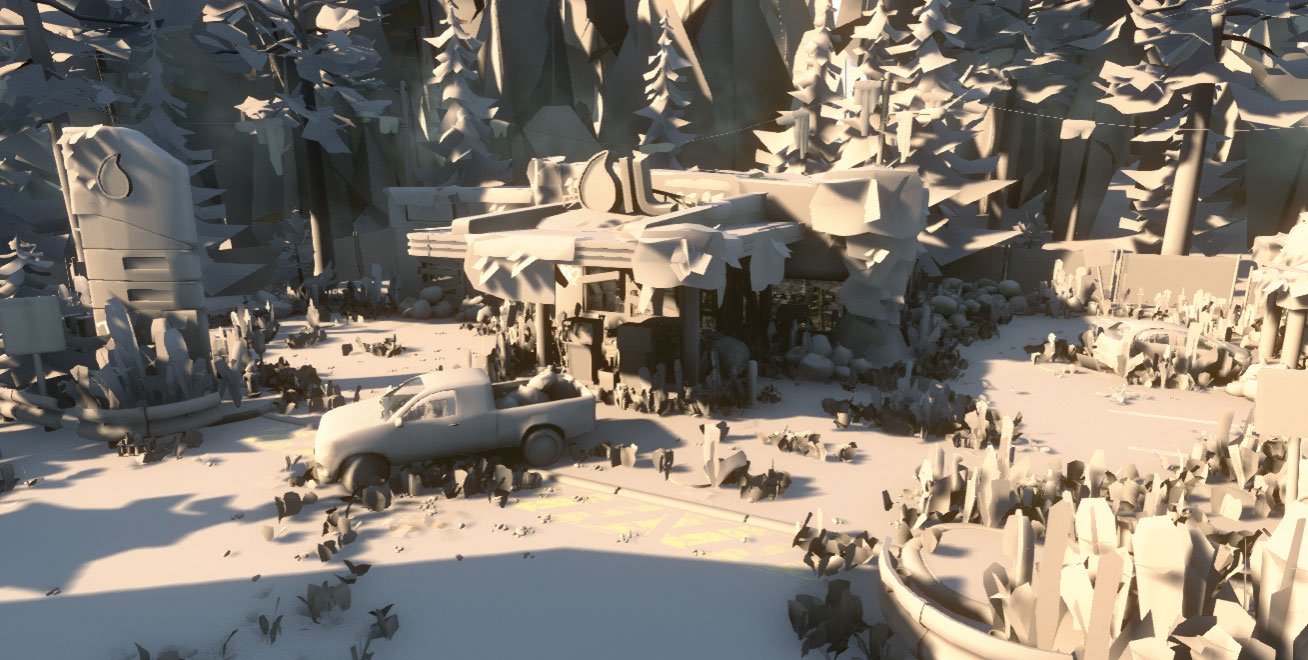
Lighting is the hardest part of a project. Bad lighting can ruin everything, so take time to get it right. Since Unreal Engine 4 is a real-time engine it's vital to keep the lighting as optimised as possible, because real-time lighting has a great impact on performance.
There are lots of things that affect the end results when lighting a scene, so it helps to know something about Unreal Engine 4's lighting system. UE4 has three modes for lights: Movable, Static and Stationary. Movable means the light source will be fully dynamic. You can move it at runtime and it can cast real-time shadows. This is very heavy but won't require baking lightmaps with Lightmass. Static is the opposite to Movable. It will be the cheapest because lighting information is baked into lightmaps that are overlaid on top of the models using a second UV channel. You can't change it at runtime. Stationary is in-between these two: shadows and bounced light are baked but you can still change colour and intensity at runtime. It's not as expensive as Movable but not as cheap as Static.
13. Baking the lighting
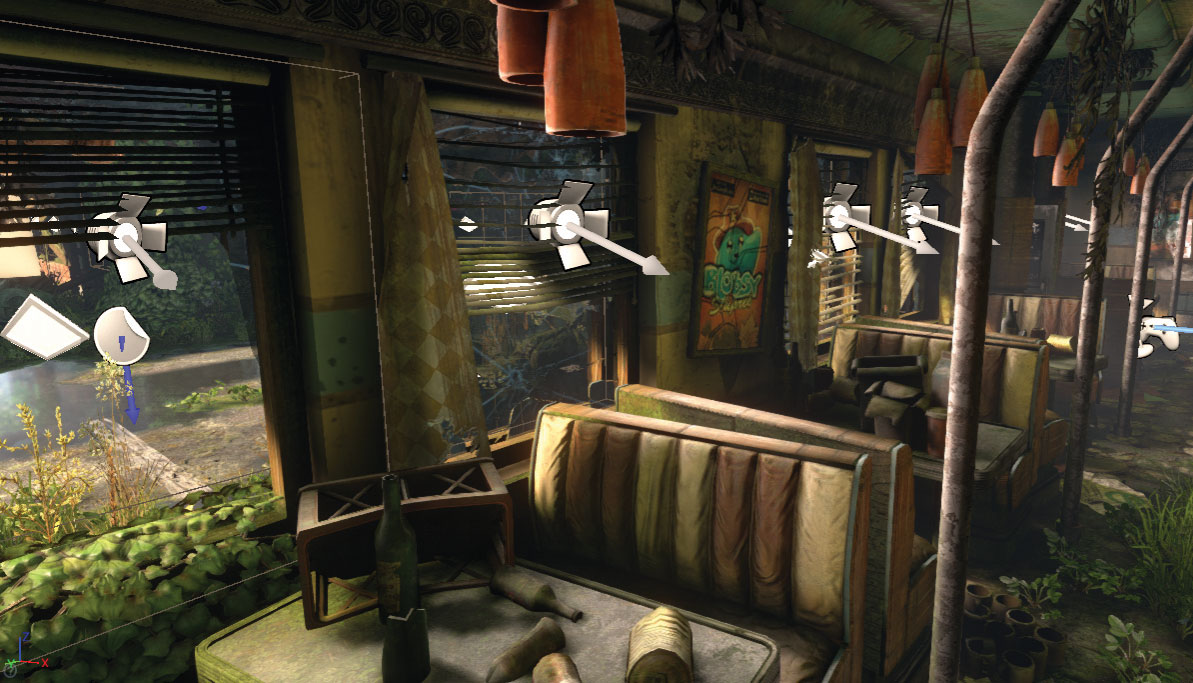
I want my scene to run in VR as well as for a game, so with this in mind I decide to bake the lighting in a way that will not affect performance.
So, my final lighting setup is:
- Stationary directional light as a sun.
- Skylight to give an illusion of bounced light. I used HDR texture for more interesting variations.
- For interior areas I used hand-placed static spot lights to simulate stronger sunlight coming through windows. I also placed Light Portals to tell Lightmass where to focus more.
14. Lightmass settings
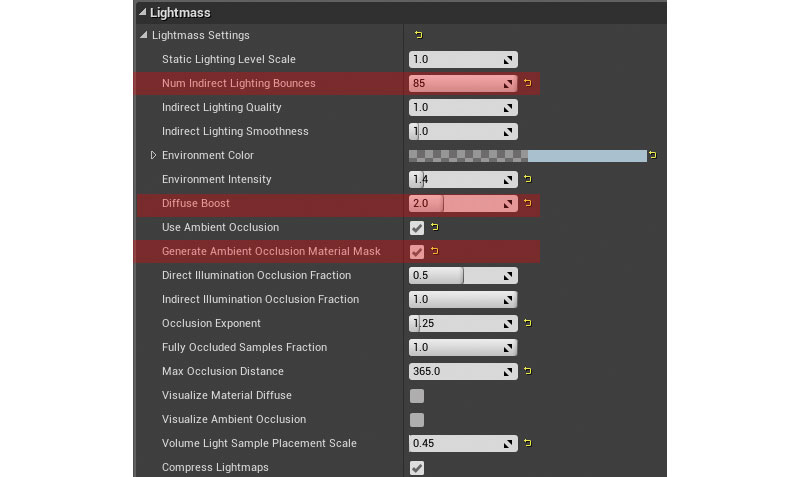
After a few light baking tests, I find I need to tweak the Lightmass settings. You can find these in the World Settings tab.
Here is what I changed my Lightmass settings to for the best performance:
- Since the scene interior parts use indirect lighting heavily I decided to boost Diffuse Bounce to 2.
- I also baked an AO mask that I could use to blend dirt and moss textures in materials.
- I set Num Indirect Lighting Bounces to 85.
15. Post processing
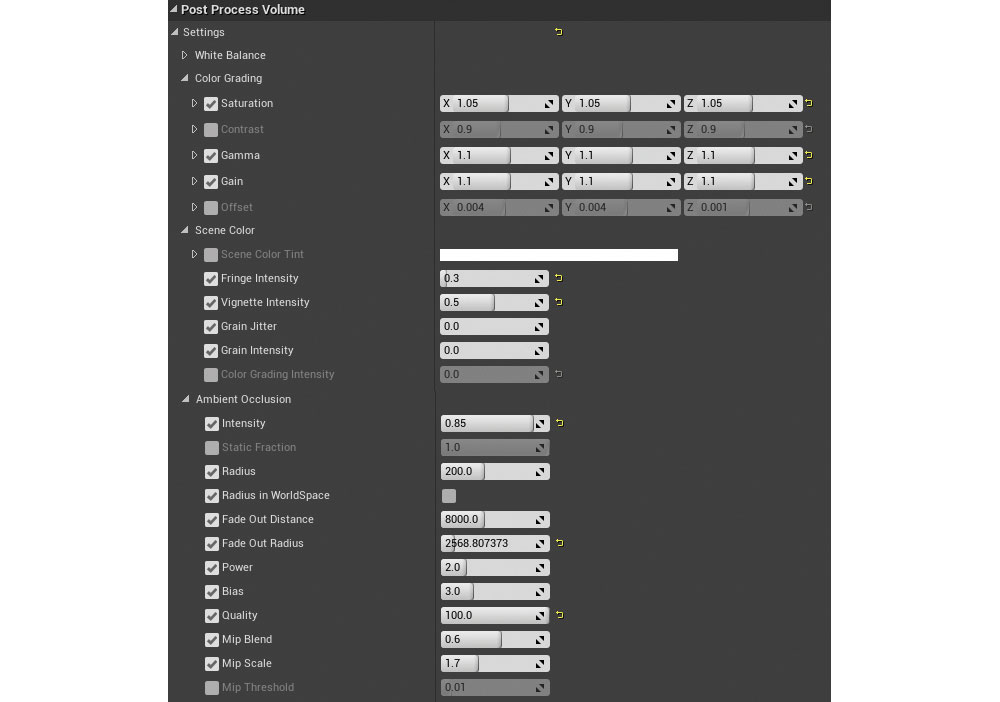
The final thing for the scene is to add some colour grading. I usually leave this to last because then I can be sure it's not affecting lighting or materials.
When I'm happy with everything else, then it's safe to start tweaking the post-processing effects. It's very easy to do in Unreal Engine 4. All you need to do is add a Post Process Volume and tweak the settings. I don't want to make my changes too extreme because I want the lighting and materials to do most of the work. I also want to have it affecting the whole scene, so I turn Unbound on.
Here are my settings, but this stage is about finding the style you want, so experiment:
- AO Intensity to 0.85.
- Chromatic Aberration set to 0.3 and Vignette to 0.5.
- Global Illumination changed to 4.
This article originally appeared in 3D World issue 212; buy it here!
Related articles:

Thank you for reading 5 articles this month* Join now for unlimited access
Enjoy your first month for just £1 / $1 / €1
*Read 5 free articles per month without a subscription

Join now for unlimited access
Try first month for just £1 / $1 / €1
