Create a folding paper animation
How to use Cinema 4D's basic tools to create a complex looking, paper-style animation.
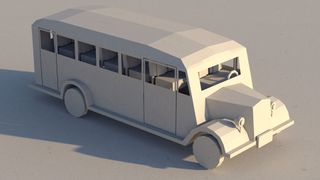
This style of animation is very popular, and has been seen in everything from TV commercials to short 3D movies. In this tutorial, we'll cover everything you need to know about how to build your own paper craft animation inside Cinema 4D.
We'll start by learning how to model. Because we are aiming to create something that looks like it's made out of paper, we don't need to be 100 per cent accurate. This can be a good place to start for people who are new to modelling, and want to begin learning. We're going to keep our model as simple as possible, but we still need some details to make our scene more complex.
After we finish modelling, we'll split the object in many pieces so that we can apply deformers. Animating with basic tools like deformers can sometimes make your animation look a bit cheesy, but by combining different techniques you can really take it to the next level.
More than 90 per cent of this animation was made using multiple iterations of the Bend Deformer. By using great features inside Cinema 4D like Physical Sky, we will make our scene look beautiful and believable.
Some parts of this tutorial are very hard to explain with words, so for each step I have provided you with a short walk-through videos, so everything is easier to understand and you don't miss a thing.
Before we dive in, make sure you get the blueprint and download this package of 12 paper textures. You can find all the assets you'll need here.
01. Setting up the scene
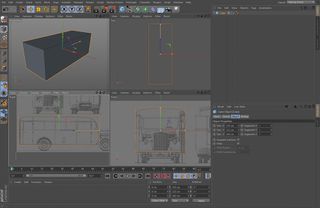
Start by loading the blueprint on the right view by holding [Shift]+[V] and then press the Back button. Increase the Transparency to 90 per cent. Centre the side view of the blueprint by changing the offsets; Offset: X: 60, Y:135. Next, add a cube and resize it to match with the blueprint; X: 245cm, Y: 225cm, Z: 640cm. Now on the front view, you can use the cube as a reference to center out the front view of blueprint; Offset X: 150, Y: -160.
Get the Creative Bloq Newsletter
Daily design news, reviews, how-tos and more, as picked by the editors.
02. Block out the object
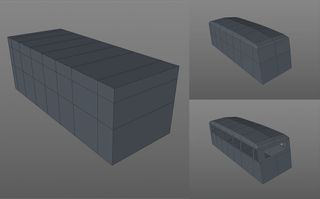
Make the cube editable [C]. Switch to Point mode, then from the right view, use the Knife [K] to add some cuts based on the blueprint. Then reshape the cube by using the Rectangle Selection tool. On the front view repeat the same process. Within Polygon mode, select the polygons that represent side windows and using Extrude Inner [I] extrude them slightly, then press [Delete] to get the holes. Use the same technique to create the front and back window.
03. Modelling
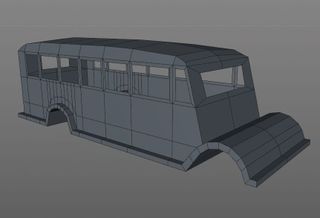
Add some extra cuts so we can create room for the back wheels by tweaking the new points. Select all the polygons on the bottom and split them from the object (right-click and select Split). Now we should have two objects, so rename the second one 'Bottom'. Select all the polygons from that object and Extrude [D] them down slightly. Make sure you switch Create Caps on. Reshape the bottom object by adding some extra cuts and tweaking points.
04. Finishing the exterior
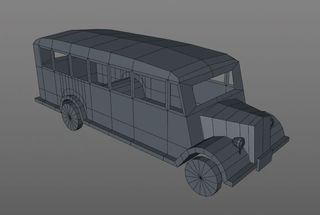
To create the bus hood the drill is the same: add a new cube, re-position and resize the cube to match with the blueprint, and make the cube editable so that you can add some extra cuts to reshape it. To create the lights, start a new scene, and by using a Bezier Spline and the Lathe Object create the head of the light. The rest of the objects, including the wheels, are created by using cylinders.
05. Create your interior
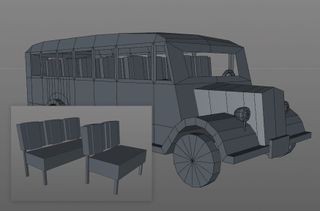
We will not stress too much over the interior. Again, create a new scene. Initially try to create the passenger seats by using cubes. Then make a group (select all objects and press [Alt]+[G]), and rename it 'Passenger Seats'. Make a copy of this group and rename it 'Driver Seat'. Try to make the driver seat a little smaller on the width. Bring the seats into your last scene and place them where they need to be.
06. Splitting the object
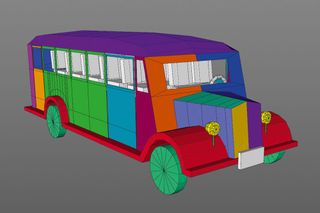
Now you need to split the object into small pieces. In this step keeping things organised is very important. First select all the objects, make a group and name it 'Old_Bus'. Now as you split the objects, drag them outside of that group, and name them properly. To keep the naming structured, use a prefix based on their position; 'R' for objects on the right and 'L' for the objects on the left.
07. Use Traffic Lights
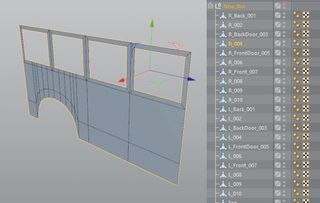
I assume that by now you should have everything organised regarding your labelling and groups. Applying deformers with all objects visible within your scene can be a very frustrating process. I suggest you hide all the objects except the object that you will work with. You can do that easily by using Traffic Lights (two dots on the side of every object). First, make sure that all the objects are part of one group, so that you can hide all objects at once.
08. Applying deformers
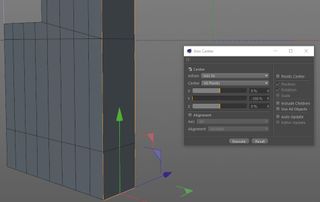
Fixing axis points is a crucial step. Knowing we'll scale these objects on the edges, most of our axis should not be in the middle. Use the Axis Center tool (Mesh> Axis Center) to fix the axis for each object. To apply the Bend Deformer on the selected object, hold [Shift] when you select it in the menu. Sometimes the Bend Deformer will bend your object in the wrong direction. Use the Rotation tool on the deformer to fix this. Add extra segments by using the Knife tool.
09. Plug them together
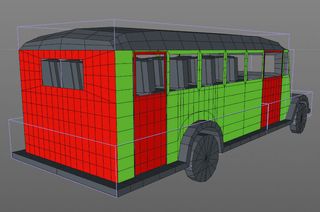
The beauty of Cinema 4D is that you can make increasingly complex effects by using an alternating series of nested objects and Bend Deformers. Keep in mind it's not necessary to nest them all together; you can keep it as low as two objects, and some of them don't have to nest together at all. Based on how your objects deform, you may need to add additional segments as you go along.
10. Deformers for wheels
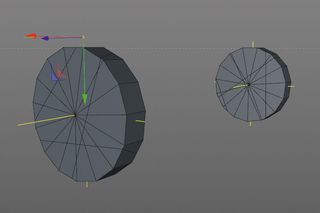
For the wheels we will use the Melt and Displacer Deformer. Now this part is a little tricky. If you select the wheel while holding [Shift] and apply the Melt, it is going to disorder the position of the wheel. To fix this, go to Character>Commands>Reset PSR. Now decrease the Strength to 0 and rotate the Melt deformer 180° on Pitch (P). Finally, apply the Displacer on each wheel with Noise as a Shader to get that crumpled paper look.
11. Animation
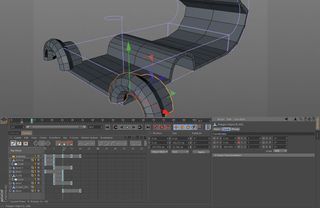
Before you do anything else it's a good idea to specify the frame rate, by pressing [Ctrl]+[D] to open Project Settings. I was using 30 FPS. It's also a good habit to keep the Timeline (Window>Timeline) open every time you animate, so that you have some room to play with keyframes. Most of my Bend Deformers were keyframed for 10 frames and each object was delayed for five frames. For every object that has a Bend Deformer, I have keyframed the scale as well.
12. Animating the seats
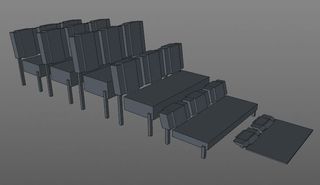
Because the seats have no deformer whatsoever, we will animate them just on the scale. We can do this by selecting all the seats, and on the coordinates for the first frame, bring the Scale Y to 0. After 10 frames, we bring the Scale Y back to 1. If you want to create little overshoot, you can add another keyframe between the two by changing the Scale Y to 1.2. To hide the seats in the first frame use the Display Tag.
13. Texturing
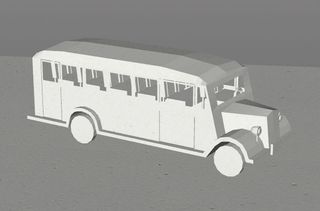
Before we create our material, add the floor and a camera to the scene. Activate the Camera View by clicking the target icon on the side of the camera. Change the Focal Length to 80mm. This type of Camera will make your object look like a miniature. Now create a material and for the Color by using one of the seamless paper textures. For the Bump create a grayscale version of the same texture using Photoshop.
14. Lighting and rendering
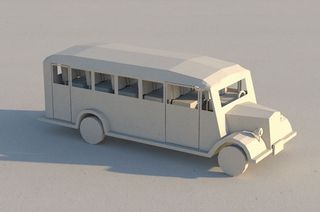
To light the scene we will use Physical Sky. Physical Sky is a very powerful feature inside Cinema 4D, which combines the light source (sun), the environment (sky), and much more in one single tool. I also like it because you can change the date, time and location. If you're going for a sunny day look, change the month to July. Physical Sky without Global Illumination doesn't look realistic, so make sure in the Render Settings to introduce Global Illumination.
This tutorial originally appeared in 3D World issue 207. Buy it here!

Thank you for reading 5 articles this month* Join now for unlimited access
Enjoy your first month for just £1 / $1 / €1
*Read 5 free articles per month without a subscription

Join now for unlimited access
Try first month for just £1 / $1 / €1
Related articles
-

-

-
-

