Track a 3D object into live footage with After Effects and Cinema 4D
Learn how to master this key visual effects skill, in the third in our series of articles sponsored by HP.
Integrating computer graphics into live action video footage used to be a dark art known only to top-level 3D artists using hugely expensive software. But nowadays the tools that come with Adobe's After Effects can be used very successfully for a huge range of shots, from simple 2D sign replacement to inserting a correctly lit CG object into your source video footage.
After Effects works especially well with the 3D package Cinema 4D - a free version, Cinema 4D Lite, comes with After Effects CC - and the plugin Cineware, which allows the swapping of camera and 3D data between the two programmes.
In this article we will look at tracking an object in After Effects to create a virtual camera. This can then be used in Cinema 4D to create a matching CG element, which can finally be round tripped back into After Effects for final compositing.
01. Types of tracking software
Before we start, it is worth outlining the different types of tracking software that comes bundled with After Effects. The first is the 2D tracker: this can set a point on the footage, which can be tracked backwards and forwards. This is excellent for basic tracking for paint cleanup, attaching nulls, etc, and is quick and simple to use.
The second tracker that comes with After Effects is Mocha AE. This is a standalone application that's launched through 'Animation Menu>Track in Mocha AE' in After Effects.
Mocha AE
Mocha AE is a planar tracker which is excellent for screen or sign replacement, as it tracks perspective really well. In fact Mocha AE is one of the unsung parts of After Effects and although the prospect of learning another new application is daunting, there are excellent tutorials available by going to the 'Help' menu. Just learning the basics of Mocha AEcan hugely improve your productivity.
The Final tracker, the 3D camera tracker, is the newest tracking solution and was introduced along with the 'Warp Stabilizer' effect as it uses similar technology.
Get the Creative Bloq Newsletter
Daily design news, reviews, how-tos and more, as picked by the editors.
This is the tracker that needs to be used if CGI elements are to be integrated in After Effects as it creates a virtual 3D camera which matches that of the camera in the footage as well as enable the creation of 3D objects which can be matched to the Live footage.
02. Tracking the shot
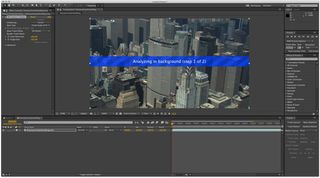
To start tracking, place the chosen footage into After Effects and drop it onto the 'Create a New Composition Button' to make a new After Effects composition of the same dimension and length as the footage.
To run the tracker, go to the 'Window Menu' and select 'Tracker' this pops up the tracker menu, select the footage layer in the timeline and select 'Track Camera'.
A blue bar with 'Analyzing in Background) will pop up over the footage, and in the effect controls palette a countdown of the tracking progress is available so this may be a good time to get a cup of tea.
Your tracked shot
Once the progress bars have disappeared, a lot of little multicoloured 'x's will appear over the footage which when scrubbed through will lock to the objects. Congratulations, the shot is now tracked.
Move the mouse over some of the x's (Track Points, the size of which can be controlled in the Effect Controls panel) and shift select the ones that are to have 3D CGI objects tracked to them.
In my case this is on the side of the Chrysler building. Right-click on the selected track points and a menu of options appear. By selecting 'Create Solid and Camera', an After Effects solid and 3D camera appear, which can be exported to Cinema 4D. Explore the other options if all that is needed is tracked text or nulls which can control layers directly within After Effects.
03. Getting tracked data into CINEMA 4D
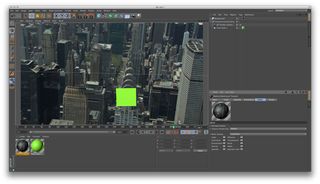
To get the 3D camera and solid data into Cinema 4D, go to the After Effects File>Export>Maxon Cinema 4D Exporter. This creates a new Cinema 4D file, which can be saved where appropriate.
Open this new file in Cinema 4D, where a polygon should appear in the viewport along with a group in the object list. Don't worry if the view is different to that in After Effects.
Open the Group in the object list by clicking the [+] symbol to the left of the group and it will expand to reveal the 3D Camera and Track Solid. Make sure the [+] symbol to the right of the 3D Camera Tracker object is white which will shift the viewport to be viewed through the camera.
New texture
To make sure the shot is working properly, make a new texture, call it 'Background Texture' and load in the source video into the colour channel. Then add a background object, and place the new texture onto the background object in the object list.
All being well, a frame of the footage should appear in the viewport. To make the BG footage scrub with the CINEMA 4D timeline, double click on the Background Texture in the Material Palette and select the 'Editor' tab and make sure 'Animate Preview' is ticked.
The Background should now scrub with the tracked solid, this can slow down Cinema 4D, so use the traffic lights (the two grey dots beside each object, in the object list, the top one controls viewport visibility and the bottom render visibility) in the object list to toggle the background object on and off if speed issues are occurring in the viewport.
04. Adding geometry
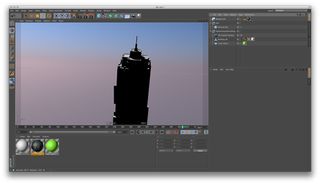
Now there's a tracked object in Cinema 4D (I prefer solids to nulls as they provide visual reference for size and orientation between After Effects and Cinema 4D), this can be used as a parent object or the co-ordinates can be copied from it into the object that's to be added.
Here I'm adding another skyscraper to replace the Chrysler building. Once I've pasted the co-ordinates into the object, I move and scale it into the right position. But I find that the nulls I've chosen are slightly wonky and the building is not lining up correctly.
I can fix this by lining up the object with the Background object in my Cinema 4D viewport so that I don't need to go back to After Effects to start over.
Lighting
It's at this point that lighting comes into play. Add a Physical Sky object, which can be used to create realistic exterior lighting environments. This will cause the footage in the background to disappear.
By using the traffic lights in the Object List, toggle visibility between the Background Object and the Physical Sky Object to help set the lighting. Also make sure that the Background Object is set to not render.
Again cheats can be used. To get the lighting correctly aligned, parent the Physical Sky object into a null so that its heading can be changed by changing the parent Nulls heading.
05. Getting the 3D back into After Effects
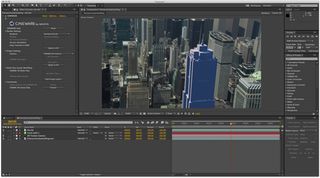
Now that all the CGI elements are created - namely the new building and lighting solution with the 'Physical Sky' Object - simply drag the Cinema 4D file into the Project Window of After Effects and drop it as a layer into the original After Effects composition.
This will create a Cineware window in the 'Effects Control' palette in After Effects. Make sure the renderer is set to Standard (it doesn't matter if it's Draft or Final). The object will appear correctly placed in the After Effects composition.
As Cineware is being used, any tweaking to the lighting in Cinema 4D will be instantaneously reflected in the After Effects file once the Cinema 4D file is saved. Switch off the null objects in both the Cinema 4D file and After Effects file to allow the ability to concentrate on compositing the shot using both the lighting and texturing tools in Cinema 4D and the compositing tools in After Effects.
Focus on key frames
Cineware is still in its early days: just concentrate on integrating the shot on key frames throughout the shot, as Cineware can be used to create a true multipass compositing environment for creating hold out mattes, and material passes which then gives the ability to render out the Cinema 4D file as normal knowing exactly what is needed to rendered, which can then be finished as with any other After Effects composition.
Conclusion
The workflow between After Effects and Cinema 4D is getting smoother with every passing day and the enhancements in After Effects with tools like the 3D Camera Tracker and Cineware mean complex vfx shots can be setup in minutes without the need for any other software, which can then allow the full 3D power within Cinema 4D to be utilised with the compositing finesse of After Effects.
Even if the full version of Cinema 4D is not available, this process will work with Cinema 4D Lite (other than the Physical Sky) which can offer a huge range of new creative options for After Effects users just getting their first steps into the world of 3D CGI creation.
Words: Mike Griggs
Win a trip to Los Angeles!

Masters of CG is a competition for EU residents that offers the one-in-a-lifetime chance to work with one of 2000AD's most iconic characters: Rogue Trooper.
We invite you to form a team (of up to four participants) and tackle as many of our four categories as you wish - Title Sequence, Main Shots, Film Poster or Idents. For full details of how to enter and to get your Competition Information Pack, head to the Masters of CG website now.
Enter the competition today!

Thank you for reading 5 articles this month* Join now for unlimited access
Enjoy your first month for just £1 / $1 / €1
*Read 5 free articles per month without a subscription

Join now for unlimited access
Try first month for just £1 / $1 / €1
The Creative Bloq team is made up of a group of design fans, and has changed and evolved since Creative Bloq began back in 2012. The current website team consists of eight full-time members of staff: Editor Georgia Coggan, Deputy Editor Rosie Hilder, Ecommerce Editor Beren Neale, Senior News Editor Daniel Piper, Editor, Digital Art and 3D Ian Dean, Tech Reviews Editor Erlingur Einarsson and Ecommerce Writer Beth Nicholls and Staff Writer Natalie Fear, as well as a roster of freelancers from around the world. The 3D World and ImagineFX magazine teams also pitch in, ensuring that content from 3D World and ImagineFX is represented on Creative Bloq.


