Rig a 3D vehicle in Blender
Discover how the rig for this spaceage combat jet was created with this expert animator's insights.
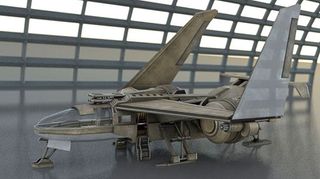
I am often asked how I made the rig for the animation of my futuristic combat jet on Sketchfab, so I'm happy to be able to share the answer with you in this Blender tutorial. I want to show you how a bone constraint works in Blender and how to set it up, and also how a bone constraint affects the animation skelton.
To demonstrate this, I will explain how I adjusted the Action and the Track To constraints on the front landing gear of my model (the other animated parts of the plane are made in the same way).

By scaling the control bone from 1.000 Y to 2.000 Y, the front landing gear will move into the plane by driving a predefined action. All animations of the plane are saved in one action.
To assign a bone constraint, select the bone for the Action Constraint, then go into the Bone Constraints section and click on Add Bone Constraint. Now select the Action and set up the Action Constraint.
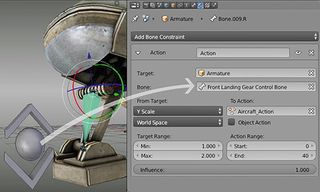
To set up the Action Constraint first select the target (the target is the armature object). Now set the bone by entering the name of the bone or the object you want to use for controlling the constraint.
The From Target setting defines how to interact with the constraint; in my model, I use Y scaling. In the To Action setting you need to enter the name of the action you want to use for the constraint.
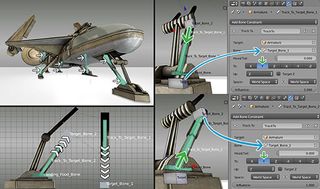
Next, in the Action Range you need to enter the start and end frame of your Action. In Target Range you can define the interaction range of the control bone.
Finally, I use the Track To Constraint setting – Track To Constraints are perfect for animating hydraulic elements. Head here to see in more detail how I rigged the entire jet animation.
Expert tip: Baking out
If you animate something with constraints in Blender you should bake the animations to get the result you want in other programs like Unity 5 or Unreal 4, so before you hit the export button bake all bone constraints to key frames and clear all the bone constraints from the Armature in one process. To do this, go to Pose> Animation>Bake Action.
This article was originally published in 3D World magazine issue 207. Buy it here.

Thank you for reading 5 articles this month* Join now for unlimited access
Enjoy your first month for just £1 / $1 / €1
*Read 5 free articles per month without a subscription

Join now for unlimited access
Try first month for just £1 / $1 / €1
Get the Creative Bloq Newsletter
Daily design news, reviews, how-tos and more, as picked by the editors.
Related articles
-

-

-

-
