How to create a sci-fi inspired matte painting
CG artist Mateusz Szulik reveals the process behind his Into the Mountains project.
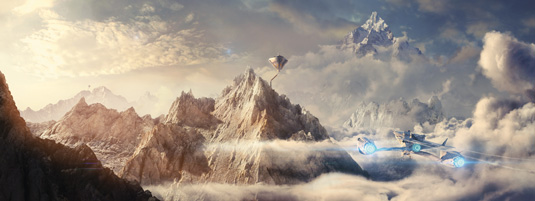
This image was initially created to be a simple terrain test for Vue. I wanted to experiment a bit with some mountain shapes and atmospheres; that led me to think of the recent sci-fi movie, Oblivion, with its beautiful environments, and I was suddenly inspired to create this matte painting.
I wanted to place a sharp, imposing mountain in the centre of the composition, with some kind of an observatory on it, and to light the scene with a warm, sunset light. I really wanted to convey the sheer greatness of the mountain range, so to add impact I placed a really massive mountain in the distance, breaking through the clouds.
To give the scene some dynamism and to make the composition look better, I place a spaceship on the right. I think elements like this spaceship are very important; they make the scene more interesting by bringing some story telling into the picture, and they help to lead the eye of the viewer nicely through the image.
As my main 3D tool is 3ds Max, I decided to make the rest of the objects in Max and render them using V-Ray. I was also very satisfied with the results I got in Vue, so I thought I would finish the environment using stock photos and textures in Photoshop.
I love to experiment with mixing different techniques and blending a variety of media when creating images, especially sci-fi illustrations or matte paintings. In many cases, the render from the 3D software is just the beginning for me in the process of making an illustration.
01. Set up the scene
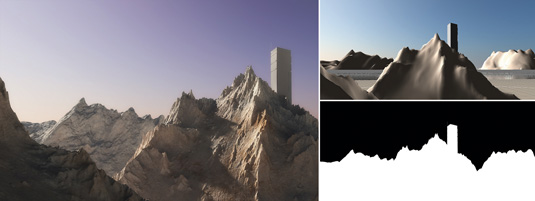
First set up the scene in Vue. Place four mountain models in the scene and a temporary object for the building to check the composition. Put the main mountain in the middle, two at the back and one in the dark foreground (these three are the same models, just rotated randomly). Next, pick one of the sunset atmospheres from Vue's atmosphere editor. Hit render, and save the colour and alpha channels.
02. Place the models in Vue
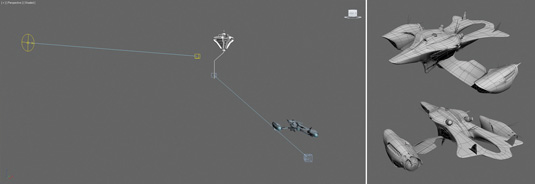
Now go to 3ds Max to make the objects. When the models are ready, set the render from Vue as a background (to see where to put the models, and make the mountains reflect and refract in the building’s glass), and place the VRaySun in a similar position to the one it was in Vue. Now it's time to render the image and save a few passes (colour, reflection and self illumination – for the engines).
03. Photoshop post work
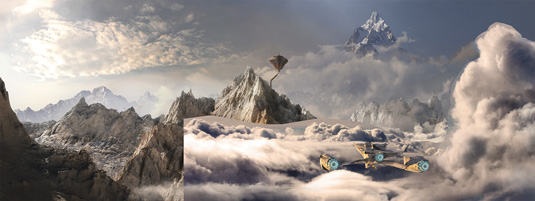
Put the Vue and Max renders together in Photoshop. Replace the sky with some cloud photos, and add a mountain range photo and hide it behind a fog layer. Adjust the mountains in the front by adding some nice rock textures on them. Now add some cloud formations in the front, adjust the colours to make the whole image warmer, add a sun glow using a big standard soft brush, and play with some blue flares.
This article originally appeared in 3D World issue 181.

Thank you for reading 5 articles this month* Join now for unlimited access
Enjoy your first month for just £1 / $1 / €1
*Read 5 free articles per month without a subscription

Join now for unlimited access
Try first month for just £1 / $1 / €1
Get the Creative Bloq Newsletter
Daily design news, reviews, how-tos and more, as picked by the editors.

The Creative Bloq team is made up of a group of design fans, and has changed and evolved since Creative Bloq began back in 2012. The current website team consists of eight full-time members of staff: Editor Georgia Coggan, Deputy Editor Rosie Hilder, Ecommerce Editor Beren Neale, Senior News Editor Daniel Piper, Editor, Digital Art and 3D Ian Dean, Tech Reviews Editor Erlingur Einarsson, Ecommerce Writer Beth Nicholls and Staff Writer Natalie Fear, as well as a roster of freelancers from around the world. The ImagineFX magazine team also pitch in, ensuring that content from leading digital art publication ImagineFX is represented on Creative Bloq.
