Build your own HTML5 3D engine
When Toronto agency Jam3 built www.bjork.com, a site that features an interactive real-time rendered 3D model, they decided to create their own engine to ensure it turned out the way they wanted. Here senior developer Mikko Haapoja explains how you can do the same with a little bit of help of JavaScript and HTML5 Canvas.
- Knowledge needed: Intermediate JavaScript, basic working knowledge with HTML5 Canvas
- Requires: Text editor
- Project Time: 1.5 hours
There are several off-the-shelf solutions for 3D on the web. However, these solutions are not appropriate for all sites and sometimes you need the full control that comes from knowing the ins and outs of your own codebase. When it came time to build www.bjork.com, a site that features an interactive real-time rendered 3D model, we decided to build our own engine to ensure it turned out the way we wanted.
This was a great learning experience and it allowed us to streamline the engine so that the site performed at its very best. This tutorial breaks down the component parts of the engine in the hopes that it will demystify 3D. Even the most experienced developers can find building their own 3D engines from scratch to be a very daunting task as there is a considerable amount of math and theory involved. However, once you understand the fundamentals and theory behind it, it’s not nearly as difficult as you might think. Hopefully when we’ve finished you’ll be ready to start building your own 3D experiences.
The cornerstone of any 3D engine is one equation:
scale=focalLength/(z+focalLength)
This is the equation to go from 3D to 2D. It projects from 3D to 2D.
How you would use it is as follows:
var point3D={x: 100, y: 133, z: 230};
var focalLength=1000;
var scale=focalLength/(point3D.z+focalLength);
var point2D={x: point3D.x*scale, y: point3D.y*scale};
Knowing this we can start to build our small/efficient canvas-based 3D engine. Before you begin any project, figure out what you want to achieve and begin to map it out on paper. We should figure out how this 3D engine will be architected and what we want to draw.
Rendering 3D objects is one of the most taxing tasks that the CPU can take on, so we have to optimise our engine as much as possible. The easiest way to optimise code is to follow the rule of KISS (Keep It Simple, Stupid). If you keep your code as simple as possible it will most likely be optimised from the start or then it will be very easy to optimise later.
I'm really in favour of Object Oriented programming and my brain tends to think in those lines. So we have to start thinking about what we want to accomplish and what we need. For our 3D engine we're going to be rendering lines. So if you think about it a line is made up two points connected by the actual line. So we need a Point3D class and a Line3D class. Of course it would be nice to have something hold this together so we'll make a class called Scene3D.
So let's start on Scene3D.
Get the Creative Bloq Newsletter
Daily design news, reviews, how-tos and more, as picked by the editors.
function Scene3D(canvas)
{
this.focalLength=1000;
this.context=canvas.getContext("2d");
this.sceneWidth=canvas.width;
this.sceneHeight=canvas.height;
this.points3D=[];
this.points2D=[];
this.numPoints=0;
this.render=function()
{
}
}
Now this may seem weird because we talked about Point3D above but I still want to keep all the actual position data within the Scene3D. Generally because we can then perform operations on this point data without hitting a Point3D. You'll see later what I mean. We'll get back to the render function later.
Let's now make a Point3D class. So because we want to keep the 3D point data all within the Scene3D we need a way for the Point3D to be able to access and modify this 3D data. For this we'll use getters and setters. Getters and setters are special functions that outside of the class look like just any old class property. But when that property is set or asked for then those functions are actually called. So in our case when a Point3D's x position is set we want to set the x position and also update the Scene3D's point3d array. In JavaScript you defined getters and setters doing the following:
this.__defineGetter__("x", this.getX);
this.__defineSetter__("x", this.setX);
Where this.getX and this.setX are functions that should be called when this property is either being "get" or "set".
So let's write the Point3D class:
function Point3D(xVal, yVal, zVal)
{
var _x=xVal!=undefined?xVal:0;
var _y=yVal!=undefined?yVal:0;
var _z=zVal!=undefined?zVal:0;
var myScene=null;
var xIdx;
var yIdx;
var zIdx;
var xIdx2D;
var yIdx2D;
this.setupWithScene=function(scene)
{
myScene=scene;
var idx=scene.setupPoint(_x, _y, _z);
var i3=idx*3;
var i2=idx*2;
xIdx=i3;
yIdx=i3+1;
zIdx=i3+2;
xIdx2D=i2;
yIdx2D=i2+1;
}
this.getSceneIdx=function()
{
return mySceneIdx;
}
this.getX=function()
{
return _x;
}
this.setX=function(value)
{
if(myScene!=null)
myScene.points3D[xIdx]=value;
_x=value;
}
this.getY=function()
{
return _y;
}
this.setY=function(value)
{
if(myScene!=null)
myScene.points3D[yIdx]=value;
_y=value;
}
this.getZ=function()
{
return _z;
}
this.setZ=function(value)
{
if(myScene!=null)
myScene.points3D[zIdx]=value;
_z=value;
}
this.getX2D=function()
{
return myScene.points2D[xIdx2D];
}
this.getY2D=function()
{
return myScene.points2D[yIdx2D];
}
this.__defineGetter__("sceneIdx", this.getSceneIdx);
this.__defineGetter__("x", this.getX);
this.__defineGetter__("y", this.getY);
this.__defineGetter__("z", this.getZ);
this.__defineSetter__("x", this.setX);
this.__defineSetter__("y", this.setY);
this.__defineSetter__("z", this.setZ);
this.__defineGetter__("x2D", this.getX2D);
this.__defineGetter__("y2D", this.getY2D);
}
So in order for Point3D to know about a Scene3D it must be added to a scene. In turn in order for Point3D to be able to update the Scene3D's point3D array it has to know the location of where it's allowed to update the data. Scene3D's point3D array is a one dimensional array that will look like this: [x, y, z, x, y, z, ...] So the data is in sets of 3's. It may seem crazy to do it this way, why not use a 2D array or an array of Objects? However this goes back to the KISS rule. You can't go wrong by keeping your data structures as simple as possible (it's easy to optimise or no optimisation needed).
Let's look at the function setupWithScene:
this.setupWithScene=function(scene)
{
myScene=scene;
var idx=scene.setupPoint(_x, _y, _z);
var i3=idx*3;
var i2=idx*2;
xIdx=i3;
yIdx=i3+1;
zIdx=i3+2;
xIdx2D=i2;
yIdx2D=i2+1;
}
First we just set myScene. So now the Point3D knows what Scene3D it belongs to. Next we're calling a function we haven't written into Scene3D yet but what it does is add the x, y, z data currently set on the Point3D into the scene and returns an idx for that point. From this index we can calculate the indices for the 3D data and 2D data. Since we're saving the 3D data in the scene why not the 2D data also?
Let's add the function setupPoint to Scene3D:
this.setupPoint=function(x, y, z)
{
var returnVal=this.numPoints;
this.points2D[this.points2D.length]=0;
this.points2D[this.points2D.length]=0;
this.points3D[this.points3D.length]=x;
this.points3D[this.points3D.length]=y;
this.points3D[this.points3D.length]=z;
this.numPoints++;
return returnVal;
}
At this point we really could start writing the render function for Scene3D. However we have to decide whether the scene will actually do the drawing to the canvas or would our future Line3D class do the drawing. Now obviously since I hinted to the Line3D class we're going to use that. Architecting your 3D engine so that objects render themselves makes it more extensible because at any point in time we can easily add a new item that can be rendered. For instance if we want to add Particles then we could.
So let's write the Line3D class. One cool thing about Canvas is that your one path can consist of many lines. So we'll take advantage of this. In fact drawing one long path performs much better than drawing that path as individual line segments.
function Line3D()
{
this.colour="#AAAAAA";
this.points=[];
this.startPoint=new Point3D();
this.endPoint=new Point3D();
this.addToScene=function(scene)
{
for(var i=0;i<this.points.length;i++)
{
this.points[i].setupWithScene(scene);
}
}
this.addPoint=function(point)
{
this.points[this.points.length]=point;
}
this.render=function(context)
{
context.beginPath();
context.strokeStyle=this.colour;
for(var i=0;i<this.points.length;i++)
{
context.lineTo(this.points[i].x2D, this.points[i].y2D);
}
context.stroke();
}
}
In order to take advantage of creating long paths and not just short line segments we have to store multiple points per line.
Before we can start rendering these lines we need to add them to the Scene3D so let's write an addItem function to Scene3D.
this.addItem=function(item)
{
this.items[this.items.length]=item;
item.addToScene(this);
}
We also have to add the items array variable to the Scene3D:
this.items=[];
I think now we are finally ready to finish writing the render function for Scene3D. What do we have to do in the render function beside the obvious drawing to canvas? Well we have to calculate the transformation of 3D data to 2D. So let's finally write the render function.
this.render=function()
{
var halfWidth=this.sceneWidth*0.5;
var halfHeight=this.sceneHeight*0.5;
for(var i=0;i<this.numPoints;i++)
{
var i3=i*3;
var i2=i*2;
var x=this.points3D[i3];
var y=this.points3D[i3+1];
var z=this.points3D[i3+2];
var scale=this.focalLength/(z+this.focalLength);
this.points2D[i2]=x*scale+halfWidth;
this.points2D[i2+1]=y*scale+halfHeight;
}
this.context.save();
this.context.fillStyle="rgb(0, 0, 0);";
this.context.fillRect(0, 0, this.sceneWidth, this.sceneHeight);
for(var i=0;i<this.items.length;i++)
{
this.items[i].render(this.context);
}
this.context.restore();
}
The transformation from 3D to 2D might look familiar because it's pretty well exactly what we started this article out with.
So now we are ready to use our simple 3D engine. To use this we'll have to do the following:
- Get the Canvas we're going to draw on
- Create out Scene3D object
- Create some Line3D objects and add them to the Scene3D
- Start rendering Scene3DD in an interval loop
So this is what that code would look like. It's run when the HTML document is loaded:
function onInit()
{
canvas=document.getElementById("mainCanvas");
scene=new Scene3D(canvas);
var numLinesSegments=pointData.length/4;
var line=new Line3D();
line.colour="rgb(255, 0, 0)";
for(var i=0;i<numLinesSegments;i++)
{
var i4=i*4;
line.addPoint(new Point3D(pointData[i4], pointData[i4+1], pointData[i4+2]));
}
scene.addItem(line);
setInterval(onRender, 33);
}
Our render loop function looks like this:
function onRender()
{
scene.render();
}
One thing you might be wondering is where does the function pointData come from? Generally 3D data sets are very large and so I generally keep the data set in an external .js file. I've hosted the data set we are using at jsdo.it.

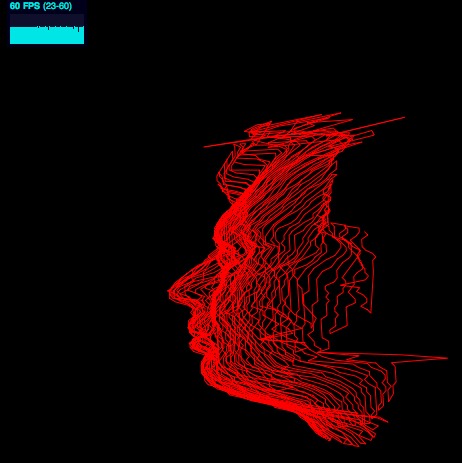
You can see this example we've been writing at jsdo.it/MikkoH/RadioHead3DContiguous.

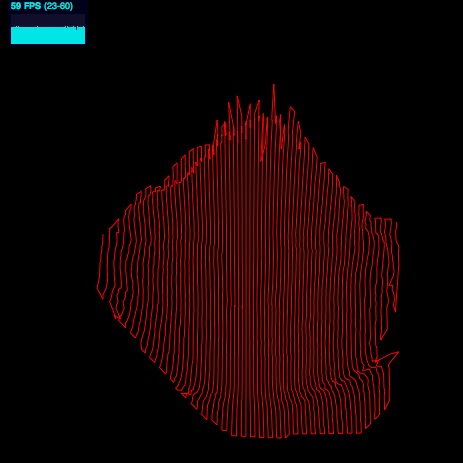
One thing you might notice when you run the code that we've been writing, however, is that it doesn't look 3D at all. In fact you'll just see some lines that look like nothing and it's quite small. In order to get our 3D model rotating, scaling and moving we have to start transforming our models using a 3D Matrix. It sounds complicated but it really isn't too bad. A matrix will just calculate a new transformed position for each point.
The cool thing about JSDo.it is that you can go in and "fork" (use and modify) someone elses code and modify it. So this is what I've done to create a Matrix3D we can use for this project. I've went in and forked a Matrix class written by Masayuki Daijima.
So let's add a matrix to our Scene3D so we can start rotating our scene. It would also be nice to have properties for rotationX, rotationY, and scale on our scene so let's also add those.
function Scene3D(canvas)
{
this.matrix=new Matrix3D();
this.rotationX=0;
this.rotationY=0;
this.scale=1;
this.focalLength=1000;
this.context=canvas.getContext("2d");
this.sceneWidth=canvas.width;
this.sceneHeight=canvas.height;
this.points3D=[];
this.points2D=[];
this.numPoints=0;
this.items=[];
...
Now we'll modify the Scene3D's render function to use this Matrix3D to transform the points before rendering. This way we can scale up our model then rotate it.
this.matrix.identity();
this.matrix.scale(this.scale, this.scale, this.scale);
this.matrix.rotateX(this.rotationX);
this.matrix.rotateY(this.rotationY);
this.matrix.translate(0, 0, 1000);
var transformed=this.matrix.transformArray(this.points3D);
for(var i=0;i<this.numPoints;i++)
{
var i3=i*3;
var i2=i*2;
var x=transformed[i3];
var y=transformed[i3+1];
var z=transformed[i3+2];
var scale=this.focalLength/(z+this.focalLength);
this.points2D[i2]=x*scale+halfWidth;
this.points2D[i2+1]=y*scale+halfHeight;
}
this.context.save();
this.context.fillStyle="rgb(0, 0, 0);";
this.context.fillRect(0, 0, this.sceneWidth, this.sceneHeight);
for(var i=0;i<this.items.length;i++)
{
this.items[i].render(this.context);
}
this.context.restore();
}
So let's walk through the matrix stuff:
When we say this.matrix.identity(); we are just "resetting" the Matrix. An identity Matrix is something that does nothing when multiplied against another number. It's similar to the number 1. So for instance when we do something line 6*1=6 the 1 really does nothing.
Something we have to talk about quickly is that Matrix multiplication is not commutative. What this means is that A*B!=B*A. So what this means for us in our example is that we have to add our transformations in a specific order to have it look right. We first want to scale, rotate, then translate our model. So that's what we do here:
this.matrix.scale(this.scale, this.scale, this.scale);
this.matrix.rotateX(this.rotationX);
this.matrix.rotateY(this.rotationY);
this.matrix.translate(0, 0, 1000);
Finally we can transform our points:
var transformed=this.matrix.transformArray(this.points3D);
There's a small dirty little secret I have to share about what we're building.
Remember our cornerstone equation:
var scale=focalLength/(point3D.z+focalLength);
Well what happens if point3D.z becomes very small? So essentially our object is going behind us? Well let's calculate it out. Let's say focal length is 1000 and our z position is -2000.
scale=1000/(-2000+1000)
scale=1000/-1000=-1
Our scale is -1!!! What that means is our model will actually flip upside down when it goes behind us. It's really screwed up looking. What you could do is check if a line segment is going to be behind us and if so, don't render it or what you can do is cheat like what we're doing here and making sure the object is always in front of us. That's why we translate our model by 1000 positions before rendering it.
But there's yet another dirty little secret here. To keep our frame rate super-high we're not performing Z-Rotation. Z-Rotation is when in advance you figure out what line segments should be rendered first. However you can get away with this as long as your entire model is the same colour, because you'll never be able to tell the difference what is being rendered first and what is being rendered last.
So as you can see there are definitely places where you can take this simple 3D engine still but the main thing is to have it perform well. So as you experiment remember the KISS rule and you'll be good.
Liked this? Read these!
- How to build an app
- Free graphic design software available to you right now!
- The best 3D movies of 2013
- Discover what's next for Augmented Reality
- Download free textures: high resolution and ready to use now

Thank you for reading 5 articles this month* Join now for unlimited access
Enjoy your first month for just £1 / $1 / €1
*Read 5 free articles per month without a subscription

Join now for unlimited access
Try first month for just £1 / $1 / €1

The Creative Bloq team is made up of a group of design fans, and has changed and evolved since Creative Bloq began back in 2012. The current website team consists of eight full-time members of staff: Editor Georgia Coggan, Deputy Editor Rosie Hilder, Ecommerce Editor Beren Neale, Senior News Editor Daniel Piper, Editor, Digital Art and 3D Ian Dean, Tech Reviews Editor Erlingur Einarsson, Ecommerce Writer Beth Nicholls and Staff Writer Natalie Fear, as well as a roster of freelancers from around the world. The ImagineFX magazine team also pitch in, ensuring that content from leading digital art publication ImagineFX is represented on Creative Bloq.
