How to model a realistic 3D character
You won't believe this isn't a photo! Dan Roarty explains how he created this birthday tribute to his grandmother.
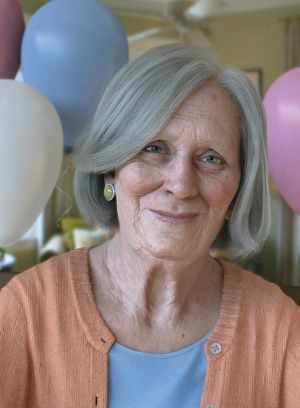
For me, this piece of work is all about paying tribute to my own Nana for all the support and encouragement she has given me throughout my life as an artist. I have been working in the industry for around 10 years as a character artist for companies such as Activision, 2K, Square Enix and LucasArts. Most recently I was lead character artist on Star Wars 1313, before taking up a position at Crystal Dynamics.
‘Happy Birthday Nana’ took me three months to create in total, working using a variety of techniques including photo projections and hand painting textures. The HDR image is from HDR Labs, but I created all the other aspects of the work.
As an artist, I try to take inspiration from the world around me. I’m always inspired by how far we can push artistic talent and technology, and combine them together. Seeing how far we can go with the realism of characters in 3D is hugely inspiring to me.
Stage 1: Sculpting, texturing and shaders
01 Start by sculpting the major forms
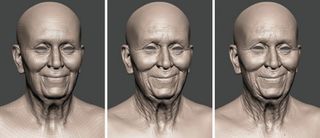
I started by importing my generic head mesh into Mudbox. I then began sculpting the major forms and roughed in the expression I wanted Nana to have. I use the same base head for all the human heads I create.
02 Wrinkles and pores
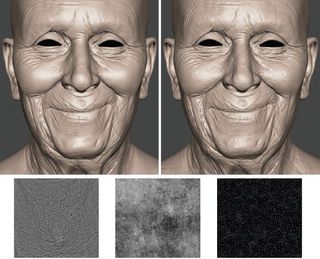
With the major forms and facial expression complete, I gradually stepped up my subdivisions in Mudbox and began sculpting in the wrinkles and pores. I only add pores at the highest subdivision – I used the standard Mudbox stencils for this step.
03 Sculpt the shirt
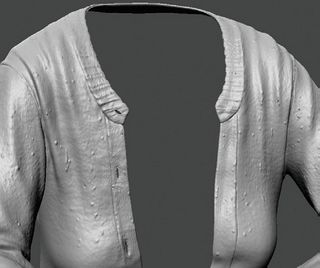
I sculpted the major creases and folds of the shirt in the same way I did with for the head in Mudbox. For the fine surface details, I created a greyscale fabric bump texture and displaced it in Mudbox to help break up the surface.
04 Texturing the face
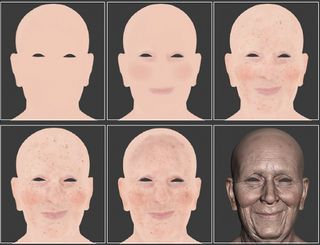
For texturing the skin, I decided to paint it by hand in Mudbox rather than projecting photo reference. By doing this, I had more control over ensuring the final texture had no baked lighting or shadows in it – these are often present in photos. I started by painting rough block colours using standard Mudbox brushes, and layering in further blemishes, moles and veins. I then saved out my colour map and created a desaturated, slightly blue version of the map to be used as my eventual subsurface colour.
05 Creating the reflection maps
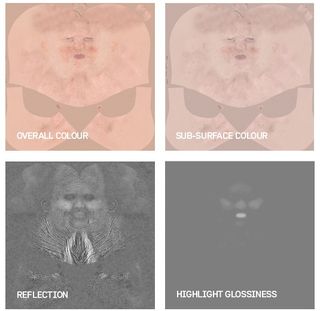
For the reflection map I baked out a normal map and used it with a new piece of software called Knald. I used Knald to extract an AO and cavity map based on my normal map, which I layered and saved as my reflection map. I used my reflection map as a base and created a blurred, adjusted version for my gloss map.
06 Creating the head shaders
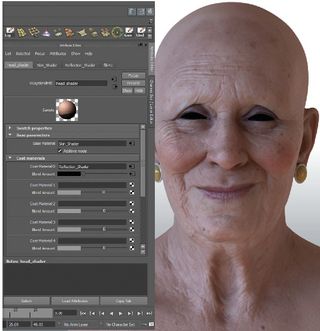
Once my textures were completed, I imported my high-res head into Maya and used V-Ray to create my shaders in Maya. I used my geo rather than a displacement map. I created a VRayBlend material and plugged the VRaySSS2 shader into the Base Material Slot and an additional VRayMaterial shader into Coat Material 1 to act as an additional reflection shader.
For my textures I used my base colour map in the overall colour slot for my SSS shader, and my subsurface map in the subsurface colour slot. On my Reflection Shader I used my reflection texture map in the Blend Amount slot of my VRayBlend material.
I then put my gloss map into the Highlight Glossiness slot of my VRayMaterial reflection shader. For my cloth shader I used a basic VRayMaterial with a bump map and colour.
Stage 2: Creating the hair and the eyes
07 Creating and combing the hair
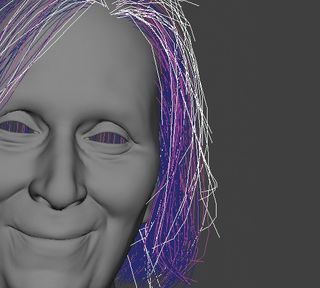
To make Nana’s hair, I created a basic hair cap by extracting geo from the lowest subdivision of my head mesh, and then used Shave and a Haircut to spawn hairs from the extracted geo.
I then used the comb brushes within Shave and a Haircut to style the hair splines the way I wanted. Once complete, I converted the hair guides to NURBs curves to use with Maya Hair.
08 Convert to Maya Hair
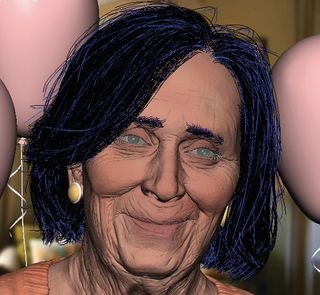
Next I created three separate Hair Systems with Maya Hair, so I was able to control each of the systems separately. Once complete, I took my curves and applied the Maya Hair systems to them. For shading, I applied a VRayHair shader to each of my hair systems and adjusted the colour slightly on each of them for some colour variation.
09 Creating the eye mesh

Next I built the eyes. I kept things fairly basic, and created three separate pieces of geometry for her eyes. The outer shell is the lens, the inner concaved geometry is the sclera and the small plane is the pupil. I used the lens only for reflection and refraction.
The sclera is a piece of geometry with the eye texture applied and a small hole for the pupil. The pupil geometry sits behind the sclera, and has a solid black Lambert material applied to it.
10 Creating the eyes
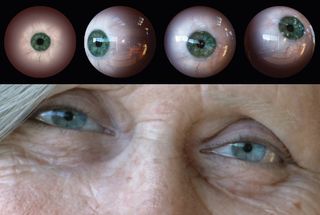
For Nana’s eyes I used photo reference from www.3D.sk and textured it in 2D within Photoshop. I vacillated back and forth on colour and the amount of reflection needed for the eyes. Here you can see the final texture I ended up using.
I kept the texture a bit cloudy to show some age in her eyes. I also created a small piece of geo that sits between the lens and her eyelid, and applied it to the lens material to give some wetness and reflection.
Stage 3: Lighting, rendering and compositing
11 Lighting setup
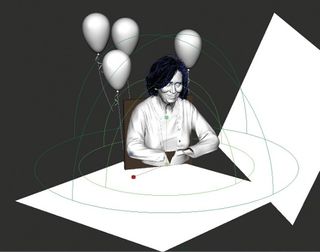
For this project I used a very basic VRayDome light with an HDR image from www.hdrlabs.com. I wanted to ensure that it looked as photo-real as possible, so I didn’t want to add in too much additional lighting that might take away from that.
I turned the Sampling Subdivisions on the light up to 48 to ensure there was no graininess. I wanted to give off a little more GI, so I added a couple of geo planes in the scene and made their materials white. This gave me a nice fill in my overall render.
12 Test renders

With the scene shaping up, I did some renders from different angles to ensure that it felt natural from all angles. By doing test renders from other angles you can also see how your materials work in different lighting conditions. When you are close to finishing, it’s also nice to have these alternate views of your final render saved for people to see.
13 Time to render
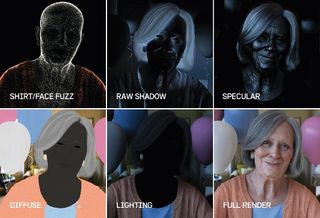
For this image, I enabled multiple layer passes during the final render that could be used if needed. I found it very beneficial with this project to have all the layers already rendered out separately and quickly assessable, so I could adjust elements in Photoshop. Here you can see some of the layers I rendered out and used later in post.
14 Compositing the final image
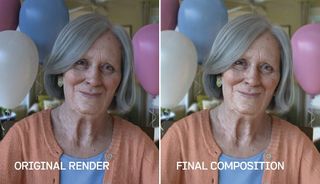
With my final render complete, I did some small touch ups in Photoshop. These tweaks included colour adjustments, layer overlays, and lightening or darkening small areas of the image.
An important thing to stress is that you really shouldn’t need to spend a lot of time in post if you have taken the time to test out renders and shaders beforehand. You can see the adjustments that I made from the original to the final render.
Words: Dan Roarty
This article originally appeared in 3D World issue 172
Liked this? Read these!
- The best 3D movies of 2013
- Discover what's next for Augmented Reality
- Free 3D models to download today!
What do you think of Dan's work? Tell us in the comments!

Thank you for reading 5 articles this month* Join now for unlimited access
Enjoy your first month for just £1 / $1 / €1
*Read 5 free articles per month without a subscription

Join now for unlimited access
Try first month for just £1 / $1 / €1
Get the Creative Bloq Newsletter
Daily design news, reviews, how-tos and more, as picked by the editors.
The Creative Bloq team is made up of a group of design fans, and has changed and evolved since Creative Bloq began back in 2012. The current website team consists of eight full-time members of staff: Editor Georgia Coggan, Deputy Editor Rosie Hilder, Ecommerce Editor Beren Neale, Senior News Editor Daniel Piper, Editor, Digital Art and 3D Ian Dean, Tech Reviews Editor Erlingur Einarsson and Ecommerce Writer Beth Nicholls and Staff Writer Natalie Fear, as well as a roster of freelancers from around the world. The 3D World and ImagineFX magazine teams also pitch in, ensuring that content from 3D World and ImagineFX is represented on Creative Bloq.
Related articles
-
-
-
-
